
HondaBook.ru
Auto companies Volkswagen Auto companies Ford Auto companies Lada Auto companies Skoda Auto companies BMW Auto companies Mazda Auto companies Peugeot
English Русский
Български
Беларускі
Український
Српски
Hrvatski
Română
Polski
Slovenský
Magyar
Bookmark Contacts Sitemap   


Accord Civic Fit / Jazz CR-V HR-V Others Articles
CR-V 1 (1995-2001, petrol) CR-V 2 (2002-2006, petrol)

Disconnecting fuel pipes and quick-release fittings (Honda CR-V 2)

  • Main
  • Honda CR-V
  • 2 (2002-2006, petrol)
  • Power unit
  • Fuel system
  • Disconnecting fuel pipes and quick-release fittings
0
1. Relieve fuel pressure.

2. Check the quick-release fittings for contamination and clean if necessary.

3. While holding the coupling (A) in one hand, squeeze the locking tabs (B) with the other hand and release them from the latches (C). Remove the coupling.
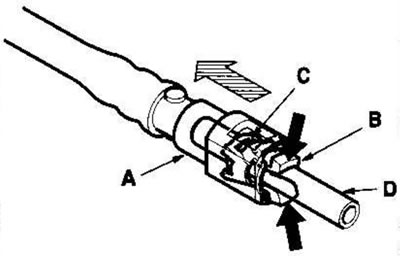
3. While holding the coupling (A) in one hand,…


The quick-release fitting can be reconnected after being disconnected, but the retainer on the insertion tube cannot be reused after being removed. Change the retainer:
  • when replacing the fuel distribution line;
  • when replacing the fuel line;
  • when replacing the fuel pump;
  • when replacing the fuel filter;
  • when replacing the fuel level indicator sensor;
  • if it was taken off the phone;
  • if it is damaged.

ComponentManufacturerColor of the retainer
Engine compartment (fuel supply hose: from the fuel distribution line side)TOKAIBlue
Engine compartment (fuel supply hose: from the fuel supply pipe side)TOKAIGreen
Fuel tank, fuel filterSANOHWhite
Fuel filter (from the feed side)MOD SIGNALGrey

Note.
  • Do not damage the tube (D) or other components. Do not use the tool.
  • If the coupling does not come off, wiggle it while squeezing the locking tabs until the coupling comes off.
  • Do not remove the clamp from the tube; if you remove it, you will have to replace it with a new one.


4. Check that there is no dirt or damage on the contact area (A) of the tube (B).
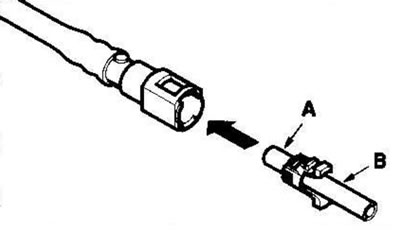


4. Check that there is no dirt or damage on the…

  • If the surface is dirty, clean it.
  • If the surface is rusty or damaged, replace the fuel pump, fuel filter or fuel supply line.

5. To avoid damage and to prevent foreign objects from getting into the disconnected coupling and tube, place plastic bags (A) over them.
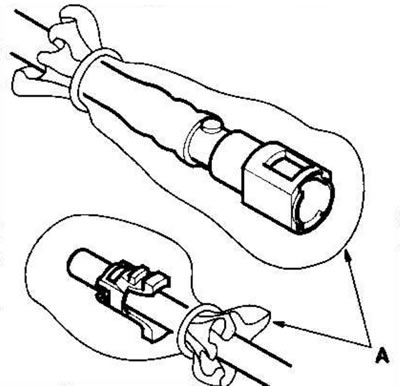
5. To avoid damage and to prevent foreign objects…


Note: The retainer cannot be reused once removed. Change the retainer:
  • when replacing the fuel distribution line;
  • when replacing the fuel line;
  • when replacing the fuel pump;
  • when replacing the fuel filter;
  • when replacing the fuel level indicator sensor;
  • if it was taken off the phone;
  • if it is damaged.


(The text can be found on the website: «hondabook.ru»)
This article is available at: russian, bulgarian, belarusian, ukrainian, serbian, croatian, romanian, polish, slovak, hungarian
This information has been verified: Mikhail Kopasov
Share with friends:
◀ Previous
CR-V 2: Fuel system
Next ▶

Precautions when handling fuel pipes/quick couplings
Checking fuel lines
Checking fuel pressure
Fuel pressure relief
Fuel system — component locations
Connecting fuel pipes and quick-release fittings
Replacing the fuel pressure regulator
Replacing the fuel filter
Replacing the fuel pump/fuel level gauge sensor
Replacing the fuel tank
See also other articles from Honda manuals:
Fuel filter — removal and installation Honda Accord 3 (1985-1989)
Checking the condition and replacing fuel lines and their fittings Honda Civic 6 (1995-2000)
Fuel quantity indicator Honda Fit 1 (2001-2008)
Fuel line and quick release couplings Honda HR-V 1 (1998-2006, petrol)
Removal and installation fuel pipes with quick-release couplings Honda Avancier 1 (1999-2003, petrol)
Link in different formats to this article
Comments and feedback from visitors
No comments yet


How much will 37 + 27 ?


CR-V 2 (2002-2006, petrol) 
  • General information
  • User manual
  • Technical data
  • Maintenance
  • Power unit
  • Engine repair
  • Lubrication system
  • Cooling system
  • Exhaust system
  • Fuel system
  • Engine management
  • Engine electrical equipment
  • Transmission
  • Clutch
  • Manual gearbox
  • Automatic gearbox
  • Rear differential
  • Drive shafts
  • Chassis and running gear
  • Steering
  • Front suspension
  • Rear suspension
  • Brake system
  • Body and interior
  • Exterior (external elements)
  • Interior (internal elements)
  • Doors, locks and windows
CR-V 1 (1995-2001, petrol) 
  • General information
  • Maintenance
  • Tips for car owner
  • Power unit
  • Engine repair
  • Engine overhaul
  • Cooling and lubrication system
  • Engine electrical equipment
  • Control system
  • Fuel system
  • Transmission
  • Clutch and drive shafts
  • Car gearbox
  • Chassis and running gear
  • Front suspension
  • Rear suspension
  • Steering
  • Brake system
  • Body and interior
  • Body service
  • Exterior (external elements)
  • Interior (internal elements)
  • Electrical equipment
  • Equipment and devices
  • Electrical circuits
HondaBook.ru © 2018–2026 • Mobile version • Sitemap: EN BG BY UA RS HR RO PL SK HU • Feedback • Driver Information • Search system • Bookmark
Accord 3 (1985-1989) • Accord 6 (1997-2002) • Civic 3 and 4 (1983-1991) • Civic 5 and 6 (1991-2000) • Civic 6 (1995-2000) • Civic 7 (2000-2005) • Civic 8 (2005-2011) • Fit 1 (2001-2008) • CR-V 1 (1995-2001) • CR-V 2 (2002-2006) • HR-V 1 (1998-2006) • Avancier 1 (1999-2003) •
 
This website uses cookies to ensure proper functioning. By clicking "OK," you agree.