
Brake system of the car Honda Fit/Jazz 1

Checking the brake fluid level
The procedures for checking the brake fluid level are described in Chapter " Maintenance and general check and adjustment procedures ".
The procedures for checking the brake fluid level are described in Chapter " Maintenance and general check and adjustment procedures ".

Bleeding the brake system
Note: During bleeding, the brake fluid level in the reservoir should not fall below 3/4 of the set level. Whenever the brake pipes are disconnected, the entire system must be bled. If the brake pipe was disconnected...
Note: During bleeding, the brake fluid level in the reservoir should not fall below 3/4 of the set level. Whenever the brake pipes are disconnected, the entire system must be bled. If the brake pipe was disconnected...
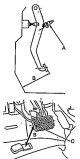
Brake pedal — checking and adjustment
1. Fold back the floor covering. 2. Press the brake pedal 2-3 times. 3. Measure the brake pedal height (A): the distance from the center of the pedal (C) to the floor (B). Pedal height: right hand drive models - 145 mm...
1. Fold back the floor covering. 2. Press the brake pedal 2-3 times. 3. Measure the brake pedal height (A): the distance from the center of the pedal (C) to the floor (B). Pedal height: right hand drive models - 145 mm...

Brake pedal — removal and installation
1. Remove the lower trim panel on the driver's side (see Chapter " Body "). 2. Disconnect the brake light switch connector (A). 3. Remove the pin (C) and cotter pin (B). 4. Remove the instrument panel stand (D). 5....
1. Remove the lower trim panel on the driver's side (see Chapter " Body "). 2. Disconnect the brake light switch connector (A). 3. Remove the pin (C) and cotter pin (B). 4. Remove the instrument panel stand (D). 5....

Master Brake Cylinder — Removal and Installation
1. Disconnect the cable from the negative terminal of the battery. Note: Before disconnecting the wire from the battery, make sure you know the access code for the radio. Otherwise, the radio will be blocked. 2. Remove...
1. Disconnect the cable from the negative terminal of the battery. Note: Before disconnecting the wire from the battery, make sure you know the access code for the radio. Otherwise, the radio will be blocked. 2. Remove...

Master Brake Cylinder — Disassembly and Assembly
Note: disassemble and assemble using the assembly drawing "Master Brake Cylinder". 1. Press down on the piston (A) and, while holding the piston down, remove the retaining ring (B). 2. Remove the brake fluid reservoir...
Note: disassemble and assemble using the assembly drawing "Master Brake Cylinder". 1. Press down on the piston (A) and, while holding the piston down, remove the retaining ring (B). 2. Remove the brake fluid reservoir...

Checking the Low Brake Fluid Level Sensor
1. Disconnect the sensor connector. 2. Using an ohmmeter, make sure there is no conductivity between the connector terminals when the brake fluid level in the reservoir is above the "MIN" mark. 3. Using an ohmmeter,...
1. Disconnect the sensor connector. 2. Using an ohmmeter, make sure there is no conductivity between the connector terminals when the brake fluid level in the reservoir is above the "MIN" mark. 3. Using an ohmmeter,...

Vacuum brake booster — check
Without using devices Note: If you find that the brake booster is not working properly, replace the brake booster assembly. 1. Checking the operation of the brake booster. a) Start the engine. b) Press the brake pedal...
Without using devices Note: If you find that the brake booster is not working properly, replace the brake booster assembly. 1. Checking the operation of the brake booster. a) Start the engine. b) Press the brake pedal...

Vacuum Brake Booster — Checking and Adjusting the Rod Clearance
1. Remove the brake master cylinder. 2. Install the special tool (A) on the brake master cylinder (B). Turn the adjusting nut (F) to set the rod (D) so that its end (C) touches piston No.2 (E) of the brake master...
1. Remove the brake master cylinder. 2. Install the special tool (A) on the brake master cylinder (B). Turn the adjusting nut (F) to set the rod (D) so that its end (C) touches piston No.2 (E) of the brake master...

Vacuum brake booster — removal and installation
1. Remove the brake master cylinder (see section " Master brake cylinder "). 2. (Left hand drive models) Remove the fuel vapor canister. 3. Remove the brake pipes (B) from the clamps (C). 4. Disconnect the vacuum hose...
1. Remove the brake master cylinder (see section " Master brake cylinder "). 2. (Left hand drive models) Remove the fuel vapor canister. 3. Remove the brake pipes (B) from the clamps (C). 4. Disconnect the vacuum hose...

Brake hoses
Replace the brake pipes and hoses using the diagram "Replacing the brake pipes and hoses". Note: Tightening torques are specified in the table "Tightening torques for brake pipes and hoses". Replacement of brake pipes...
Replace the brake pipes and hoses using the diagram "Replacing the brake pipes and hoses". Note: Tightening torques are specified in the table "Tightening torques for brake pipes and hoses". Replacement of brake pipes...

Front brakes — check
1. Check the axial runout of the brake disc. a) Pull out the parking brake lever, place chocks under the rear wheels and jack up the front of the vehicle. b) Remove the front wheels. a) Remove the brake pads. d) Secure...
1. Check the axial runout of the brake disc. a) Pull out the parking brake lever, place chocks under the rear wheels and jack up the front of the vehicle. b) Remove the front wheels. a) Remove the brake pads. d) Secure...

Replacing the front brake pads
1. Jack up the front of the car and place it on stands. 2. Remove the front wheels. 3. Loosen the bolt (A) and tilt the support (B) upward. 4. Remove the brake pads (B) and linings (A). 5. Remove the retaining plate...
1. Jack up the front of the car and place it on stands. 2. Remove the front wheels. 3. Loosen the bolt (A) and tilt the support (B) upward. 4. Remove the brake pads (B) and linings (A). 5. Remove the retaining plate...

Removal the front brake pad support
1. Loosen the bypass bolt (A) and disconnect the brake hose (B) from the caliper (C). Note: Avoid contact with brake fluid on painted surfaces. If fluid does come into contact with a painted surface, wipe it off...
1. Loosen the bypass bolt (A) and disconnect the brake hose (B) from the caliper (C). Note: Avoid contact with brake fluid on painted surfaces. If fluid does come into contact with a painted surface, wipe it off...

Installing the front brake pad support
1. Apply grease to the boot (B), guide pin (A) and caliper bore (C). Install the boot and guide pin. 2. Install the brake pads (the installation procedure is described in the subsection " Replacing brake pads "). 3....
1. Apply grease to the boot (B), guide pin (A) and caliper bore (C). Install the boot and guide pin. 2. Install the brake pads (the installation procedure is described in the subsection " Replacing brake pads "). 3....

Disassembling and assembling the front brake pad support
Disassemble and assemble the brake caliper using the assembly drawing "Brake caliper". Note: When installing, use only new piston dust boot, piston seal and gaskets. Brake caliper. 1 - piston sealing cuff, 2 - piston, 3...
Disassemble and assemble the brake caliper using the assembly drawing "Brake caliper". Note: When installing, use only new piston dust boot, piston seal and gaskets. Brake caliper. 1 - piston sealing cuff, 2 - piston, 3...

Rear disc brakes — check
1. Check the axial runout of the brake disc. a) Secure the brake disc by installing washers (A) and tightening the wheel nuts (B). b) Install the pointer indicator. c) Rotate the brake disc and measure the axial runout...
1. Check the axial runout of the brake disc. a) Secure the brake disc by installing washers (A) and tightening the wheel nuts (B). b) Install the pointer indicator. c) Rotate the brake disc and measure the axial runout...

Replacing rear brake pads
1. Release the parking brake levers. 2. Loosen the nut and remove the parking brake cable bracket (A). 3. While holding the guide pin (A) with a wrench, loosen the bolts (B) and remove the brake caliper (C). 4. Remove...
1. Release the parking brake levers. 2. Loosen the nut and remove the parking brake cable bracket (A). 3. While holding the guide pin (A) with a wrench, loosen the bolts (B) and remove the brake caliper (C). 4. Remove...

Removal the rear brake pad support
1. Release the parking brake lever. 2. Remove the retainer (A) and disconnect the parking brake cable (C) from the caliper lever (B). 3. Loosen the bypass bolt (A) and disconnect the brake hose (B) from the caliper (C)....
1. Release the parking brake lever. 2. Remove the retainer (A) and disconnect the parking brake cable (C) from the caliper lever (B). 3. Loosen the bypass bolt (A) and disconnect the brake hose (B) from the caliper (C)....

Installing the rear brake pad support
1. Apply grease to the boot (B), guide pin (A) and caliper bore (C). Install the boot onto the guide pin, then install the guide pin. 2. Install the brake pads (the installation procedure is described in the subsection...
1. Apply grease to the boot (B), guide pin (A) and caliper bore (C). Install the boot onto the guide pin, then install the guide pin. 2. Install the brake pads (the installation procedure is described in the subsection...

Disassembling and assembling the rear brake pad support
Brake caliper. 1 - parking brake drive lever, 2 - lever axle boot, 3 - parking brake drive lever axis, 4 - bleed nipple, 5 - support, 6 - pin, 7 - O-ring seal, 8 - bushing, 9 - adjusting bolt, 10 - bearing, 11 - spacer,...
Brake caliper. 1 - parking brake drive lever, 2 - lever axle boot, 3 - parking brake drive lever axis, 4 - bleed nipple, 5 - support, 6 - pin, 7 - O-ring seal, 8 - bushing, 9 - adjusting bolt, 10 - bearing, 11 - spacer,...

Rear drum brakes — check
1. Checking the thickness of the brake shoe linings. a) Remove the brake drums. b) Check the thickness of the brake linings/pads. Nominal thickness: left hand drive models - 4.5 mm right hand drive models: 2WD - 4.3 mm...
1. Checking the thickness of the brake shoe linings. a) Remove the brake drums. b) Check the thickness of the brake linings/pads. Nominal thickness: left hand drive models - 4.5 mm right hand drive models: 2WD - 4.3 mm...

Replacing the rear drum brake pads
1. Jack up and support the rear of the vehicle. 2. Remove the rear wheels. 3. Release the parking brake lever and remove the brake drum. 4. Press the spring clip (B) and turn the pin (A). Remove the spring clip. 5....
1. Jack up and support the rear of the vehicle. 2. Remove the rear wheels. 3. Release the parking brake lever and remove the brake drum. 4. Press the spring clip (B) and turn the pin (A). Remove the spring clip. 5....

Removal and installation of rear drum brakes
Removal and installation of parts should be carried out using the assembly drawing "Removal and installation of rear drum brake mechanisms". Removal and installation of rear drum brakes. 1 - pin, 2 - brake shield, 3 -...
Removal and installation of parts should be carried out using the assembly drawing "Removal and installation of rear drum brake mechanisms". Removal and installation of rear drum brakes. 1 - pin, 2 - brake shield, 3 -...

Disassembly and assembly of the working brake cylinder
Removal and installation of parts should be carried out using the assembly drawing "Working brake cylinder". Working brake cylinder: 1 - anther, 2 - piston cuff, 3 - bleed nipple, 4 - bleed nipple cap, 5 - piston cuff,...
Removal and installation of parts should be carried out using the assembly drawing "Working brake cylinder". Working brake cylinder: 1 - anther, 2 - piston cuff, 3 - bleed nipple, 4 - bleed nipple cap, 5 - piston cuff,...

Parking brake — checking and adjusting
Examination Pull the parking brake lever with a force of 196 N. Count the audible clicks. Lever travel: right hand drive models - 6-10 left-hand drive models - 6-8 clicks Adjustment 1. Remove the center console (see...
Examination Pull the parking brake lever with a force of 196 N. Count the audible clicks. Lever travel: right hand drive models - 6-10 left-hand drive models - 6-8 clicks Adjustment 1. Remove the center console (see...

Parking brake switch
Examination 1. Remove the center console (see chapter " Body "). 2. Disconnect the connector (A) of the parking brake switch (B). 3. Check for continuity between terminal (C) and ground with the parking brake lever...
Examination 1. Remove the center console (see chapter " Body "). 2. Disconnect the connector (A) of the parking brake switch (B). 3. Check for continuity between terminal (C) and ground with the parking brake lever...

Removal and installation the parking brake
Removal and installation of parts should be carried out using the assembly drawing "Removal and installation of the parking brake". Removal and installation the parking brake. 1 - parking brake lever, 2 - regulator, 3 -...
Removal and installation of parts should be carried out using the assembly drawing "Removal and installation of the parking brake". Removal and installation the parking brake. 1 - parking brake lever, 2 - regulator, 3 -...

Parking brake cables
Note: When removing and installing the parking brake cables, refer to the figure " Removal and installation the parking brake ". Models with rear drum brakes 1. Loosen the adjusting nut. 2. Remove the brake drum and...
Note: When removing and installing the parking brake cables, refer to the figure " Removal and installation the parking brake ". Models with rear drum brakes 1. Loosen the adjusting nut. 2. Remove the brake drum and...

Anti-lock braking system (ABS) — description of the diagnostic system
The electronic control unit has a fail-safe system that can detect a malfunction in the system. When a malfunction is detected, the electronic control unit switches off the ABS system and the "ABS" indicator lights up...
The electronic control unit has a fail-safe system that can detect a malfunction in the system. When a malfunction is detected, the electronic control unit switches off the ABS system and the "ABS" indicator lights up...

ABS System Error Codes
Reading fault codes 1. With the ignition off, connect the scanner to the diagnostic connector (A). 2. Turn on the ignition and read the fault codes. For detailed information on the fault code reading procedure, see the...
Reading fault codes 1. With the ignition off, connect the scanner to the diagnostic connector (A). 2. Turn on the ignition and read the fault codes. For detailed information on the fault code reading procedure, see the...

Removal and installation the pressure modulator and the ABS control unit
Caution: Do not allow the pressure modulator to drop with the ABS control unit. Note: When removing, refer to the assembly drawing "Removing and installing the pressure modulator with the ABS control unit". Installation...
Caution: Do not allow the pressure modulator to drop with the ABS control unit. Note: When removing, refer to the assembly drawing "Removing and installing the pressure modulator with the ABS control unit". Installation...

Checking wheel speed sensors
1. Remove the wheel and check the speed sensor and the sensor rotor for damage. Replace the sensor and/or sensor rotor if necessary. 2. Check the gap between the wheel speed sensor and the sensor rotor as shown in the...
1. Remove the wheel and check the speed sensor and the sensor rotor for damage. Replace the sensor and/or sensor rotor if necessary. 2. Check the gap between the wheel speed sensor and the sensor rotor as shown in the...

Removal and installation wheel speed sensors
1. Jack up the car and remove the wheel. 2. Remove the speed sensors, following the figures "Removing and installing the wheel speed sensor". Removal and installation the wheel speed sensor (rear wheels). 1 - wire...
1. Jack up the car and remove the wheel. 2. Remove the speed sensors, following the figures "Removing and installing the wheel speed sensor". Removal and installation the wheel speed sensor (rear wheels). 1 - wire...
This section is available on: russian, bulgarian, belarusian, ukrainian, serbian, croatian, romanian, polish, slovak, hungarian
Link in different formats to this section
TEXTHTMLBB Code
- General information
- User manual
- Maintenance
- Power unit
- Engine repair
- Cooling and lubrication system
- Injection and power system
- Control system
- Engine electrical equipment
- Transmission
- Clutch
- Mechanical gearbox
- Automatic gearbox
- Variator (CVT)
- Drive shafts and gearbox
- Chassis and running gear
- Car suspension
- Steering
- Brake system
- Body and interior
- Exterior (external elements)
- Interior (internal elements)
- Doors, locks and windows
- Heater and air conditioner
- Safety system
- Electrical equipment
- Equipment and devices
- Wiring diagrams (since 06.2001)
- Wiring diagrams (since 06.2004)