HondaBook.ru
Auto companies Volkswagen Auto companies Ford Auto companies Lada Auto companies Skoda Auto companies BMW Auto companies Mazda Auto companies Peugeot
English Русский
Български
Беларускі
Український
Српски
Hrvatski
Română
Polski
Slovenský
Magyar
Bookmark Contacts Sitemap   


Accord Civic Fit / Jazz CR-V HR-V Others Articles
CR-V 1 (1995-2001, petrol) CR-V 2 (2002-2006, petrol)

Metering valve (rear brake pressure regulator) (Honda CR-V 1)

  • Main
  • Honda CR-V
  • 1 (1995-2001, petrol)
  • Chassis and running gear
  • Brake system
  • Metering valve (rear brake pressure regulator)
0
Attention! The metering valve provides pressure regulation in the rear brakes. After removing and installing the rear suspension part, it is necessary to check and adjust the length of the metering valve spring.


4-cylinder Odyssey


Removal


1. Raise the vehicle.

2. Disconnect the tubes from the metering valve.

3. Unscrew the U-bolt nuts and remove the stabilizer bar.

4. Remove the metering valve.
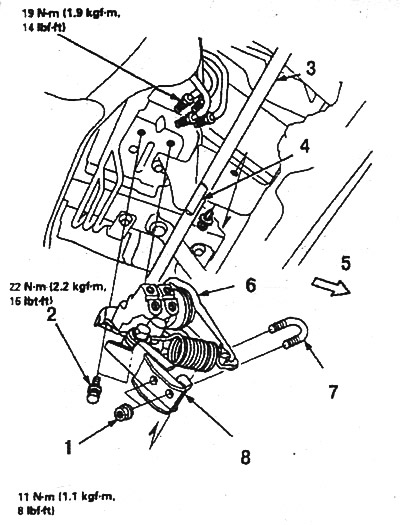
Dosing valve (4-cylinder Odyssey): 1.…

Dosing valve (4-cylinder Odyssey): 1. Self-locking nuts M8x1.25; 2. Bolts M8x1.25; 3. Stabilizer bar; 4. Lyska; 5. To the front of the car; 6. Valve; 7. Stepladder; 8. Lever
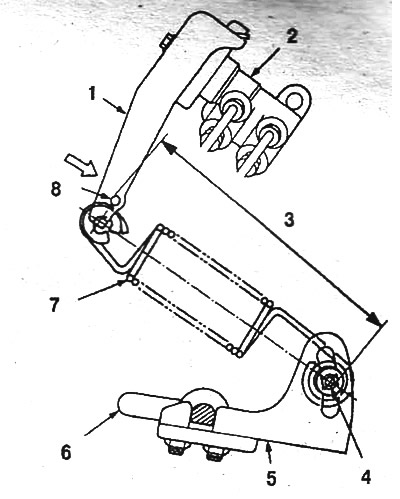
Valve spring and adjusting bolt: 1. Valve lever;…

Valve spring and adjusting bolt: 1. Valve lever; 2. Valve; 3. Distance L; 4. Threaded part of bolt M8; 5. Stabilizer arm; 6. Stabilizer bar; 7. Valve spring; 8. Hole 5mm


Installation


5. Installation is carried out in reverse order. When assembling, align the lever with the flat on the stabilizer bar. Bleed the brakes. Lower the car, bleed the suspension, check and adjust the valve if necessary.

Adjustment


The test is performed on an unloaded vehicle.

1. Release the parking brake.

2. Check the level in the gas tank, compare it with the table value (photo) to determine the length of the valve spring to be set during adjustment.

3. Install a drill or pin with a diameter of 5.0-5.3 mm into the hole in the valve lever.

4. Measure the distance L between the outer surfaces of the inserted stud and the M8 bolt with a caliper (photo). The measured distance is equal to the length of the spring.
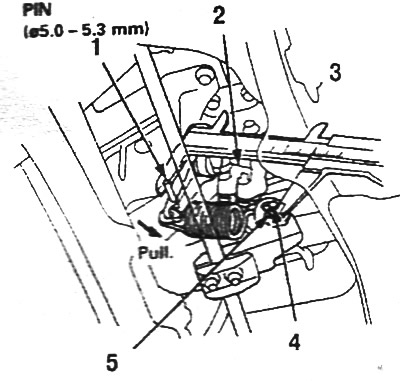
Measure the distance between the outer surfaces…

Measure the distance between the outer surfaces of the inserted stud and the thread of the M8 bolt: 1. Hairpin; 2. Valve; 3. Distance L; 4. Nut M8; 5. Bolt thread M8; 6. Pull in this direction


5. If the measured value does not match the value specified in the table, loosen the adjusting bolt and adjust the spring length. Tighten the adjusting nut to 12 Nm.

6. Check and adjust the rear wheel alignment angles.


Table for adjusting the metering valve (data outside brackets in mm)
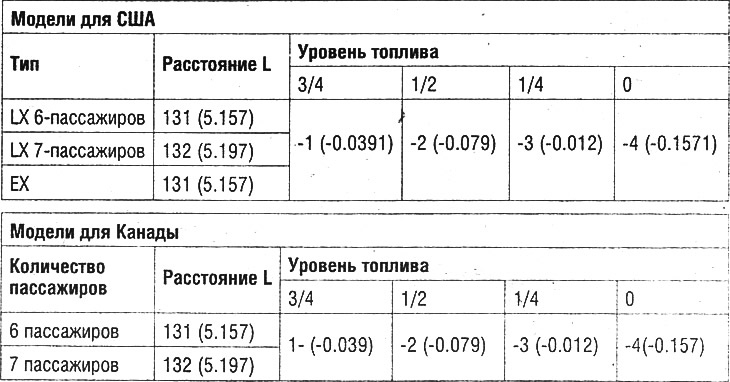


Table for adjusting the metering valve (data…

Note: For vehicles with a towing hitch, add 3 mm to the length L and use this value to adjust the length of the valve spring taking into account the fuel level.
This article is available at: russian, bulgarian, belarusian, ukrainian, serbian, croatian, romanian, polish, slovak, hungarian
This information has been verified: Emil Safonov
Share with friends:
◀ Previous
CR-V 1: Brake system
Next ▶

Vacuum booster — removal and installation
Brake Master Cylinder — Removal and Installation
Adjusting the brake pedal
Brake light switch — removal and installation
Vacuum Brake Booster — Leak Test
Brake Hydraulic Hoses and Lines — Removal and Installation
Bleeding the brake system
Front disc brake pads
Rear disc brake pads
Support — removal and installation
See also other articles from Honda manuals:
Rear Disc Brake Caliper — Removal and Installation Honda Accord 3 (1985-1989)
Fuel pressure regulator — inspection and replacement Honda Civic 3 and 4 (1983-1991)
Pressure regulator Honda Fit 1 (2001-2008)
Fuel pressure regulator Honda HR-V 1 (1998-2006, petrol)
Removal and installation the pressure regulator Honda Avancier 1 (1999-2003, petrol)
Link in different formats to this article
Comments and feedback from visitors
No comments yet


How much will 18 + 18 ?


CR-V 2 (2002-2006, petrol) 
  • General information
  • User manual
  • Technical data
  • Maintenance
  • Power unit
  • Engine repair
  • Lubrication system
  • Cooling system
  • Exhaust system
  • Fuel system
  • Engine management
  • Engine electrical equipment
  • Transmission
  • Clutch
  • Manual gearbox
  • Automatic gearbox
  • Rear differential
  • Drive shafts
  • Chassis and running gear
  • Steering
  • Front suspension
  • Rear suspension
  • Brake system
  • Body and interior
  • Exterior (external elements)
  • Interior (internal elements)
  • Doors, locks and windows
CR-V 1 (1995-2001, petrol) 
  • General information
  • Maintenance
  • Tips for car owner
  • Power unit
  • Engine repair
  • Engine overhaul
  • Cooling and lubrication system
  • Engine electrical equipment
  • Control system
  • Fuel system
  • Transmission
  • Clutch and drive shafts
  • Car gearbox
  • Chassis and running gear
  • Front suspension
  • Rear suspension
  • Steering
  • Brake system
  • Body and interior
  • Body service
  • Exterior (external elements)
  • Interior (internal elements)
  • Electrical equipment
  • Equipment and devices
  • Electrical circuits
HondaBook.ru © 2018–2026 • Mobile version • Sitemap: EN BG BY UA RS HR RO PL SK HU • Feedback • Driver Information • Search system • Bookmark
Accord 3 (1985-1989) • Accord 6 (1997-2002) • Civic 3 and 4 (1983-1991) • Civic 5 and 6 (1991-2000) • Civic 6 (1995-2000) • Civic 7 (2000-2005) • Civic 8 (2005-2011) • Fit 1 (2001-2008) • CR-V 1 (1995-2001) • CR-V 2 (2002-2006) • HR-V 1 (1998-2006) • Avancier 1 (1999-2003) •
 
This website uses cookies to ensure proper functioning. By clicking "OK," you agree.