HondaBook.ru
Auto companies Volkswagen Auto companies Ford Auto companies Lada Auto companies Skoda Auto companies BMW Auto companies Mazda Auto companies Peugeot
English Русский
Български
Беларускі
Український
Српски
Hrvatski
Română
Polski
Slovenský
Magyar
Bookmark Contacts Sitemap   


Accord Civic Fit / Jazz CR-V HR-V Others Articles
CR-V 1 (1995-2001, petrol) CR-V 2 (2002-2006, petrol)

Brake Master Cylinder — Removal and Installation (Honda CR-V 1)

  • Main
  • Honda CR-V
  • 1 (1995-2001, petrol)
  • Chassis and running gear
  • Brake system
  • Brake Master Cylinder — Removal and Installation
0
Brake Master Cylinder: 1. Central valve A; 2, 3.…

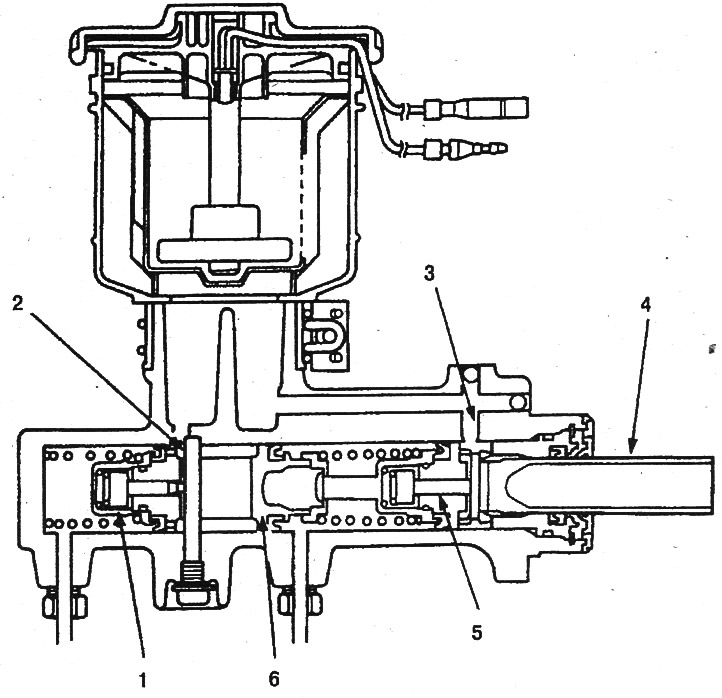
Brake Master Cylinder: 1. Central valve A; 2, 3. Channel; 4. Secondary chamber piston; 5. Central valve B; 6. Primary chamber piston

Typical view of the master cylinder (CR-V): 1.…

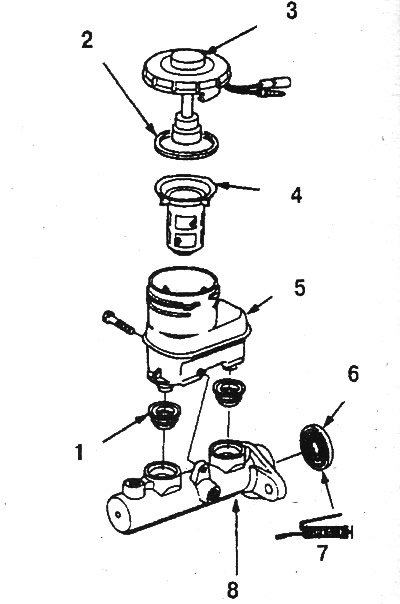
Typical view of the master cylinder (CR-V): 1. Bushings; 2. Gasket. Check for wear and damage; 3. Lid. Check the vent hole for cleanliness; 4. Mesh filter (wash); 5. Tank. Check for damage; 6. Seal. Check for wear and damage; 7. Silicone grease; 8. Master cylinder. Check the condition of the inner surface.


Warning! Brake fluid in Honda anti-lock brake system units (in the pump, modulator, hydraulic accumulator) is under very high pressure. Before disconnecting any hydraulic lines, the system must be decompressed. Failure to do so or performing decompression incorrectly may result in injury. For decompression, use tee 07HAA-SG00100 or equivalent device.


1. Disconnect the battery from ground.

2. Disconnect the wiring.

3. Remove the cap and drain the brake fluid from the reservoir.

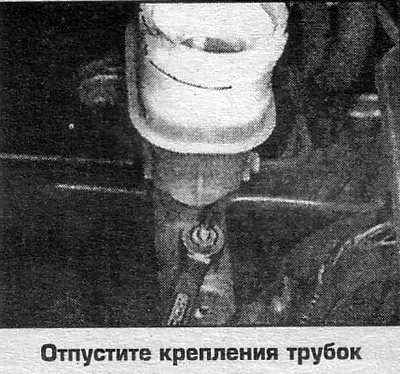
4. Disconnect the tubes from the cylinder.

5. Loosen the nuts securing the cylinder to the vacuum booster, then remove the cylinder.

6. Installation is carried out in reverse order.

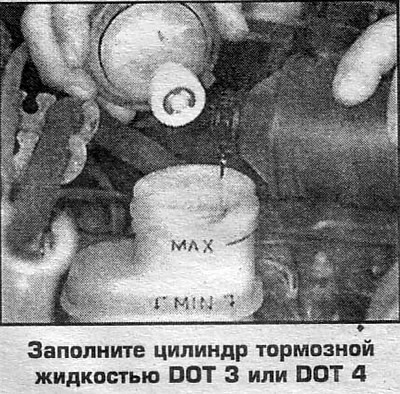
7. Fill the cylinder with DOT 3 or DOT 4 brake fluid.

8. Remove air from the cylinder (see below).

Removal air


The procedure is performed both on a removed cylinder and directly on the vehicle.

1. Secure the cylinder in a vice.

2. Attach the brake pipe sections to the cylinder. Bend them so that the end of the tube is slightly below the fluid level in the cylinder reservoir.

3. Fill the reservoir with DOT 3 or DOT 4 brake fluid.

4. Press the master cylinder piston until all bubbles in the reservoir disappear.

5. Disconnect the tubes, add liquid to the cylinder and close the cylinder openings with plugs.

6. If the cylinder is installed on the vehicle, do the following.
  • a. Loosen the tube 1/4 turn.
  • b. Ask the assistant to press the brake pedal, wrap the tube and ask the assistant to slowly release the pedal.
  • c. Check the fluid level in the reservoir, top up if necessary.
  • d. Repeat the procedure for all tubes until no more bubbles appear.

Caution: Always tighten the hose nipple before releasing the pedal.


7. If necessary, completely remove air from the brake system.

If the procedure for removing air from the master cylinder is performed properly, bleeding the entire brake circuit is not required.


If the procedure for removing air from the master…


The original can be found on the resource: www.hondabook.ru
This article is available at: russian, bulgarian, belarusian, ukrainian, serbian, croatian, romanian, polish, slovak, hungarian
This information has been verified: Emil Safonov
Share with friends:
◀ Previous
CR-V 1: Brake system
Next ▶

Adjusting the brake pedal
Brake light switch — removal and installation
Vacuum Brake Booster — Leak Test
Vacuum booster — removal and installation
Metering valve (rear brake pressure regulator)
Brake Hydraulic Hoses and Lines — Removal and Installation
Bleeding the brake system
Front disc brake pads
See also other articles from Honda manuals:
Master brake cylinder Honda Accord 3 (1985-1989)
Master Brake Cylinder — Removal, Repair and Installation Honda Civic 3 and 4 (1983-1991)
Master Brake Cylinder — Removal and Installation Honda Fit 1 (2001-2008)
Master cylinder, brake booster — removal and installation Honda HR-V 1 (1998-2006, petrol)
Master Cylinder and Brake Booster — Removal and Installation Honda Avancier 1 (1999-2003, petrol)
Link in different formats to this article
Comments and feedback from visitors
No comments yet


How much will 31 + 15 ?


CR-V 2 (2002-2006, petrol) 
  • General information
  • User manual
  • Technical data
  • Maintenance
  • Power unit
  • Engine repair
  • Lubrication system
  • Cooling system
  • Exhaust system
  • Fuel system
  • Engine management
  • Engine electrical equipment
  • Transmission
  • Clutch
  • Manual gearbox
  • Automatic gearbox
  • Rear differential
  • Drive shafts
  • Chassis and running gear
  • Steering
  • Front suspension
  • Rear suspension
  • Brake system
  • Body and interior
  • Exterior (external elements)
  • Interior (internal elements)
  • Doors, locks and windows
CR-V 1 (1995-2001, petrol) 
  • General information
  • Maintenance
  • Tips for car owner
  • Power unit
  • Engine repair
  • Engine overhaul
  • Cooling and lubrication system
  • Engine electrical equipment
  • Control system
  • Fuel system
  • Transmission
  • Clutch and drive shafts
  • Car gearbox
  • Chassis and running gear
  • Front suspension
  • Rear suspension
  • Steering
  • Brake system
  • Body and interior
  • Body service
  • Exterior (external elements)
  • Interior (internal elements)
  • Electrical equipment
  • Equipment and devices
  • Electrical circuits
HondaBook.ru © 2018–2026 • Mobile version • Sitemap: EN BG BY UA RS HR RO PL SK HU • Feedback • Driver Information • Search system • Bookmark
Accord 3 (1985-1989) • Accord 6 (1997-2002) • Civic 3 and 4 (1983-1991) • Civic 5 and 6 (1991-2000) • Civic 6 (1995-2000) • Civic 7 (2000-2005) • Civic 8 (2005-2011) • Fit 1 (2001-2008) • CR-V 1 (1995-2001) • CR-V 2 (2002-2006) • HR-V 1 (1998-2006) • Avancier 1 (1999-2003) •
 
This website uses cookies to ensure proper functioning. By clicking "OK," you agree.