HondaBook.ru
Auto companies Volkswagen Auto companies Ford Auto companies Lada Auto companies Skoda Auto companies BMW Auto companies Mazda Auto companies Peugeot
English Русский
Български
Беларускі
Український
Српски
Hrvatski
Română
Polski
Slovenský
Magyar
Bookmark Contacts Sitemap   


Accord Civic Fit / Jazz CR-V HR-V Others Articles
CR-V 1 (1995-2001, petrol) CR-V 2 (2002-2006, petrol)

Drum brake shoes — removal and installation (Honda CR-V 1)

  • Main
  • Honda CR-V
  • 1 (1995-2001, petrol)
  • Chassis and running gear
  • Brake system
  • Drum brake shoes — removal and installation
0
Contents: Examination ⇊ Removal ⇊ Installation ⇊
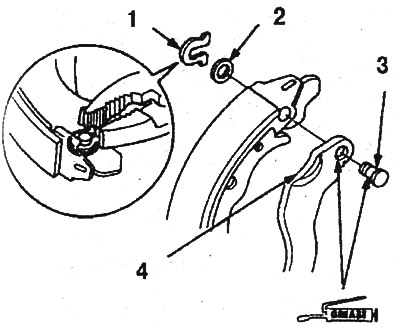
Parking brake parts: 1. Split washer; 2. Spring…

Parking brake parts: 1. Split washer; 2. Spring washer; 3. Axis; 4. Lever
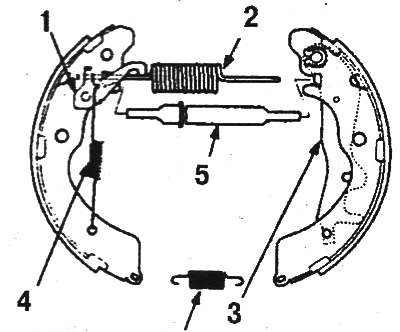
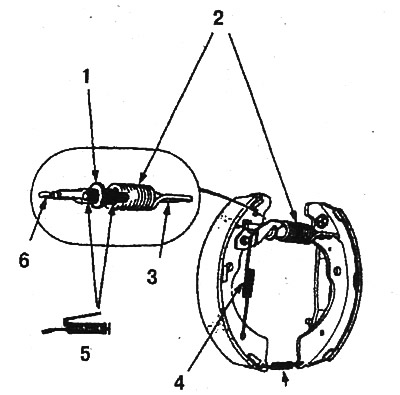
Drum brake parts (the regulator is inserted…

Drum brake parts (the regulator is inserted inside the upper spring): 1. Regulator lever; 2. Upper spring; 3. Brake shoe drive lever; 4. Regulator spring

Examination


If cracks, contamination or thickness reduction below the norm are detected, the drum brake pads are replaced as a set on the axle. Thickness of new pads:
  • 3.9-4.5 mm (CR-V)
  • 4.5 mm (Odyssey V6)

Maximum thickness 2.0 mm (CR-V and Odyssey V6).

Removal


1. Raise the rear of the vehicle and remove the drum.

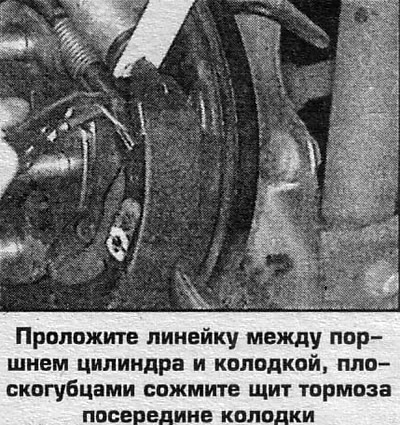
2. Place a ruler between the cylinder piston and the shoe, and use pliers to squeeze the brake shield in the middle of the shoe.


3. Using thin round-nose pliers, squeeze the end of the spring and disconnect it from the shoe.

4. Remove the lower spring.

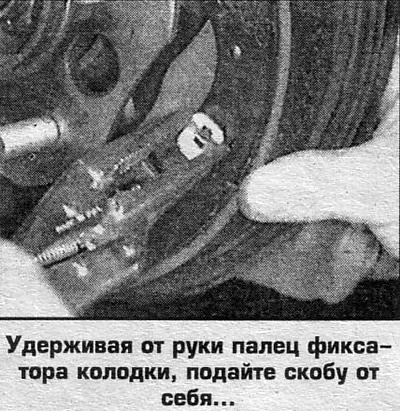
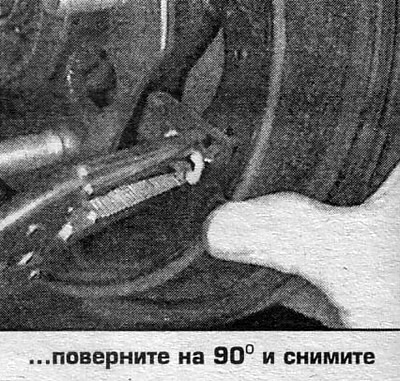
5. While holding the shoe retainer pin with your hand, push the bracket away from you, turn it 90° and remove it from the pin.

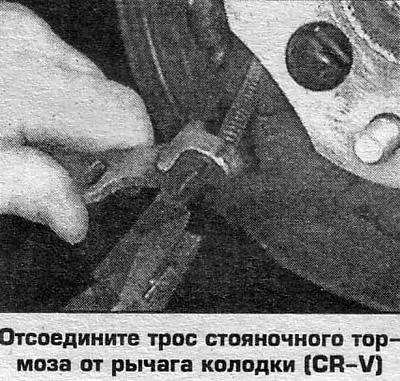
6. Remove the front shoe, adjuster and other parts. Disconnect the parking brake cable from the brake shoe lever.

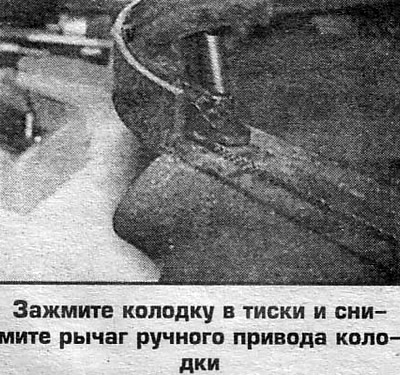
7. Clamp the shoe in a vice, knock out the split washer and remove the shoe manual drive lever (photo).

8. Check the condition of the wheel cylinder.

Installation


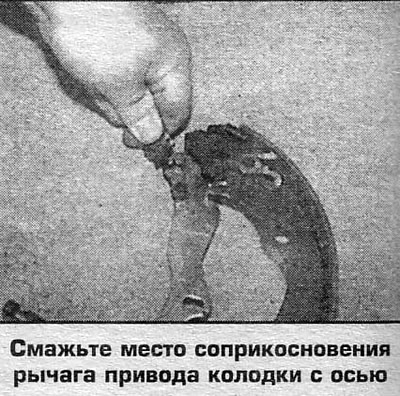
9. Clean the lever, lubricate the point of contact with the axle and replace it with a new shoe.

To secure the lever to the shoe, clamp the ends of the split washer.

10. Lubricate the following parts with high-melting grease:
  • brake adjuster threads and the friction part of the stop,
  • all protruding rubbing parts of the steel base of the brake shoe and shield,
  • slots in the wheel cylinder piston and in the lower support plate of the shoe.

11. Place the parking brake cable on the lever and install the shoe on the shield, replacing the pin and the spring clip of the retainer.

12. Place a ruler between the cylinder piston and the shoe, and use pliers to squeeze the brake shield in the middle of the shoe.

13. Install the regulator with springs on the front shoe, placing the front shoe on the brake shield, hook the lower spring onto the rear shoe. Secure the front shoe with a spring clip (replace the pin and spring clip).

14. Place the other end of the upper spring on the shoe. Remove the ruler placed under the shoe.


15. Install the drum and secure with wheel nuts.

16. While rotating the drum, spread the pads by turning the toothed wheel of the regulator with a screwdriver until a slight noise appears. If necessary, remove the drum and spread the shoes by turning the adjuster wheel by hand.

17. Install the wheels and lower the vehicle.

18. Press the brake pedal several times to cock the regulator. While driving at low speed in both directions, periodically press the brake pedal (within about 5 minutes).

19. Check the handbrake adjustment and the fluid level in the reservoir.
19. Check the handbrake adjustment and the fluid…

19. Check the handbrake adjustment and the fluid…

19. Check the handbrake adjustment and the fluid…

Lubricate the brake parts with rubber grease in…

Lubricate the brake parts with rubber grease in the following places: 1. Regulator screw; 2. Upper spring; 3, 6. Axis; 4. Regulator spring; 5. Lubricate the sliding surfaces with rubber grease
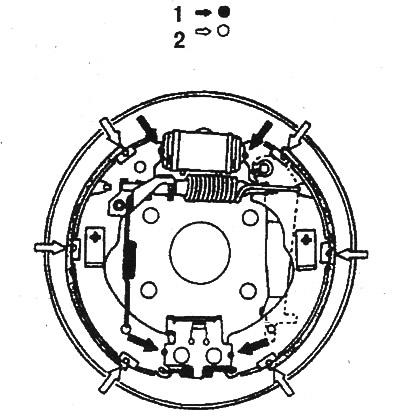
Lubricate the following brake parts with…

Lubricate the following brake parts with high-melting grease in the indicated locations: 1. The ends of the pads in contact with the cylinder piston; 2. Ends of the pads (from the brake shield and drum side)


[Original material on the website «Hondabook.ru»]
This article is available at: russian, bulgarian, belarusian, ukrainian, serbian, croatian, romanian, polish, slovak, hungarian
This information has been verified: Emil Safonov
Share with friends:
◀ Previous
CR-V 1: Brake system
Next ▶

Drum brakes — removal and installation
Brake disc — removal and installation
Support — removal and installation
Rear disc brake pads
Front disc brake pads
Wheel cylinders of drum brakes — removal and installation
Parking brake parts
Parking brake cables — removal and installation
Parking brake — adjustment
Disc Brake Pads — Replacement (4-Cylinder Odyssey)
See also other articles from Honda manuals:
Rear Drum Brake Shoes — Removal and Installation Honda Accord 3 (1985-1989)
Drum brake shoes — replacement Honda Civic 3 and 4 (1983-1991)
Replacing the rear drum brake pads Honda Fit 1 (2001-2008)
Replacing drum brake shoes Honda HR-V 1 (1998-2006, petrol)
Installing the parking brake shoes Honda Avancier 1 (1999-2003, petrol)
Link in different formats to this article
Comments and feedback from visitors
No comments yet


How much will 15 + 45 ?


CR-V 2 (2002-2006, petrol) 
  • General information
  • User manual
  • Technical data
  • Maintenance
  • Power unit
  • Engine repair
  • Lubrication system
  • Cooling system
  • Exhaust system
  • Fuel system
  • Engine management
  • Engine electrical equipment
  • Transmission
  • Clutch
  • Manual gearbox
  • Automatic gearbox
  • Rear differential
  • Drive shafts
  • Chassis and running gear
  • Steering
  • Front suspension
  • Rear suspension
  • Brake system
  • Body and interior
  • Exterior (external elements)
  • Interior (internal elements)
  • Doors, locks and windows
CR-V 1 (1995-2001, petrol) 
  • General information
  • Maintenance
  • Tips for car owner
  • Power unit
  • Engine repair
  • Engine overhaul
  • Cooling and lubrication system
  • Engine electrical equipment
  • Control system
  • Fuel system
  • Transmission
  • Clutch and drive shafts
  • Car gearbox
  • Chassis and running gear
  • Front suspension
  • Rear suspension
  • Steering
  • Brake system
  • Body and interior
  • Body service
  • Exterior (external elements)
  • Interior (internal elements)
  • Electrical equipment
  • Equipment and devices
  • Electrical circuits
HondaBook.ru © 2018–2026 • Mobile version • Sitemap: EN BG BY UA RS HR RO PL SK HU • Feedback • Driver Information • Search system • Bookmark
Accord 3 (1985-1989) • Accord 6 (1997-2002) • Civic 3 and 4 (1983-1991) • Civic 5 and 6 (1991-2000) • Civic 6 (1995-2000) • Civic 7 (2000-2005) • Civic 8 (2005-2011) • Fit 1 (2001-2008) • CR-V 1 (1995-2001) • CR-V 2 (2002-2006) • HR-V 1 (1998-2006) • Avancier 1 (1999-2003) •
 
This website uses cookies to ensure proper functioning. By clicking "OK," you agree.