HondaBook.ru
Auto companies Volkswagen Auto companies Ford Auto companies Lada Auto companies Skoda Auto companies BMW Auto companies Mazda Auto companies Peugeot
English Русский
Български
Беларускі
Український
Српски
Hrvatski
Română
Polski
Slovenský
Magyar
Bookmark Contacts Sitemap   


Accord Civic Fit / Jazz CR-V HR-V Others Articles
CR-V 1 (1995-2001, petrol) CR-V 2 (2002-2006, petrol)

Ignition coils, spark plugs (Honda CR-V 2)

  • Main
  • Honda CR-V
  • 2 (2002-2006, petrol)
  • Power unit
  • Engine electrical equipment
  • Ignition coils, spark plugs
0
Contents: Removal/installing ignition coils ⇊ Troubleshooting Ignition Coils ⇊ Checking spark plugs ⇊

Removal/installing ignition coils


1. Remove the ignition coil cover (A), then remove the ignition coils (B).
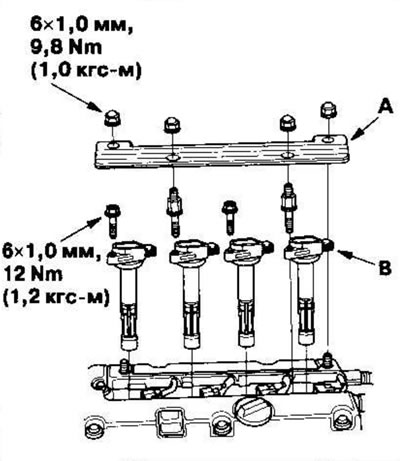
1. Remove the ignition coil cover (A), then…


2. Installation of ignition coils is performed in the reverse order of removal.

Troubleshooting Ignition Coils


1. Remove the four ignition coils.

2. Remove the spark plugs from the cylinder head and check the spark plugs.

Are the spark plugs in good condition?

Yes Proceed to p. 3.

No Replace the spark plugs.

3. Disconnect the connectors from the four injectors.

4. Install the spark plugs on the ignition coils.

5. Connect the connectors to the coils and ground the spark plugs.

6. With the selector lever in position [N] or [P] (automatic transmission), turn the ignition key to position START (III) and check for spark.

Does the spark plug produce a spark?

Yes The ignition coil is in good condition.

No Proceed to p. 7.

7. Install a known good ignition coil and check for spark.

Does the spark plug produce a spark?

Yes Replace the original ignition coil.

No Proceed to p. 8.

8. Disconnect the 3-pin ignition coil connector.


9. Turn the ignition key to the ON (II) position.

10. Measure the voltage between terminal No. 3 of the 3-pin ignition coil connector and ground.
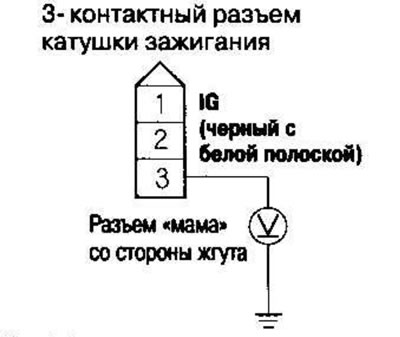
10. Measure the voltage between terminal No. 3 of…


Is there battery voltage?

Yes Proceed to p. 11.

No Repair open circuit in wire between ignition coil and fuse #1 (15A) in under-dash fuse/relay box.

11. Turn the ignition key to the OFF position.

12. Check for continuity between pin #2 of the 3-pin ignition coil connector and ground.
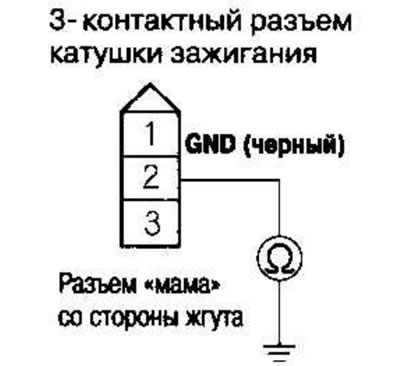
12. Check for continuity between pin #2 of the…


Is there conductivity?

Yes Proceed to p. 13.

No Repair open circuit in wire between ignition coil and G101.

13. Disconnect the cable from the negative battery terminal.

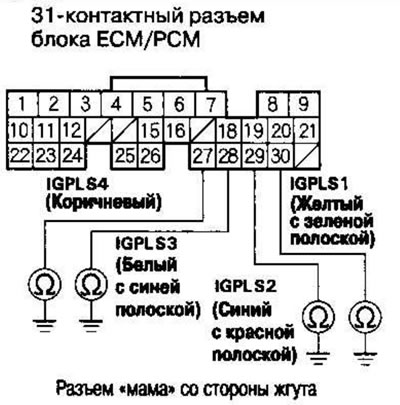
14. Disconnect the 31-pin connector A from the ECM/PCM.

15. Check for continuity between ground and the following terminals of the ECM/PCM connector.


  • A27 (ignition coil #4)
  • A28 (ignition coil #3)
  • A29 (ignition coil #2)
  • A30 (ignition coil #1)


A30 (ignition coil #1)


Is there conductivity?

Yes Repair short circuit in wire between ECM/PCM and ignition coil.

No Proceed to p. 16.

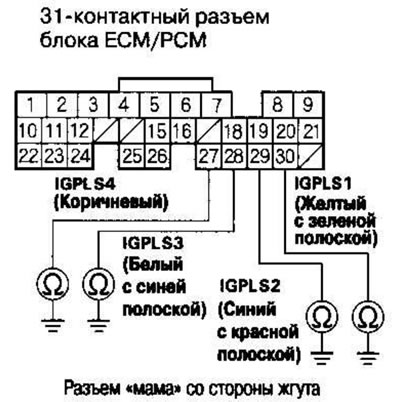
16. Short contact No. 1 of the 3-pin ignition coil connector to ground using a jumper.
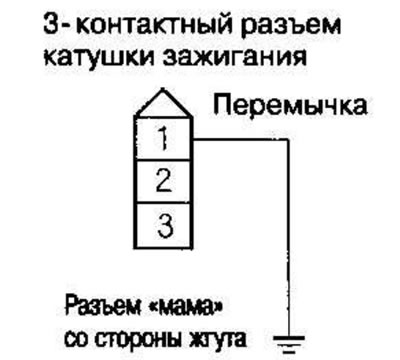
16. Short contact No. 1 of the 3-pin ignition…


17. Check for continuity between ground and the following terminals of the ECM/PCM connector.
  • A27 (ignition coil #4)
  • A28 (ignition coil #3)
  • A29 (ignition coil #2)
  • A30 (ignition coil #1)


A30 (ignition coil #1)


Is there conductivity?


Yes Substitute a known good ECM/PCM and retest.

No Repair open circuit in wire between ECM/PCM and ignition coil.

Checking spark plugs


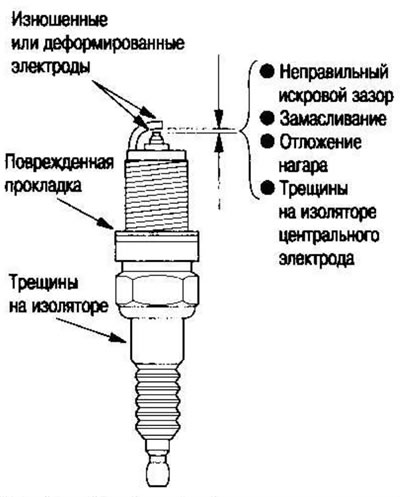
1. Check the electrodes and ceramic insulator:

Burning or wear of electrodes can occur due to:
  • Early ignition
  • Spark plug tightening is loose
  • Spark plug heat range too high
  • Insufficient cooling

Spark plug contamination can occur due to:
  • Late ignition
  • Oil entering the combustion chamber
  • Incorrect spark gap
  • Spark plug heat range too low
  • Long-term engine operation at idle/low speed
  • Clogged air filter element
  • Damage to ignition coils

Damage to ignition coils


2. Check the spark gap (A). If the gap exceeds the standard value, adjust it with a suitable tool.

Spark gap: Standard (new): 1.0-1.1 mm
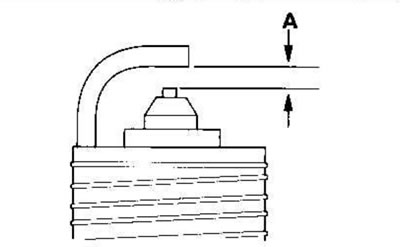
Spark gap: Standard (new): 1.0-1.1 mm


3. Replace spark plugs at the recommended interval or if the center electrode (A) is rounded. Use only spark plugs specified below.
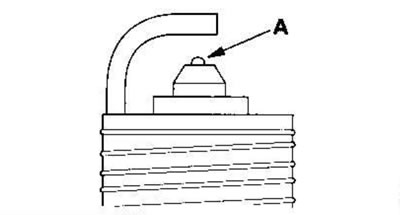


3. Replace spark plugs at the recommended…


Spark plugs: ZFR6K-11 (NGK) KJ20DR-M11 (DENSO)

4. Apply a small amount of anti-seize compound to the spark plug threads and screw the spark plugs into the cylinder head by hand. Then tighten them to a torque of 18 Nm (1.8 kgf·m).

(The text of the article is available on the website: HondaBook.ru)
This article is available at: russian, bulgarian, belarusian, ukrainian, serbian, croatian, romanian, polish, slovak, hungarian
This information has been verified: Mikhail Kopasov
Share with friends:
◀ Previous
CR-V 2: Engine electrical equipment
Next ▶

Ignition system
Starter repair
Starter replacement
Engine starting system
Charging system
Generator belt
Car Generator
Cruise control
Testing the signal at the input of the cruise control unit
See also other articles from Honda manuals:
Spark plugs Honda Accord 3 (1985-1989)
Spark plugs — inspection and replacement Honda Civic 3 and 4 (1983-1991)
Checking spark plugs Honda Fit 1 (2001-2008)
Checking spark plugs Honda HR-V 1 (1998-2006, petrol)
Ignition switch Honda Avancier 1 (1999-2003, petrol)
Link in different formats to this article
Comments and feedback from visitors
No comments yet


How much will 48 + 14 ?


CR-V 2 (2002-2006, petrol) 
  • General information
  • User manual
  • Technical data
  • Maintenance
  • Power unit
  • Engine repair
  • Lubrication system
  • Cooling system
  • Exhaust system
  • Fuel system
  • Engine management
  • Engine electrical equipment
  • Transmission
  • Clutch
  • Manual gearbox
  • Automatic gearbox
  • Rear differential
  • Drive shafts
  • Chassis and running gear
  • Steering
  • Front suspension
  • Rear suspension
  • Brake system
  • Body and interior
  • Exterior (external elements)
  • Interior (internal elements)
  • Doors, locks and windows
CR-V 1 (1995-2001, petrol) 
  • General information
  • Maintenance
  • Tips for car owner
  • Power unit
  • Engine repair
  • Engine overhaul
  • Cooling and lubrication system
  • Engine electrical equipment
  • Control system
  • Fuel system
  • Transmission
  • Clutch and drive shafts
  • Car gearbox
  • Chassis and running gear
  • Front suspension
  • Rear suspension
  • Steering
  • Brake system
  • Body and interior
  • Body service
  • Exterior (external elements)
  • Interior (internal elements)
  • Electrical equipment
  • Equipment and devices
  • Electrical circuits
HondaBook.ru © 2018–2026 • Mobile version • Sitemap: EN BG BY UA RS HR RO PL SK HU • Feedback • Driver Information • Search system • Bookmark
Accord 3 (1985-1989) • Accord 6 (1997-2002) • Civic 3 and 4 (1983-1991) • Civic 5 and 6 (1991-2000) • Civic 6 (1995-2000) • Civic 7 (2000-2005) • Civic 8 (2005-2011) • Fit 1 (2001-2008) • CR-V 1 (1995-2001) • CR-V 2 (2002-2006) • HR-V 1 (1998-2006) • Avancier 1 (1999-2003) •
 
This website uses cookies to ensure proper functioning. By clicking "OK," you agree.