
Contents: Component arrangement ⇊ Electrical diagram ⇊ Troubleshooting ⇊ Troubleshooting the Cruise Control…⇊
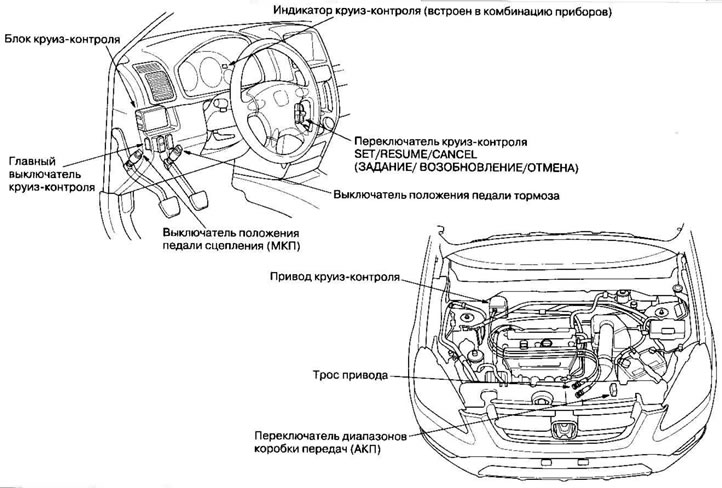
Component arrangement
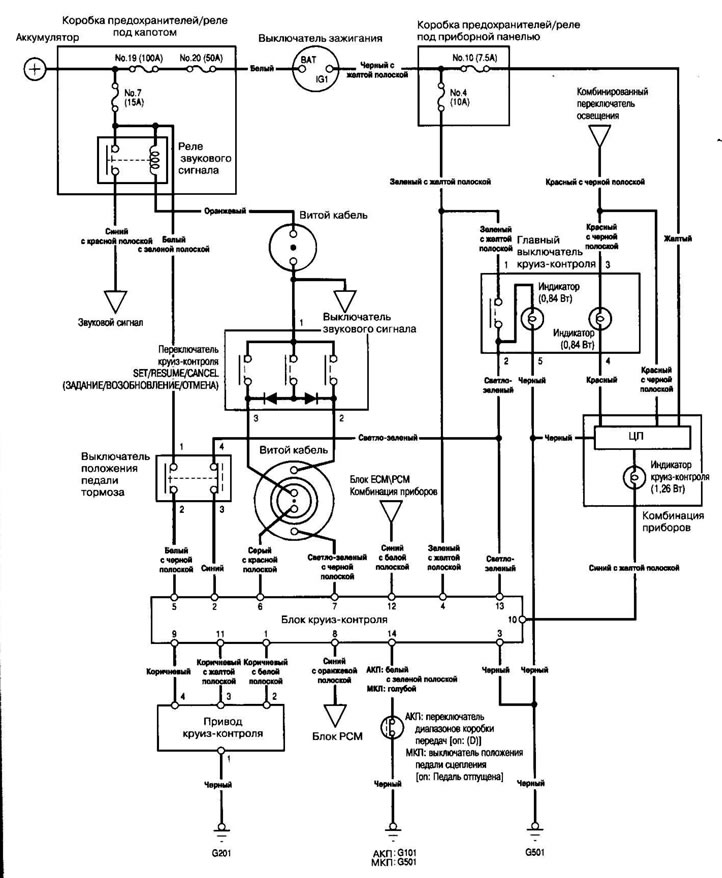
Electrical diagram
Troubleshooting
Note:
- The numbers in the table indicate the sequence of troubleshooting.
- Before search behavior:
- Check fuses #10 (7.5A) and #4 (10A) in the under-dash fuse/relay box and fuse #7 (15A) in the under-hood fuse/relay box.
- Make sure the alarm sounds.
- Check the tachometer for proper operation.
| Sign | Diagnostic procedure | Also check |
| Cruise control does not turn on | 1. Check the main switch 2. Check the SET/RESUME/CANCEL switch (task / resume / cancel)3. Test the brake pedal position switch and check its adjustment 4. Test the clutch pedal position switch (MT) and check its adjustment 5. Check the gearbox range switch (automatic transmission) 6. Check the control unit | Poor grounding: G101 (automatic transmission), G501 (manual transmission) Open circuit, loose or disconnected contacts: light green, green with yellow stripe, gray with red stripe, blue, white with green stripe (AKP), blue (MCP), blue with white stripe |
| Cruise control turns on but the indicator does not come on | 1. Check the cruise control indicator light in the instrument cluster 2. Check the control unit | Bad grounding: G501 Open circuit, loose or disconnected contacts: yellow, blue with yellow stripe |
| Cruising speed is noticeably higher or lower than set | 1. Check the vehicle speed sensor (VSS) 2. Check the drive 3. Check the control unit | |
| When setting the speed is higher or lower | 1. Check the drive 2. Check the vehicle speed sensor (VSS) 3. Check the control unit | |
| Speed deviation on a flat road with cruise control on | 1. Check the vehicle speed sensor (VSS) 2. Check the drive 3. Check the control unit | |
| The vehicle does not slow down or speed up when the SET/RESUME/CANCEL button is pressed | 1. Check the SET/RESUME/CANCEL switch 2. Check the control unit | Open circuit, loose or disconnected contacts:grey with red stripe, light green with black stripe |
| Pressing the clutch pedal (manual transmission) does not cancel the set speed (engine speed remains high) | 1. Test the clutch pedal position switch and check its adjustment 2. Check the control unit | • Short circuit to ground in blue wire |
| When the selector lever is shifted to neutral (automatic transmission), the set speed is not cancelled | 1. Check the transmission range switch 2. Check the control unit | Short circuit to ground in white wire with green stripe |
| Pressing the brake pedal does not cancel the set speed | 1. Test the brake pedal position switch and check its adjustment 2. Check the control unit | Open circuit, loose or disconnected contacts: white with black stripe |
| When the main switch is turned to the OFF position, the set speed is not cancelled | 1. Check the main switch 2. Check the control unit | Short circuit to ground in light green wire |
| Pressing the CANCEL button does not cancel the set speed | 1. Check the SET/RESUME/CANCEL switch 2. Check the control unit | Open circuit, loose or disconnected contacts: grey with red stripe, light green with black stripe |
| Pressing the RESUME button does not resume the set speed (with the main switch on, when the set speed is temporarily cancelled by pressing the brake pedal) | 1. Check the SET/RESUME/CANCEL switch 2. Check the control unit | Open circuit, loose or disconnected contacts: light green with black stripe |
| When driving uphill with cruise control on, the transmission (automatic transmission) shifts to a lower gear more slowly than usual | 1. Troubleshoot the cruise control communication channel | Open circuit, loose or disconnected contacts: blue with orange stripe |
Troubleshooting the Cruise Control Communication Channel
1. Start the engine.
2. Turn on the cruise control main switch, then drive the vehicle at a speed above 40 km/h with the cruise control.
Does cruise control work?
Yes Proceed to p. 3.
No Check the cruise control unit or cruise control actuator.
3. Turn the ignition key to the OFF position.
4. Disconnect the cable from the negative battery terminal.
5. Disconnect the 17-pin connector D from the PCM and the 14-pin connector from the cruise control unit.
6. Check for continuity between PCM connector terminal D12 and ground.
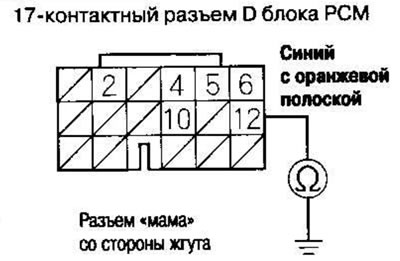
Is there conductivity?
Yes Repair short to ground in wire between PCM connector terminal D12 and cruise control module 14-pin connector terminal No. 8.
No Proceed to p. 7.
7. Connect the 17-pin connector D to the PCM and the 14-pin connector to the cruise control unit.
8. Connect the cable to the negative battery terminal.
9. Connect a voltmeter between terminal #8 of the 14-pin cruise control unit connector and ground. Test drive the vehicle at speeds above 40 km/h with cruise control on and observe the voltmeter readings.
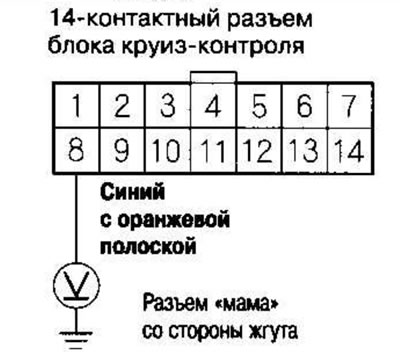
Is there a voltage around 1V?
Yes Proceed to p. 10.
No Install a known good cruise control unit. If the system works properly, replace the cruise control unit.
10. Connect the voltmeter between pin D12 of the PCM connector and the ground. Take a test car ride at speeds above 40 km / h with cruise control enabled and watch the voltmeter reading.
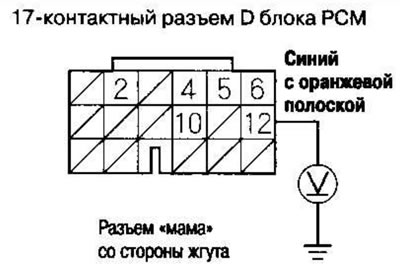
Is there a voltage around 1V?
Yes Check if the BLUE wire WITH ORANGE STRIP connectors between the cruise control unit and the PCM are disconnected. If necessary, replace the PCM and recheck.
No Repair open circuit in the wire between terminal D12 of the PCM connector and terminal No. 8 of the 14-pin cruise control module connector.