
Valve stem seals seal the valve stem against leakage of oil that circulates around the camshaft and rocker arms. Any oil rushing down due to inertia will enter the cylinder and be burned immediately. In addition, leaky valve stem seals allow some gas to leak out of the cylinder, causing the valve cover gasket and camshaft seals to leak due to the excess pressure generated.
Valve stem seals are the first thing to inspect when oil is overused. They can be replaced without removing the cylinder head from the vehicle, although care must be taken in this case.
Uninstall and install
Car execution
1. Work is done on a cold engine with the ignition off. Remove the valve cover.
2. Remove rocker arm assembly and axle (axes). Do not loosen or remove the camshaft strut bolts.
3. Temporarily install the old rocker shaft to support the spring puller. The axle must be without valves, springs, etc. Do not use the rocker axle for this; it will almost certainly be damaged or bent.
4. Rotate the crankshaft pulley to bring cylinders No. 1 and 4 to TDC.
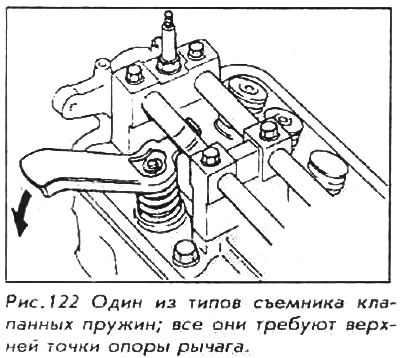
5. Install a spring extractor on any valve for cylinder 1 or 4; do not compress the spring.
6. Screw the fitting of the compressed air source into the spark plug hole of the cylinder, whose oil seal is to be replaced, and supply compressed air; the valves will be held in place by compressed air.
WARNING: The idea behind the use of a compressed air source is to prevent the valve from falling into the cylinder when the spring and valve cotters are removed. If minimal air leakage is noticed while using the tool, recheck piston position before proceeding.
7. Cover any oil passages in the head with a rag. Compress the spring with a tool. Use a magnetic probe to remove valve cotters or locks from the top of the valve stem.
8. Remove poppet or top washer and remove valve spring (s). Keep the springs in their correct orientation; they must be reinstalled exactly as they stood, not twisted.
9. Remove valve stem seal with fingers or special tool.
10. Install a new valve stem seal. All exhaust valves use black spring valve stem seals and inlet valve stem seals with white springs. Oil seals Not interchangeable.
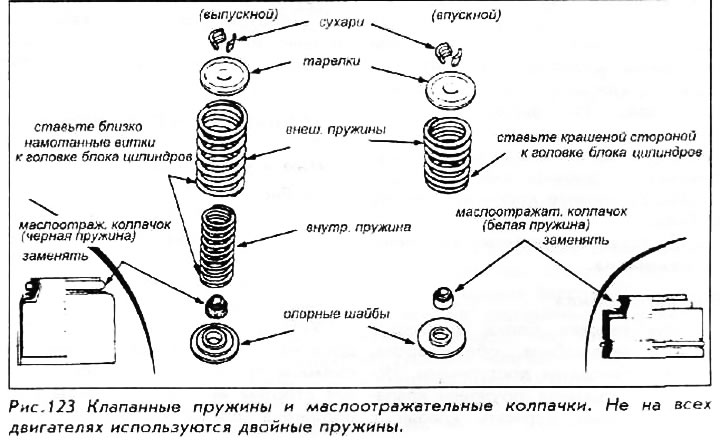
11. Install valve spring (s). The painted end or the end with closely spaced spirals is placed downwards. Install the plate or top washer.
12. Install the compressor tool. Compress the spring and put crackers on the rod. Make sure they are correctly placed on the valve stem.
13. Remove the spring remover and cloth from the oil passages.
14. Repeat Steps 6-13 for each additional valve or cylinder. If you need to process the valves for cylinders 2 or 3 - do not forget to crank the engine to bring these cylinders to TDC. It is recommended to replace all valve stem seals, not just one or two.
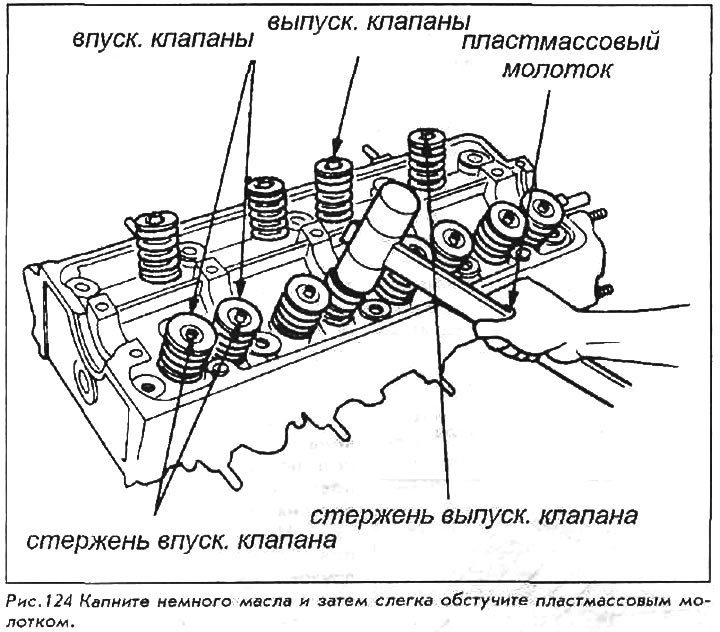
15. When all oil seals have been replaced, remove the puller and axle (axes). Using only a small plastic or rubber mallet, tap the top of each valve two or three times. This is done to ensure the correct fit of the crackers and the valve; if the crackers are not installed correctly, they will fly out.
16. Install rocker arms and axle assembly.
17. Install the valve cover.
Outside the car
If the cylinder head is removed from the vehicle, both sides of the head become accessible. Use a valve spring puller capable of holding the valve on both sides. This tool resembles a very large C-clamp that wraps around the head and rests against the face of the valve.
Compress the spring and remove the valve cotters. Don't lose them. Remove the spring plates, springs and oil seals. In most cases, each valve must be removed for inspection or replacement.
Once the valve is reinstalled, place the new slinger cap on the stem, making sure it sits firmly next to the lower spring retainers. Install the spring and plate. Compress the spring and install crackers. When all valve cotters have been replaced, use a rubber or plastic mallet to tap the top of each valve two or three times. This will place the valve and crackers correctly.