
Contents: Removal ⇊ To install: ⇊
The cylinder head temperature must be below 38°C; let the engine cool for a few hours. Rotate the flywheel so that piston number one is at top dead center.
Removal
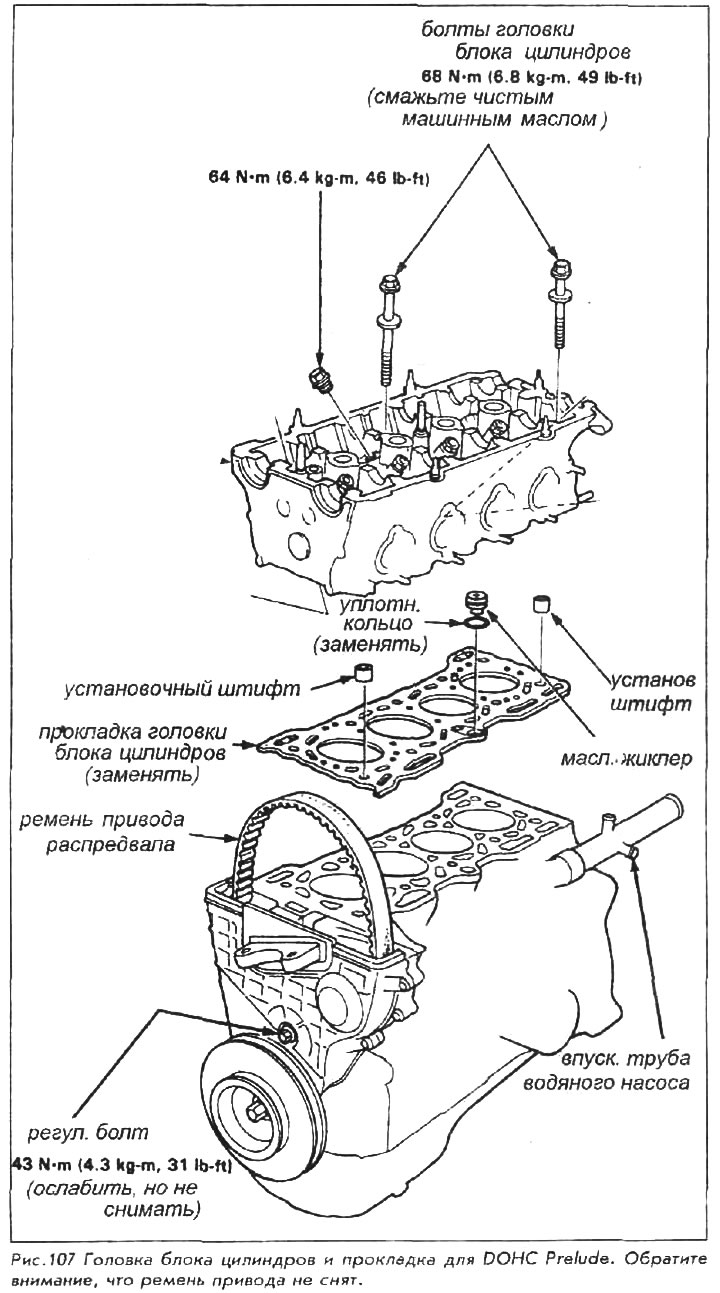
1. Disconnect the ground cable from the battery.
2. Drain the coolant from the cooling system.
3. Disconnect the brake booster vacuum hose from the intake manifold.
4. Remove the engine ground cable from the valve cover. Disconnect the radio noise suppressor connector and ignition coil wires.
5. Remove the air cleaner assembly. Reduce the fuel pressure using the appropriate procedure.
6. Disconnect the fuel lines and the fuel return line. Remove the air intake hose and the resonator hose. Disconnect the throttle cable from the throttle body.
7. For automatic transmissions, disconnect the throttle control cable from the throttle body.
8. Disconnect the carbon canister hose from the throttle valve. Disconnect and label all harness connectors from the cylinder head. Remove the emission control box and vacuum reservoir, then disconnect the two connectors. Do not remove the emission hoses.
9. Disconnect the upper radiator hose. Remove the heater hoses from the cylinder head. Remove the bypass hoses from the water pump inlet pipe.
10. Remove the power steering pump belt and the alternator belt. Also remove the air conditioning belt if the vehicle is equipped with one.
11. Disconnect the inlet hose from the power steering pump and immediately plug the hose to prevent leakage. Remove the power steering pump from the cylinder head. Remove the alternator.
When the power steering hose is disconnected, fluid will leak out. Cover the alternator with a rag to prevent any internal damage.
12. Remove the intake manifold mounting bracket. Remove the exhaust manifold mounting bracket and then the exhaust main pipe.
13. Remove and mark the spark plug wires, remove the distributor assembly. Make sure to mark the lines that connect the distributor assembly to the engine to facilitate installation.
14. Remove the cylinder sensor. Remove the valve cover.
15. Remove the middle camshaft drive belt cover.
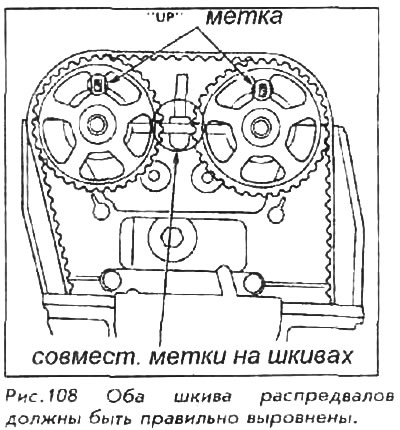
16. Loosen, but do not remove, the camshaft drive belt adjusting bolt; remove the camshaft drive belt from the camshaft pulleys.
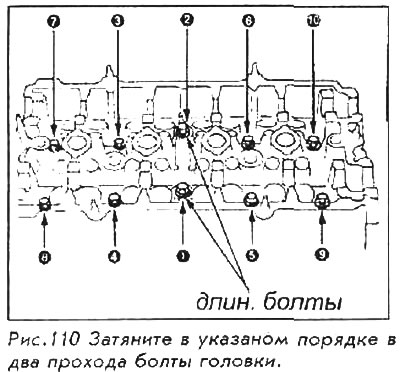
17. Remove the camshaft holders, camshafts and rocker arms. Remove the cylinder head bolts (mark the holes occupied by the two longer bolts) and remove the cylinder head. The head may resist removal, even with the bolts removed. Tap the edge of the head with a plastic or rubber mallet; lift the head straight until it comes off.
18. Remove the exhaust manifold cover and EGR pipe, then remove the exhaust manifold from the cylinder head.
19. Remove the intake manifold from the cylinder head.
To install:
20. Assemble the intake and exhaust manifolds to the head. Use new gaskets.
21. Fit a new cylinder head gasket, making sure it is seated correctly. The cylinder head dowel pins and oil jet must be in place. Refer to Fig. 109 if necessary.
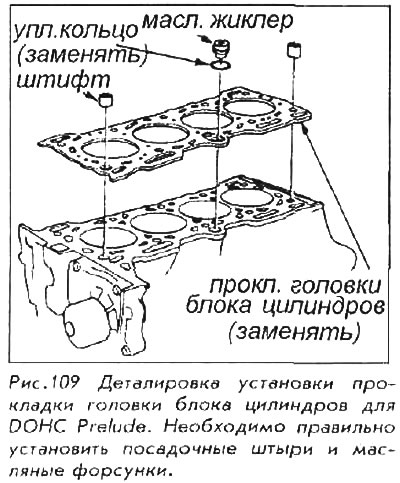
22. Install the head. Lower it straight onto the block, aligning it correctly.
23. Apply clean engine oil to the bolt threads and bolt head mating surface. Tighten the head bolts by hand.
24. Tighten the head bolts in two passes, following the order shown in Fig. 110. And after the first pass the bolts should be tightened to approximately 30 Nm; after the second and final pass - up to 68 Nm.
25. Install the camshaft, valves and camshaft holders.
26. Double check the engine position; it must be at TDC for cylinder number 1. All of the following conditions must be met: the pointer on the back of the cylinder block aligns with the white mark on the flywheel, the "UP" marker on each camshaft pulley is at the top, and the alignment marks on each camshaft pulley align with the cylinder head surface.
Each camshaft can be held in the TDC position by inserting a 5mm drift into the alignment holes behind each camshaft pulley. This will make belt installation much easier.
27. Install the camshaft drive belt so that it rotates in the same direction as before. Remove the drifts holding the camshafts, if installed.
28. Loosen the adjuster, allowing it to tighten the belt. Tighten the adjuster bolt.
29. Install the belt covers.
30. Install the crankshaft pulley and key. Lightly coat the bolt threads with oil, but do not lubricate the surfaces that contact the washer. On fuel-injected engines, tighten the bolt to 150 Nm; on carburetor engines - up to 115 Nm.
This tightening is best done with the parking brake locked and the gear engaged for a manual transmission; for an automatic transmission, the selector lever should be set to the "PARK" position; the wheels must be blocked.
31. Rotate the engine counterclockwise until the camshaft pulley has turned 3 teeth. Loosen the adjusting bolt, then retighten it to 43 Nm.
32. Install the valve cover and upper belt cover. Install the cylinder sensor. Install the ignition wires and harness protection.
33. Install the distributor and ignition wire.
34. Install the intake manifold mounting bracket.
35. Install the alternator and belt. Tighten the through bolt to 45 Nm.
36. Install the power steering pump and belt, tightening the bolts to 27 Nm. Connect the inlet hose.
37. Install the side engine mount and cruise control actuator if removed. Tighten the engine mount bolts to 40 Nm and the nuts to 65 Nm.
38. Connect the coolant bypass hoses to the water pump inlet pipe. Connect the heater hose to the cylinder head and the upper radiator hose to the thermostat housing.
39. Install the emission control box and connect the electrical connectors. Double check those vacuum hoses.
40. Connect the harness and wiring connectors located on and around the head.
41. Connect the carbon filter hose to the throttle valve.
42. Connect the throttle control cable and/or accelerator cable to the throttle body.
43. Install the air intake hose and resonator.
44. Connect the fuel supply hose and the fuel return line.
45. Install the air filter housing.
46. Connect the radio noise damper and the coil wire. Connect the engine ground cable.
47. Connect the vacuum hose to the brake booster.
48. Fill with coolant. Bleed air from the cooling system.
49. Connect the cable to the negative terminal of the battery.
50. Start the engine, allowing it to idle. Carefully inspect the work area for any sign of leakage or belt rubbing against the housing.
The text of the article is available on the website www.hondabook.ru