
Contents: Removal ⇊ To install: ⇊
Removal
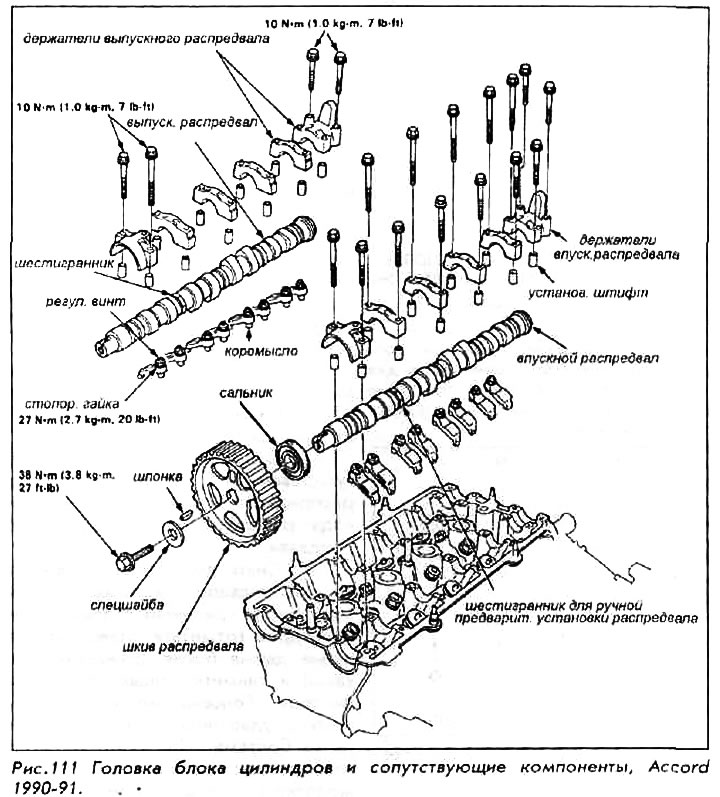
1. Disconnect the cable from the negative battery terminal.
2. Set cylinder number 1 to TDC by turning the crankshaft.
3. Drain the coolant from the cooling system. Use a clean container; close the lid when filled and wipe up any spills immediately.
4. Reduce fuel system pressure using the appropriate procedure.
5. Remove the fuel supply and return hose.
6. Remove the vacuum hose, breather hose and air intake.
7. Remove the bypass hose from the cylinder head.
8. Remove the carbon filter hose from the throttle body.
9. Remove the brake booster vacuum hose from the intake manifold. On vehicles with an automatic transmission, remove the vacuum hose retainer.
10. Remove the cruise control vacuum hose.
11. Disconnect the throttle cable from the throttle body. On vehicles with an automatic transmission, remove the throttle control cable from the throttle body.
Be careful not to bend the cable when removing it. Do not use pliers to remove the cable from the hitch. Always replace a bent cable with a new one.
12. Disconnect the 2 connectors from the distributor and the wires from the spark plugs. Mark the location of the distributor and remove it from the cylinder head.
13. Disconnect the 2 connectors from the emission control box and remove the box. Do not disconnect the emission hoses.
14. Remove the connector and clamp from the generator, then remove the engine wiring harness from the valve cover.
15. Disconnect the engine harness connectors, then remove the harness clamps from the cylinder head and intake manifold.
16. Remove the upper radiator hose and heater inlet hose from the cylinder head, then remove the heater outlet pipe bracket bolt from the intake manifold.
17. Remove the thermostat assembly from the intake manifold.
18. Disconnect the connector and vacuum hose, then remove the cruise control actuator. Do not disconnect the cable; move the drive outside the work area with the cable attached.
19. Remove the mounting bolts and drive belt from the power steering pump, then, without disconnecting the hoses, move the pump away from the mounting bracket. Secure the pump away from the work area.
20. Raise and secure the vehicle.
21. Remove the front wheels.
22. Remove the mudguard.
23. Remove the intake manifold mounting bracket bolts.
24. Remove the exhaust manifold and exhaust manifold insulation.
25. Remove the intake manifold.
26. Remove the valve cover and engine ground wire.
27. Remove the side engine mount stand, then remove the upper drive belt cover.
28. Note the rotation (cyclic shift) of the drive belt if it is to be used again. Loosen the camshaft drive belt adjusting bolt, and then loosen the belt.
29. Remove the camshaft drive belt from the camshaft pulley.
30. Remove the cylinder head mounting bolts, then remove the cylinder head.
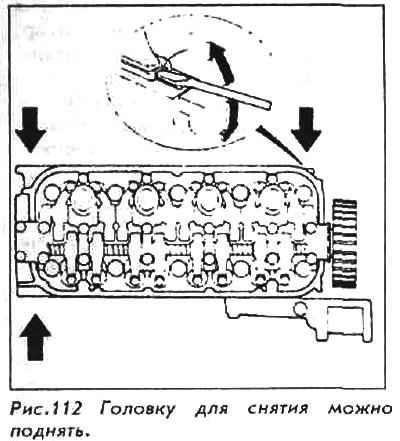
To prevent warping, loosen the bolts in 1/3 turn increments, repeating the sequence until all bolts are loosened.
To install:
31. Installation is done in the reverse order of removal. Please pay attention to the following procedures, it will help installation.
32. Make sure that the entire cylinder head and gasket surface are clean. Check the cylinder head for deformation. If the deformation is less than 0.05 mm, the cylinder head surface treatment is not required. The maximum limit is 0.2 mm - based on a cylinder head height of 99.95 mm.
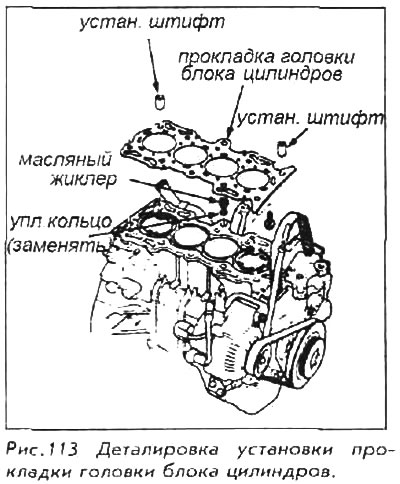
33. Always use a new cylinder head gasket.
34. The "UP" mark on the camshaft pulley should be at the top.
35. Make sure cylinder number 1 is at TDC.
36. The cylinder head dowel pins and oil jet must be installed correctly.
37. Install the bolts that secure the intake manifold to the mounting bracket, but do not tighten them.
38. Install the camshaft.
39. Tighten the cylinder head bolts sequentially in 3 steps:
- Step 1 - 40 Nm.
- Step 2 - 70 Nm.
- Step 3 - 108 Nm.
40. Install the intake manifold and tighten the nuts in a crisscross pattern in 2-3 steps, starting with the inner nuts. The final tightening torque should be 22 Nm. Always use a new intake manifold gasket.

41. Install the heat insulator to the cylinder head and block.
42. Install the exhaust manifold and tighten the nuts in a crisscross pattern in 2-3 steps, starting with the inner nut. The final tightening torque should be 32 Nm. Always use a new exhaust manifold gasket.
43. Install the exhaust manifold mounting bracket, then install the exhaust pipe, bracket and upper cover.
The original is located on the website HondaBook.ru