
WARNING: These operations include the removal and installation of the camshaft drive belt. DO NOT attempt to remove the water pump unless you know how to install the camshaft belt.
Withdrawal
1. Disconnect the cable from the negative battery terminal.
2. Turn the crankshaft pulley so that the piston of cylinder number one takes the TDC position on the compression stroke, check the alignment of the marks on the drive pulleys and the cylinder block. In this position, turning the crankshaft or camshaft is prohibited.
3. Remove a mudguard from below from the engine.
4. Drain the coolant from the radiator into a dry and clean container. Seal the container and dry the spill thoroughly.
5. Disconnect the electrical connector from the cruise control drive and, without disconnecting the cable from the drive, move the cruise control drive out of the working area.
6. Remove the belt from the power steering pump. Remove pump mounting bolts. Without disconnecting the hoses, take the pump out of the working area.
7. Disconnect the wiring from the generator terminals and remove the wiring harnesses from the valve cover.
8. Remove the adjusting and mounting bolts of the generator and / or compressor, remove the drive belts.
9. Remove valve cover.
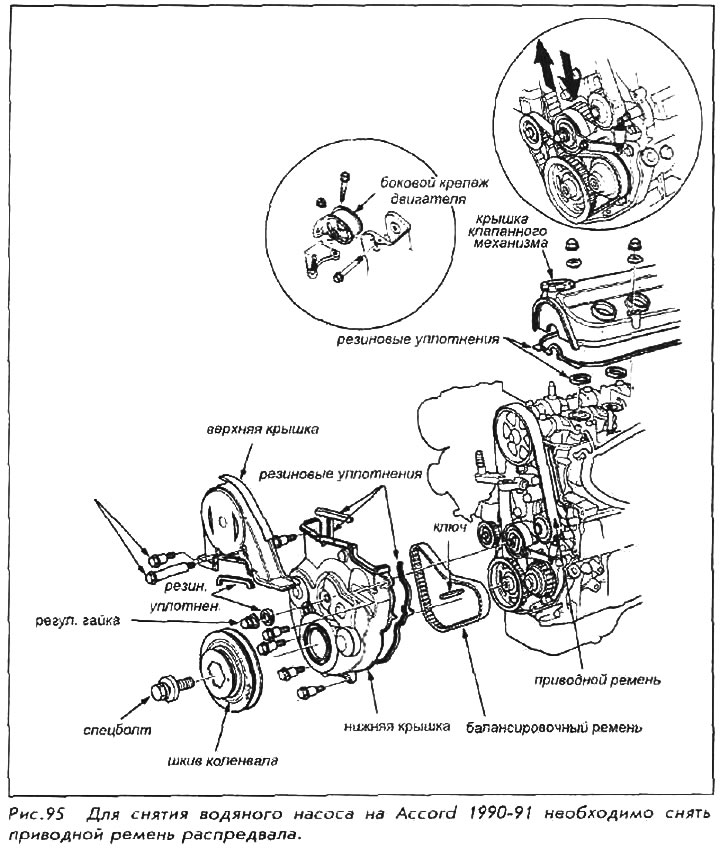
10. Remove the engine side mount bracket, if any.
11. Remove the camshaft drive belt top cover.
12. Support the engine with a jack below the middle of the center beam. Make it so that the jack only supports, but does not raise the beam.
13. Remove the through bolt from the motor side mount and remove the fastener.
14. Remove the oil level gauge and its pipe.
15. Remove the adjusting nut.
16. Remove the crankshaft pulley bolt and the crankshaft pulley itself.
This bolt is one of the tightest in the entire car. While loosening the bolt, the pulley can be held in place by the old belt, but the pulley should not be supported by the belt you are about to reinstall on the vehicle. As a result, the belt stretches or breaks.
17. Remove the two rear bolts from the center beam. Slowly lower the jack and engine until you can remove the lower camshaft belt cover.
18. Remove the camshaft drive belt lower cover.
19. There are two belts here: one goes to the camshaft pulley - this is the camshaft drive belt, the other, shorter, which drives the balance shaft, is called the balance belt, or the timing belt. Move the belt tensioner to the side to loosen the belt tension. While holding the tensioner, install the adjusting nut and tighten it so that the tensioner remains in this position.
20. Carefully remove the balancer belt and camshaft drive belt without twisting or bending them. Keep them free of oil and coolant. Slide the belts off the pulleys.
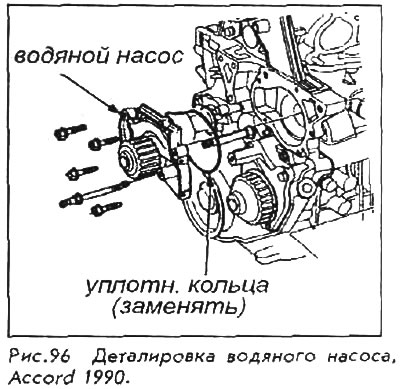
21. Remove the water pump mounting bolts. Pay attention to the position of the long bolt.
22. Remove water pump and o-ring..
For installation:
23. Install a new o-ring and make sure it is seated correctly. Install the water pump and retaining bolts by tightening them to 12 Nm.
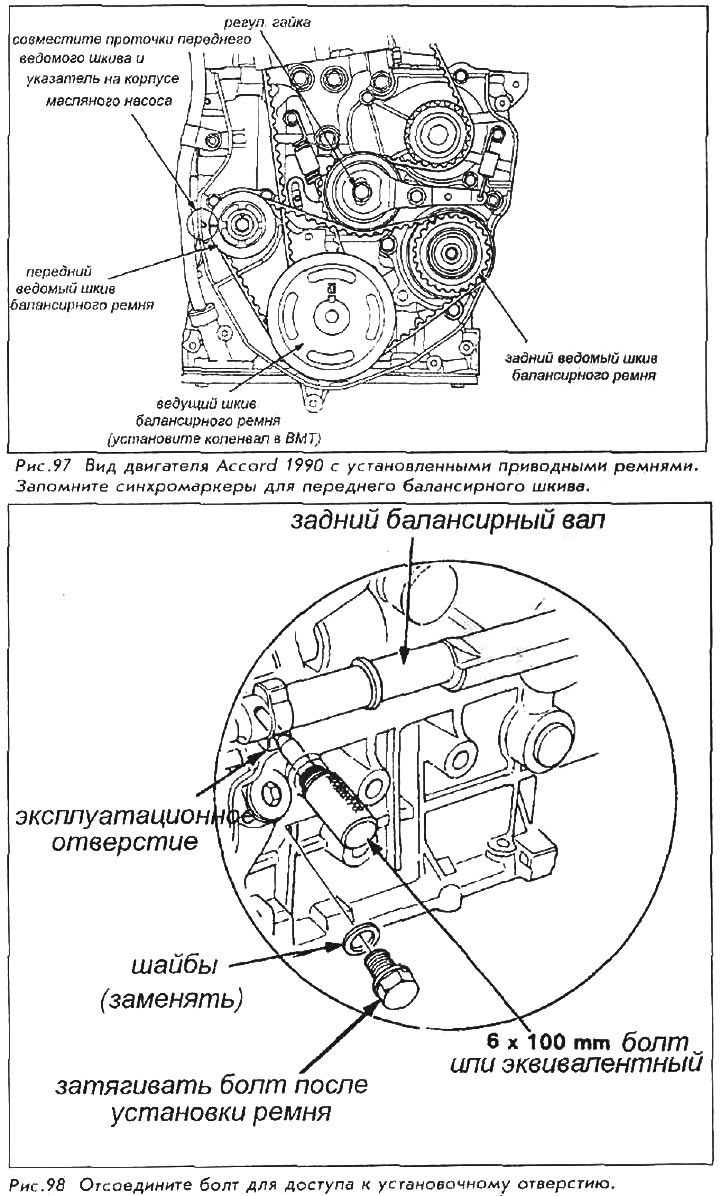
24. Check the position of the crankshaft: the pointer on the back of the cylinder block must be exactly aligned with the white mark on the flywheel or drive plate (for automatic transmission). The camshaft pulley must be oriented so that the word "UP" was at the top of the pulley and the marks on the edge of the pulley were aligned with the surface of the cylinder head. In addition, the front surface of the front balancer pulley has a mark that must match the mark on the oil pump. This pulley is installed with a mark on "10 hours" from the crankshaft pulley as viewed from the center of the crankshaft pulley.
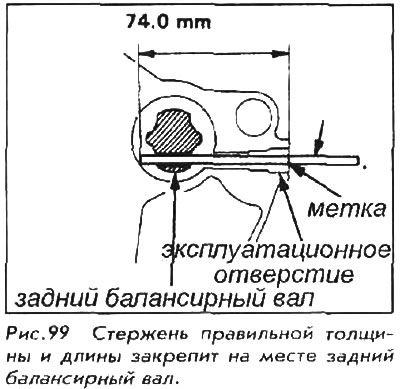
25. For the correct installation of the balance shaft, it is necessary to combine the mark, which is located on the rear balance pulley, on "2 hours" from the crankshaft pulley, which requires a rod or bolt, 6x100 mm in size with a mark of 74 mm from the end applied on it. Remove the bolt from the service hole and insert the rod into it. Achieve the immersion of the rod to the mark of 74 mm. This rod will hold the axle during installation.
26. Place the camshaft drive belt over the pulley and tensioners. Install the balance belt. After putting the straps in place, double check that the setting of all marks has remained unchanged. If the labels have moved, remove the belts, install the labels and put the belts back on. Once the belts are in place, slowly loosen and remove the adjusting nut, allowing the tensioner to move against the belts. Remove the rod from the operating hole and install the bolt and washer.
27. Install the bottom cover, making sure the rubber grommets are in place and properly oriented. Tighten the retaining bolts to 12 Nm.
28. Raise the lower beam and the engine into place. Install the lower beam rear bolts, tightening them to 39Nm.
29. Install the key on the crankshaft and install the crankshaft pulley. Lubricate threaded bolts with oil and tighten to 230 Nm.
30. Adjust the tension of the camshaft drive belt. Turn the crankshaft counterclockwise so that the camshaft pulley rotates 3 sectors (prong). This will increase the tension on the camshaft drive belt. Tighten the adjusting nut to 45 Nm.
31. Install the oil level dipstick with its pipe.
32. Install the engine side mount fasteners. Tighten the mounting bolt, nut and through bolt to 55 Nm. Remove the jack from under the center (bottom) beams.
33. Install the upper belt cover.
34. Install the engine side mount bracket.
35. Install the valve cover.
36. Install the compressor and/or alternator drive belt, adjust its tension.
37. Distribute the wiring harness on the valve cover and connect the wires to the generator.
38. Install the power steering pump, tighten the bolt to 45 Nm and install the belt.
39. Install the cruise control drive, connect the vacuum hose and electrical contacts.
40. Double-check that all components are installed correctly, paying special attention to possibly loose hoses, loose wires, loose nuts, over-tightened or over-tightened hose and wire connections, and tools left on the job site.
41. Fill the cooling system.
42. Establish a mudguard from below from the engine.
43. Connect the cable to the negative battery terminal.
44. Run the engine to idle, checking for possible leaks or for a sound of beating belts or any connections.