
HondaBook.ru
Auto companies Volkswagen Auto companies Ford Auto companies Lada Auto companies Skoda Auto companies BMW Auto companies Mazda Auto companies Peugeot
English Русский
Български
Беларускі
Український
Српски
Hrvatski
Română
Polski
Slovenský
Magyar
Bookmark Contacts Sitemap   


Accord Civic Fit / Jazz CR-V HR-V Others Articles
Accord 3 (1985-1989) Accord 6 (1997-2002)

Overhaul of the oil pump (Honda Accord 3)

  • Main
  • Honda Accord
  • 3 (1985-1989)
  • Power unit
  • Engine repair
  • Overhaul of the oil pump
0
Contents: 1984-87 Prelude, 1984-89 Accord ⇊ 1988-91 Prelude, 1990-91 Accord ⇊
These procedures are performed with the oil pump removed from the engine.


1984-87 Prelude, 1984-89 Accord
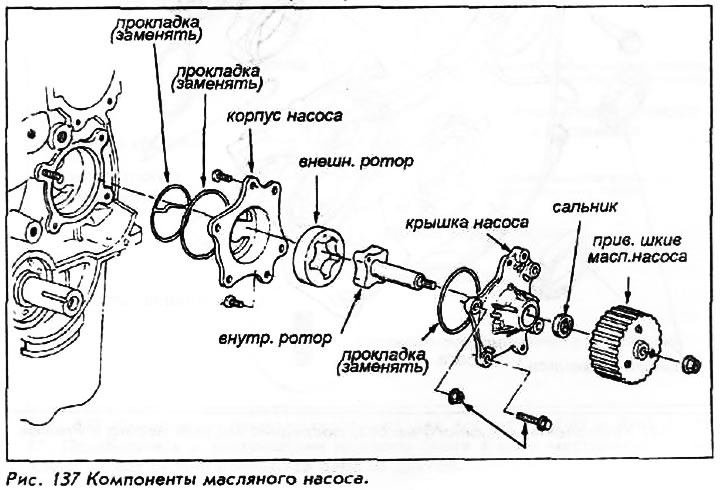


1984-87 Prelude, 1984-89 Accord


1. Check the rotor radial clearance for both the inner and outer rotors. Clearance is 0.15-0.20 mm.
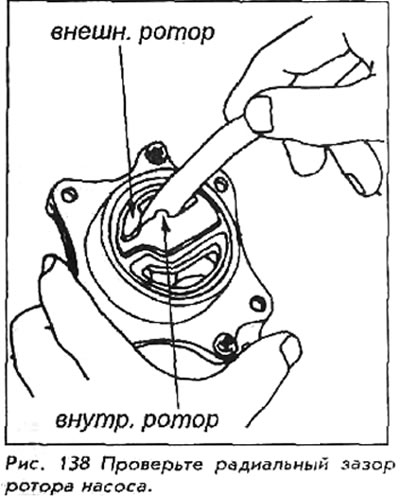
1. Check the rotor radial clearance for both the…


2. Using a feeler gauge, check the housing-rotor gap of both rotors. The gap is 0.10-18 mm for new ones; 0.20 mm - service limit.
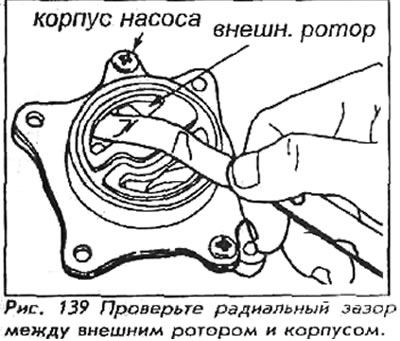
2. Using a feeler gauge, check the housing-rotor…


3. Using a feeler gauge and straightedge, check the rotor end play between the rotor surface and the gasket surface, with the gasket installed. Play should be 0.025-0.10 mm on new ones, with a service limit of 0.15 mm.
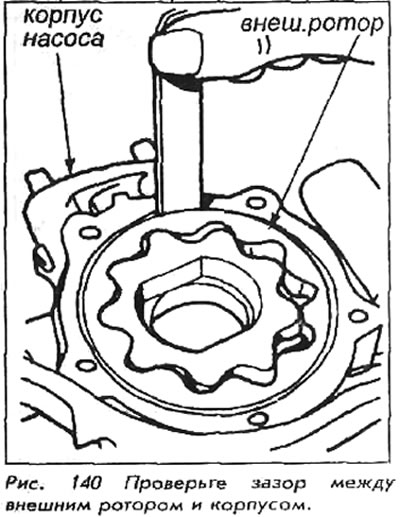


3. Using a feeler gauge and straightedge, check…


4. When replacing the rotors, internal and external, on both the upper and lower halves of the housing, the stamped marks must be aligned.

5. Install new oil seals and O-rings on the housing halves. Use an oil seal installation tool of the correct diameter to install the shaft seal; gently move the seal until the installation device touches the cover.

6. Assemble the pump. Use thread sealant for the small screws of the pump body. Tighten them only to 7 Nm.

1988-91 Prelude, 1990-91 Accord
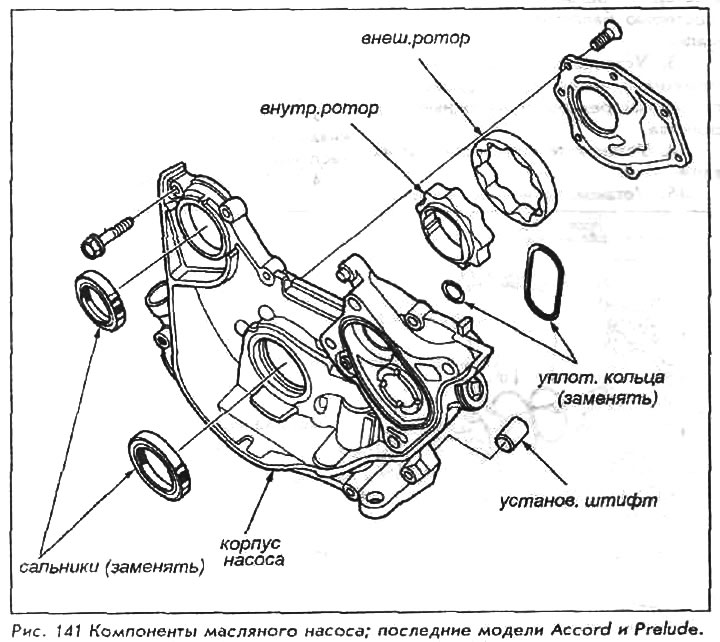


1988-91 Prelude, 1990-91 Accord


1. With the oil pump removed, separate the housing and cover by removing the eight bolts.

2. Check the radial clearance between the inner and outer rotors of the pump. Standards for a new Accord pump are 0.02-0.16 mm and Prelude 0.04-0.16 mm. The absolute wear limit for each is 0.2 mm.
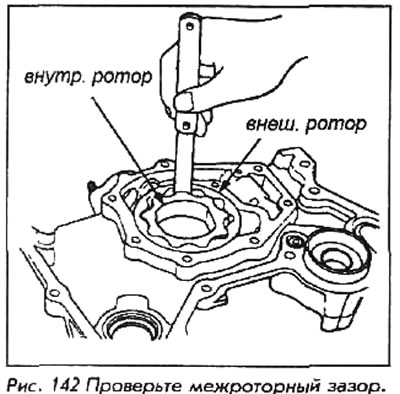


2. Check the radial clearance between the inner…


3. Check the axial clearance between the pump body and the outer rotor. Use an accurate ruler, placing it across the body. The standard clearance is 0.02-0.07 mm; absolute wear limit 0.12 mm.
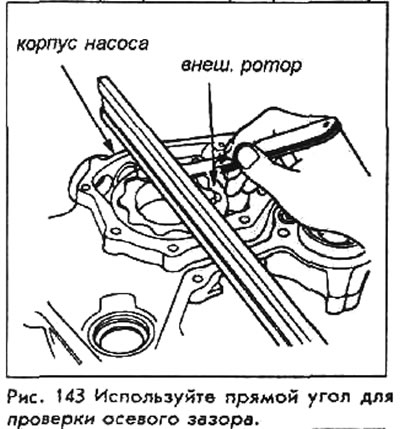
3. Check the axial clearance between the pump…


4. Check the radial clearance between the housing and the outer rotor, the standard clearance is 0.1-0.19 mm with a wear limit of 0.21 mm.
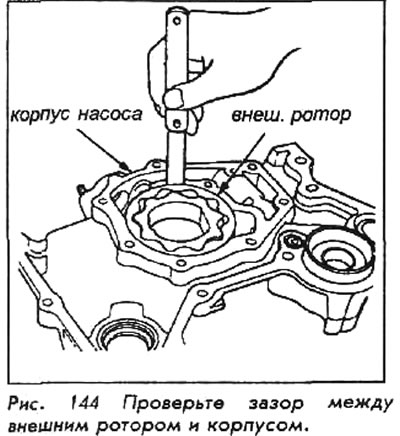
4. Check the radial clearance between the housing…


5. Visually inspect both rotors for cracking or scoring, replace if necessary.


6. Remove the oil seal from the shaft. Install a new one using an oil seal installer of the correct diameter, gently press the seal into place until the installer contacts the housing.

7. Assemble the pump. Use thread sealant for the bolts and tighten them to 7 Nm. Check that the oil pump rotates freely.

8. Install the oil pump.

(The text was taken from the website «www.hondabook.ru»)
This article is available at: russian, bulgarian, belarusian, ukrainian, serbian, croatian, romanian, polish, slovak, hungarian
This information has been verified: Yaroslav Shiryaev
Share with friends:
◀ Previous
Accord 3: Engine repair
Next ▶

Oil pump — removal and installation
Oil pan — removal and installation
Valve seats — inspection, removal and installation
Valves and springs — removal, installation and inspection
Valve springs and valve stem seals
Timing Belt and Covers — 1984-89 Accord, 1984-87 Prelude
Timing Belt and Covers — 1990-91 Accord
Timing Belt and Covers — 1988-91 Prelude
Camshaft Sprockets — Removal and Installation
Camshaft — SOHC engines
See also other articles from Honda manuals:
Oil pump — removal, inspection and installation Honda Civic 3 and 4 (1983-1991)
Coolant pump Honda Fit 1 (2001-2008)
Power steering pump Honda CR-V 1 (1995-2001, petrol)
Oil pump — design description Honda HR-V 1 (1998-2006, petrol)
Checking and adjusting the tension of the power steering pump belt Honda Avancier 1 (1999-2003, petrol)
Link in different formats to this article
Comments and feedback from visitors
No comments yet


How much will 28 + 29 ?


Accord 6 (1997-2002) 
  • General information
  • Introduction to the guide
  • User manual
  • Maintenance
  • Power unit
  • Four-cylinder engines
  • Six-cylinder engines
  • Engine overhaul
  • Cooling system
  • Heater and air conditioner
  • Power and exhaust systems
  • Engine electrical equipment
  • Engine management
  • Transmission
  • Mechanical gearbox
  • Automatic gearbox
  • Clutch and drive shafts
  • Chassis and running gear
  • Brake system
  • Car suspension
  • Steering
  • Body and interior
  • Exterior (external elements)
  • Interior (internal elements)
  • Electrical equipment
  • Equipment and devices
  • Electrical circuits
Accord 3 (1985-1989) 
  • General information
  • Maintenance
  • Power unit
  • Engine adjustment
  • Engine repair
  • Engine electrics
  • Emission management
  • Engine management (carburetor)
  • Electronic injection
  • Programmable injection
  • Schematic of emission system
  • Fuel system
  • Feedback management
  • Transmission
  • Manual gearbox
  • Automatic gearbox
  • Clutch
  • Chassis and running gear
  • Front suspension
  • Rear suspension
  • Steering
  • Brake system
  • Electrical equipment
  • Ventilation and heating
  • Air conditioner
  • Cruise control system
  • Equipment and devices
HondaBook.ru © 2018–2026 • Mobile version • Sitemap: EN BG BY UA RS HR RO PL SK HU • Feedback • Driver Information • Search system • Bookmark
Accord 3 (1985-1989) • Accord 6 (1997-2002) • Civic 3 and 4 (1983-1991) • Civic 5 and 6 (1991-2000) • Civic 6 (1995-2000) • Civic 7 (2000-2005) • Civic 8 (2005-2011) • Fit 1 (2001-2008) • CR-V 1 (1995-2001) • CR-V 2 (2002-2006) • HR-V 1 (1998-2006) • Avancier 1 (1999-2003) •
 
This website uses cookies to ensure proper functioning. By clicking "OK," you agree.