
Withdrawal
1. Disconnect the cable from the negative battery terminal. Crank the engine to bring the number 1 cylinder to TDC.
2. Raise and secure the vehicle. Drain the coolant.
3. On 2.0L engines. Remove the exhaust manifold shroud, EGR pipe and oxygen sensor.
Oxygen sensor (for 2.0 l) must be removed before the next step. On 2.1L engines, the sensor can be left in place; the use of hammers on the exhaust system is not recommended.
5. Disconnect the exhaust pipe from the manifold; Disconnect the mounting bracket from the engine block.
6. Disconnect the air filter mounting bracket from the unit.
7. Remove the two bottom intake manifold nuts.
8. Disconnect the spark plug wires from the spark plugs; remove the distributor, but do not disconnect any wiring from it.
9. Remove valve cover.
10. Disconnect the air intake valve, air intake silencer and silencer hose from the air filter.
11. Remove the power steering pump, leaving the hoses connected. Move the pump outside the work area and secure it with a rigid wire.
12. Remove the exhaust manifold.
13. Remove the top three mounting bolts on the intake manifold. Separate the manifold from the head, and slide it back or away from the head.
14. Remove the thermostat housing as a whole without disconnecting the hoses.
15. Disconnect the heater hose from the head.
16. Remove the top cover of the camshaft drive belt. Loosen but do not remove the camshaft timing belt adjusting bolt. Slide the belt off the camshaft pulley. Do not kink the belt or allow it to come into contact with motor fluids.
17. Remove the cylinder head bolts. Remove the cylinder head.
For installation:
18. Use a putty knife or similar blunt tool to remove all traces of gaskets from the head and engine surface.
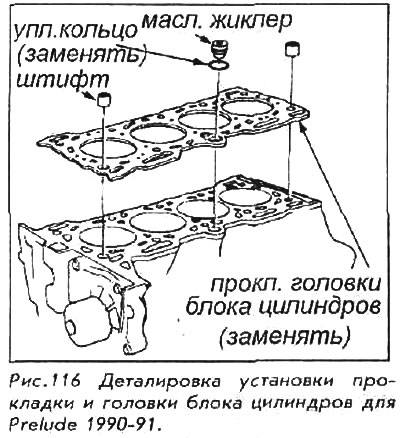
19. Having correctly installed, place a new gasket on the engine. Make sure the dowel pins and oil jet are correctly positioned.
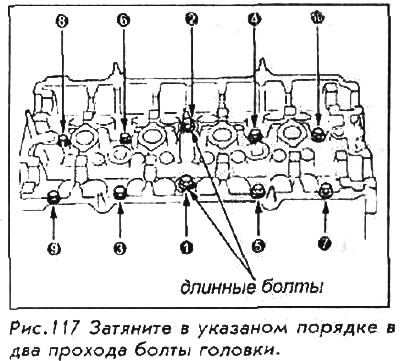
20. Install the head. Lightly coat the bolt threads with clean engine oil. Hand-tighten the bolts, making sure the two long bolts fit into the center holes.
21. Tighten the cylinder head bolts in two steps following the pattern shown. On the first pass, tighten the bolts to approximately 30 Nm. On the second pass - up to a final tightening torque of 68 Nm.
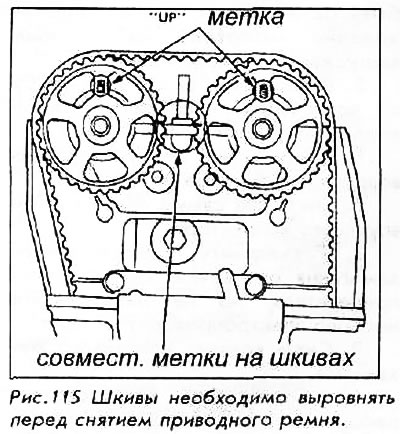
22. Double check the position of the engine; it must be set to TDC for cylinder No.1. The pointer on the rear of the cylinder block should line up with the white mark on the flywheel. "UP" The camshaft pulley marker must be vertical and the alignment marks on the surface of the camshaft pulleys must line up with the surface of the cylinder head.
23. Fit the drive belt carefully onto the pulleys.
24. Tighten the adjusting bolt.
25. Rotate the engine counterclockwise until the camshaft pulley has rotated 3 teeth.
26. Loosen the adjusting bolt; this will tighten the belt. Retighten the adjusting bolt to 43 Nm.
27. Install the upper drive belt cover.
28. Install the thermostat housing.
29. Replace gasket (Always) and install the intake manifold. Start with the center bolt; make two or three full passes using the cross order when tightening the nuts. The final tightening torque is 22 Nm.
30. Using a new gasket, install the exhaust manifold. Start with the center bolt; make two or three full passes using the cross order when tightening the nuts. The final tightening torque is 32 Nm.
31. Install the power steering pump.
32. Install the air silencer, suction valve and hose.
33. Install the valve cover. Install the distributor, connect the wires of the spark plugs. Attach the air cleaner bracket to the engine block.
34. Connect the exhaust pipe to the manifold. Use new self-locking nuts and tighten them to 55 Nm. If the oxygen sensor is mounted on a pipe, do not use hammers or pneumatic tools.
35. For 2.0L engines, install oxygen sensors, EGR pipe and heat shield.
36. Fill the cooling system.
37. Connect the wire to the negative battery terminal. Start the engine and leave it at idle. Check the work area for any sign of fluid leakage.