
Contents: Removal ⇊ To install: ⇊
The Environmental Protection Agency warns that prolonged contact of engine oil with skin causes skin pathology, including skin cancer. Use various protective equipment to minimize such contact. Wear protective gloves when changing the oil. Try to wash off any oil that gets on your skin as quickly as possible. To do this, use soap, water and a rag.
Removal
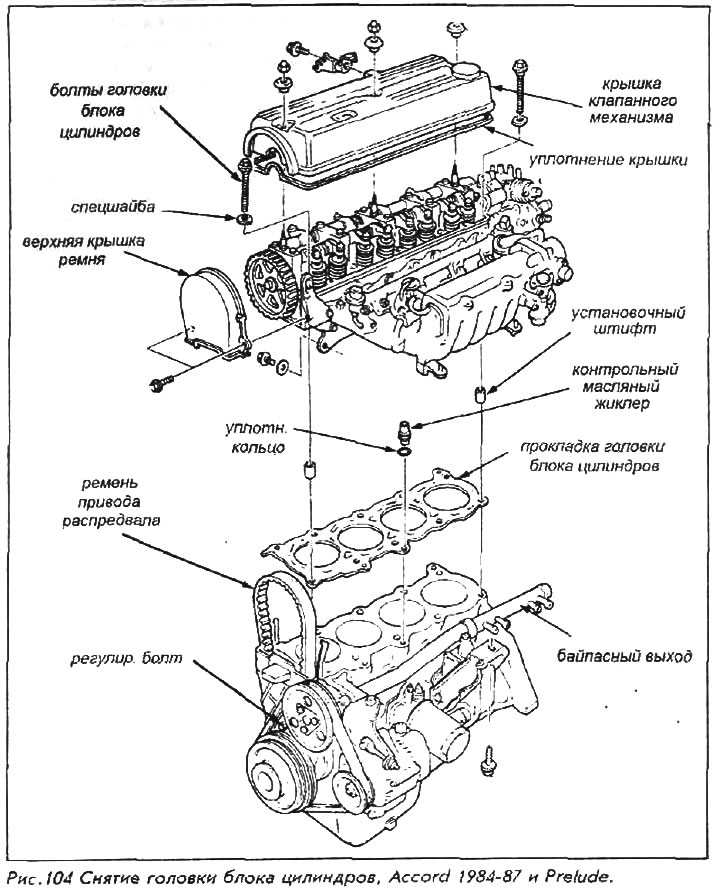
WARNING: Cylinder head temperature must be below 38°C before starting work. Allow the car to cool for a few hours if you have recently arrived from somewhere.
1. Disconnect the negative cable from the battery.
2. Place a clean drain pan under the radiator, remove the drain plug and radiator cap, then drain the coolant from the system.
3. Remove the brake booster vacuum hose and air intake from the air cleaner housing.
-> All wires and hoses should be labeled during removal. The amount of time saved during subsequent reassembly is worth the extra effort.
4. If the vehicle has a fuel injection system, reduce the fuel pressure using the correct procedures. Disconnect the fuel return hose from the pressure regulator. Remove the banjo nut and fuel supply hose; make sure to replace the washers.
5. Disconnect the ground cable from the valve cover.
6. Mark and disconnect the hoses from the air filter.
7. On carburetor models, disconnect the wires from the temperature sensor, idle air cut solenoid, primary/main idle air cut solenoid, and automatic choke.
8. Disconnect the throttle control cable and/or accelerator cable from the carburetor or throttle body.
9. Mark and disconnect all emission hoses from the carburetor(s).
10. Mark and disconnect the electrical connectors and hoses from the distributor; remove the distributor.
11. On fuel injected models, tag and disconnect the following harness connectors and couplers from the cylinder head and intake manifold:
- four injector connectors;
- tA sensor connector;
- ground connector located next to the fuel line;
- throttle sensor connector;
- tW-sensor connector;
- crankshaft angle sensor coupling;
- eGR valve connector;
- 4 wire harness clamps;
- oxygen sensor connector;
12. On carbureted models, disconnect the following parts:
- a. Mark and disconnect the emission hoses of the control box No.1 from the manifold pipe.
- b. Disconnect the air flow regulator hoses.
13. Remove the coolant hoses from the cylinder head.
14. If the vehicle is equipped with power steering, perform the following procedures:
- a. Remove the pump mount from the cylinder head.
- b. Remove the hose clamp bolt from the cylinder head.
- c. Remove the power steering pump mount from the cylinder head.
15. If the vehicle is equipped with air conditioning, disconnect the idle air control solenoid hoses.
16. If the vehicle is equipped with cruise control, remove the cruise control actuator. Do not disconnect the cable; simply move the drive out of the work area.
17. Remove the nuts of the main exhaust pipe, the pipe mount, and move the pipe away from the exhaust manifold.
18. Remove the air filter base mounting bolts. Disconnect the hose connecting the intake manifold to the breather chamber.
19. Remove the valve cover and the upper camshaft drive belt cover.
20. Loosen the tensioner adjustment bolt and remove the camshaft drive belt.
When removing the camshaft drive belt, DO NOT bend or twist it.
21. Remove the cylinder head bolts in strict sequence, working from the ends to the center. Each time, loosen each bolt by ½ turn and make several passes to evenly relieve the tension. Failure to follow this procedure may result in deformation of the head.
22. Remove the cylinder head from the engine. The head may resist because it is attached to the gasket. Release the head by gently tapping it with a plastic or rubber hammer. Lift the head straight up until it comes off.
23. Remove the exhaust manifold from the cylinder head.
24. Remove the air filter base from the intake manifold; remove the carburetors.
25. Remove the intake manifold from the cylinder head.
26. Using a putty knife or similar blunt instrument, clean the surface of the gasket installation. Inspect the parts for damage, replace them if necessary.
To install:
24. Assemble the manifolds and carburetor to the head. Use new gaskets for each manifold. Make sure the carburetor is properly tightened.
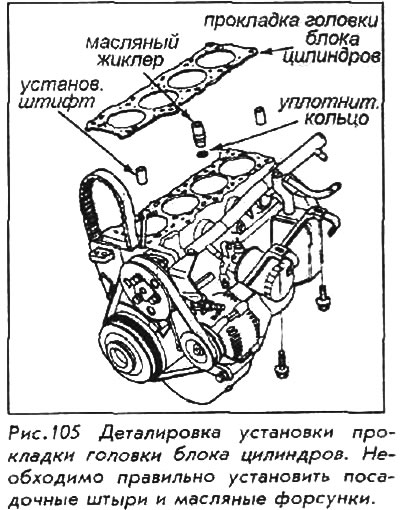
25. Install the new cylinder head gasket onto the engine surface, making sure the gasket is seated correctly. The cylinder head dowel pins and oil control jet must be in place.
26. Install the head. Lower it directly onto the block, aligning it correctly.
27. Apply clean engine oil to the bolt threads and before it contacts the head of the bolt. Hand tighten the head bolts. Install the bolts that secure the intake manifold to the mounting bracket, but do not tighten them yet.
28. Install the camshaft and pulley correctly; the "UP" mark should be at the top and the alignment marks on the edge of the pulley should be aligned with the edge of the head. On carbureted Preludes, use a small round mark or dot on the pulley; she should be on top.
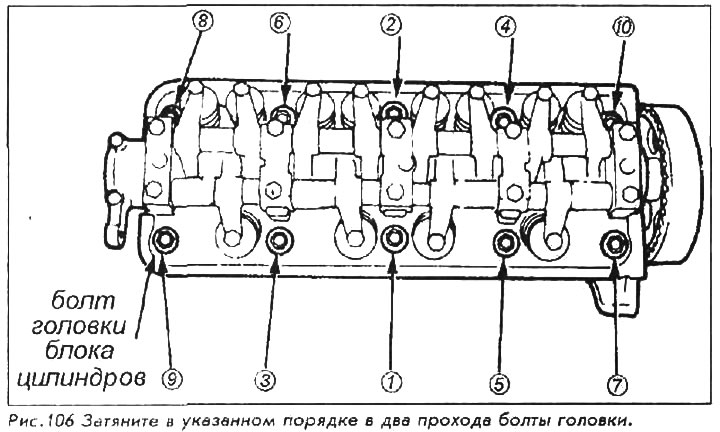
29. Tighten the head bolts in two steps, following the established order shown in Fig. 106. On the first pass, tighten the bolts to approximately 30 Nm; after the second and final pass, the total tightening torque should be 68 Nm.
30. Tighten the intake manifold mounting bracket bolts.
31. Install the camshaft drive belt. Loosen the tensioner against the belt.
32. Adjust the valve clearance. Install the valve cover and the upper timing belt cover.
33. Connect the hose from the intake manifold to the breather.
34. Install the air filter base fasteners.
35. Install the main exhaust pipe to its mounting location; install new nuts.
36. Reinstall the cruise control drive.
37. Connect the idle speed control solenoid hoses.
38. Install the power steering pump and belt.
39. Connect the coolant hoses to the thermostat housing and intake manifold.
40. Connect the upper radiator hose, heater hoses, and bypass inlet hose.
41. Connect the air flow regulator hoses. Connect the control box hoses to the vacuum manifold.
42. Connect the wires and hoses to the distributor.
43. Connect the fuel lines and the throttle control cable and/or accelerator cable.
44. Connect electrical lines to carburetor and related components.
45. Install the air filter and cover. Connect the vacuum hoses.
46. On fuel injected engines, reconnect the harness and wire connectors removed in Step 11.
47. Connect the wires and hoses of the carbon filter.
48. Connect the fuel supply hoses to the fuel injection throttle body.
49. Connect the ignition wires, ignition coil wire and radio noise suppressor.
50. Connect the engine ground cable to the valve cover. Connect the vacuum hose to the brake booster.
51. Double check all installed parts, paying special attention to sagging hoses or wires, loose nuts in the engine area.
52. Fill the cooling system.
53. Connect the negative cable to the battery.
(The article was taken from the website: hondabook)