
HondaBook.ru
Auto companies Volkswagen Auto companies Ford Auto companies Lada Auto companies Skoda Auto companies BMW Auto companies Mazda Auto companies Peugeot
English Русский
Български
Беларускі
Український
Српски
Hrvatski
Română
Polski
Slovenský
Magyar
Bookmark Contacts Sitemap   


Accord Civic Fit / Jazz CR-V HR-V Others Articles
CR-V 1 (1995-2001, petrol) CR-V 2 (2002-2006, petrol)

Installing front drive shafts (Honda CR-V 2)

  • Main
  • Honda CR-V
  • 2 (2002-2006, petrol)
  • Transmission
  • Drive shafts
  • Installing front drive shafts
0
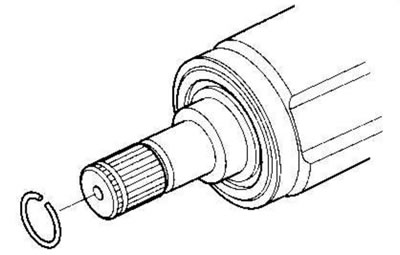
1. Place a new snap ring into the groove on the (left) drive shaft.

1. Place a new snap ring into the groove on the…


2. Apply 0.5-1.0 g of the recommended grease to the splined portion (A) of the right drive shaft. After applying grease, remove grease from the spline grooves at intervals of 2-3 splines and from the groove under the retaining ring (B) so that air can pass from the intermediate shaft.
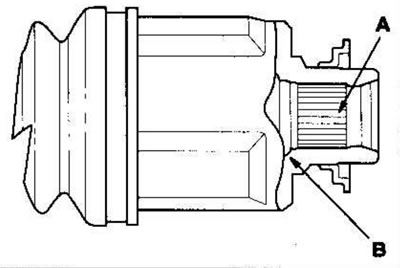
2. Apply 0.5-1.0 g of the recommended grease to…


3. Thoroughly clean the areas where the drive shaft and differential meet with solvent or carburetor cleaner and dry with compressed air. Insert the inner end (A) of the drive shaft into the differential (B) or intermediate shaft (C) so that the snap ring (D) fixed in the groove (E).
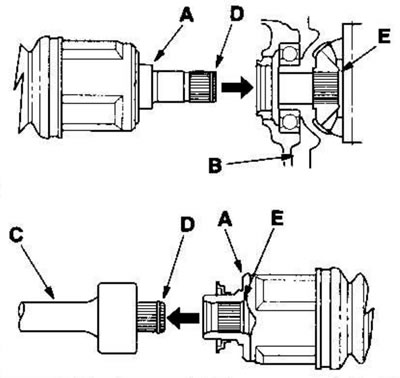
fixed in the groove (E).


4. Insert the outer joint (A) into the front wheel hub (B).
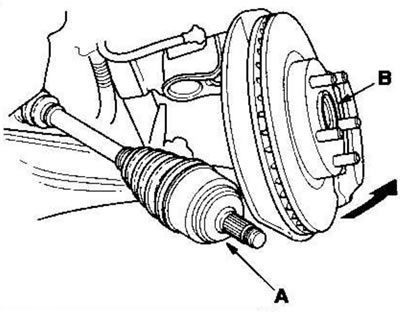


4. Insert the outer joint (A) into the front…


5. Install the steering knuckle (A) onto the lower control arm (B). Remove any excess grease before tightening the ball joint nut. Tighten the castle nut (C) to the lower tolerance limit, then tighten it just enough to align the slot with the cotter pin hole. Don't do this by loosening the nut.
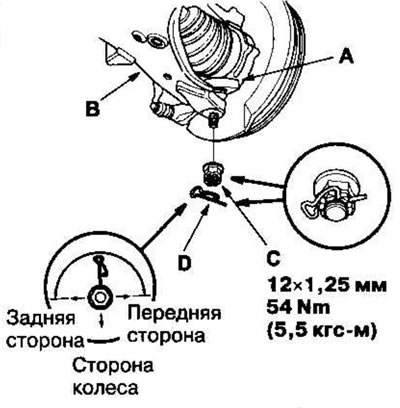
5. Install the steering knuckle (A) onto the…


6. Insert a new cotter pin (D) into the hole and bend the cotter pin as shown in the figure.

7. Connect the front stabilizer link (A) to the lower control arm. Secure the stabilizer link ball joint pin (B) with the Allen key (C) and tighten the new flange nut (D).
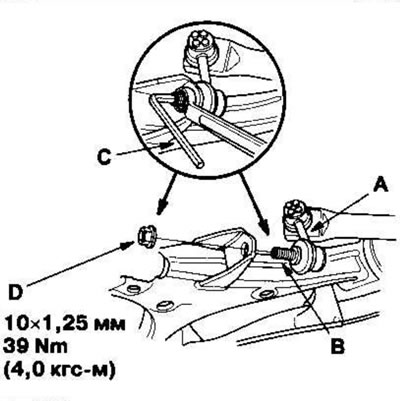
7. Connect the front stabilizer link (A) to the…


8. Place a new nut (A) on the axle shaft, then tighten it. After tightening, use a drift to tap the tongue of the axle nut (B) onto the drive shaft.
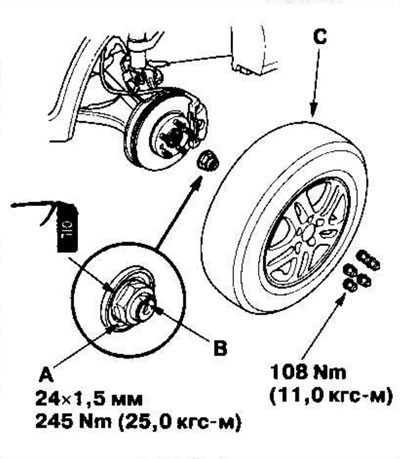


8. Place a new nut (A) on the axle shaft, then…


9. Clean the contact surfaces of the brake disc and front wheel, then install the front wheel and tighten the wheel nuts.

10. Fill the manual or automatic transmission with the recommended fluid, respectively.

11. Check the front wheel alignment angles and adjust if necessary.
This article is available at: russian, bulgarian, belarusian, ukrainian, serbian, croatian, romanian, polish, slovak, hungarian
This information has been verified: Mikhail Kopasov
Share with friends:
◀ Previous
CR-V 2: Drive shafts
Next ▶

Assembly of front drive shafts
Replacing the dynamic shock absorber
Disassembling the front drive shafts
Removal the front drive shafts
Checking drive shafts
Removal the intermediate shaft
Disassembling the intermediate shaft
Assembling the intermediate shaft
Installing the intermediate shaft
Removal the rear drive shafts
See also other articles from Honda manuals:
Installing balance shafts (four-cylinder engines) Honda Accord 6 (1997-2002)
Front Drive Shafts — Removal Honda Civic 7 (2000-2005)
Front Drive Shafts — Removal Honda Fit 1 (2001-2008)
Checking drive shafts Honda HR-V 1 (1998-2006, petrol)
Front Drive Shafts — Removal Honda Avancier 1 (1999-2003, petrol)
Link in different formats to this article
Comments and feedback from visitors
No comments yet


How much will 25 + 43 ?


CR-V 2 (2002-2006, petrol) 
  • General information
  • User manual
  • Technical data
  • Maintenance
  • Power unit
  • Engine repair
  • Lubrication system
  • Cooling system
  • Exhaust system
  • Fuel system
  • Engine management
  • Engine electrical equipment
  • Transmission
  • Clutch
  • Manual gearbox
  • Automatic gearbox
  • Rear differential
  • Drive shafts
  • Chassis and running gear
  • Steering
  • Front suspension
  • Rear suspension
  • Brake system
  • Body and interior
  • Exterior (external elements)
  • Interior (internal elements)
  • Doors, locks and windows
CR-V 1 (1995-2001, petrol) 
  • General information
  • Maintenance
  • Tips for car owner
  • Power unit
  • Engine repair
  • Engine overhaul
  • Cooling and lubrication system
  • Engine electrical equipment
  • Control system
  • Fuel system
  • Transmission
  • Clutch and drive shafts
  • Car gearbox
  • Chassis and running gear
  • Front suspension
  • Rear suspension
  • Steering
  • Brake system
  • Body and interior
  • Body service
  • Exterior (external elements)
  • Interior (internal elements)
  • Electrical equipment
  • Equipment and devices
  • Electrical circuits
HondaBook.ru © 2018–2026 • Mobile version • Sitemap: EN BG BY UA RS HR RO PL SK HU • Feedback • Driver Information • Search system • Bookmark
Accord 3 (1985-1989) • Accord 6 (1997-2002) • Civic 3 and 4 (1983-1991) • Civic 5 and 6 (1991-2000) • Civic 6 (1995-2000) • Civic 7 (2000-2005) • Civic 8 (2005-2011) • Fit 1 (2001-2008) • CR-V 1 (1995-2001) • CR-V 2 (2002-2006) • HR-V 1 (1998-2006) • Avancier 1 (1999-2003) •
 
This website uses cookies to ensure proper functioning. By clicking "OK," you agree.