
Note:
- Beware of spinning wheels when performing the test.
- Make sure lifts, jacks and safety stands are securely fastened.
- Warm up the engine to normal operating temperature (the radiator fan should turn on).
- When performing the test, do not allow dust or other foreign particles to enter the gearbox.
1. Before testing, make sure the transmission fluid level is correct.
2. 4WD: Raise the vehicle.
2WD: Raise the front of the vehicle and support it securely. Apply the parking brake and chock the rear wheels.
3. Ensure that all four wheels (4WD) or front wheels (2WD) rotate freely.
4. Warm up the engine to normal operating temperature (the radiator fan should turn on), then turn it off and connect the tachometer.
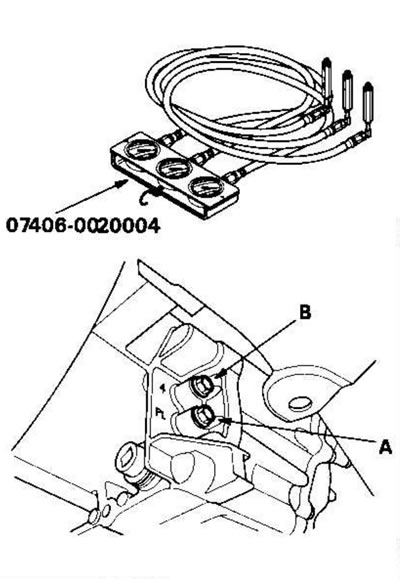
5. Connect an oil pressure gauge to the line pressure test port (A) and the 4th clutch pressure test port (A). When connecting the pressure gauges, prevent dust and other foreign particles from entering the gearbox through the test ports.
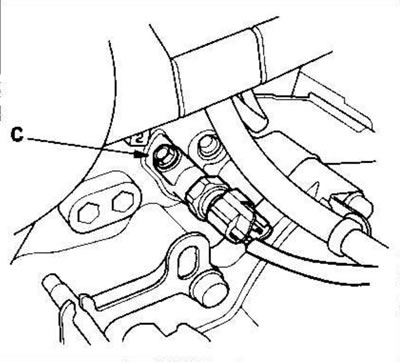
6. Remove the air cleaner housing and connect an oil pressure gauge to the pressure test port of the 2nd clutch (C). Then temporarily install the air cleaner housing in place.
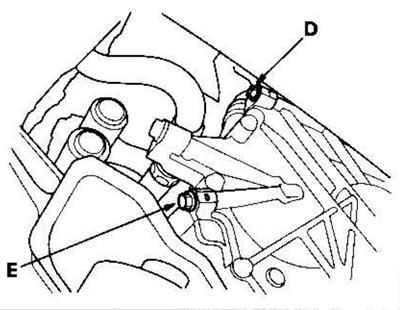
7. Connect oil pressure gauges to the 1st clutch pressure test port (D) and to the 3rd clutch pressure test port (E).
8. Start the engine. Maintain the engine speed at 2000 rpm (min⁻¹).
9. Shift to the [N] or [P] position and measure the pressure at the line pressure test port (A).
Note: If measurements are taken in positions other than [N] or [P], pressure readings may be higher.
| Pressure | Liquid pressure | |
| Standard | Limit | |
| Highway (A) | 900-960 kPa (9.2-9.8 kgf/cm²) | 850 kPa (8.7 kgf/cm²) |
10. Shift to position [1] and measure the pressure at the 1st clutch pressure test hole (D) while maintaining the engine speed at 2000 rpm (min⁻¹).
11. Shift to position [2] and measure the pressure in the 2nd clutch pressure test hole (C) while maintaining the engine speed at 2000 rpm (min⁻¹).
12. Shift to the [D] position and select the "overdrive off" mode by turning off the O/D switch. Measure the pressure at the 3rd clutch pressure test hole (E) while maintaining the engine speed at 2,000 rpm (min⁻¹).
13. Select the "overdrive engaged" mode by turning on the O/D switch and measure the pressure at the 4th clutch pressure test hole (B) while maintaining the engine speed at 2000 rpm (min⁻¹).
14. Shift to the [R] position and measure the pressure at the 4th clutch pressure test hole (B) while maintaining the engine speed at 2000 rpm (min⁻¹).
| Pressure | Liquid pressure | |
| Standard | Limit | |
| 1st gear clutch (D) 2nd gear clutch (C) 3rd gear clutch (E) 4th gear clutch (D) | 890-970 kPa (9.1-9.9 kgf/cm²) | 840 kPa (8.6 kgf/cm²) |
15. If the measurements are not within the specified limit, see the table at the bottom of the page.
16. Screw in the plug, installing a new sealing washer, and tighten the bolts.
Tightening torque: 18 Nm (1.8 kgf·m)
Note: Do not reuse old sealing washers.
17. Install the air cleaner housing.
| Malfunction | Probable cause |
| No pressure or low pressure in the line. | Torque converter Control valve Torque converter check valve ATF pump Low fluid level The ATF mesh filter is clogged |
| No pressure or low pressure in 1st gear clutch | 1st gear clutch O-ring seals |
| No pressure or low pressure in 2nd gear clutch | 2nd gear clutch O-ring seals |
| No pressure or low pressure in 3rd gear clutch | 3rd gear clutch O-ring seals |
| No pressure or low pressure in 4th gear clutch in position [D] | 4th gear clutch O-ring seals |
| No pressure or low pressure in 4th gear clutch in [R] position | Servo valve 4th gear clutch O-ring seals |
[Based on materials from the website: www.HondaBook.ru]