
HondaBook.ru
Auto companies Volkswagen Auto companies Ford Auto companies Lada Auto companies Skoda Auto companies BMW Auto companies Mazda Auto companies Peugeot
English Русский
Български
Беларускі
Український
Српски
Hrvatski
Română
Polski
Slovenský
Magyar
Bookmark Contacts Sitemap   


Accord Civic Fit / Jazz CR-V HR-V Others Articles
CR-V 1 (1995-2001, petrol) CR-V 2 (2002-2006, petrol)

Restoration of valve seats (Honda CR-V 2)

  • Main
  • Honda CR-V
  • 2 (2002-2006, petrol)
  • Power unit
  • Engine repair
  • Restoration of valve seats
0
1. Check the clearance between the valve stem and the valve guide. If the guides are worn, replace them before machining the valve seats.

2. Restore the valve seats in the cylinder head using a cutter.
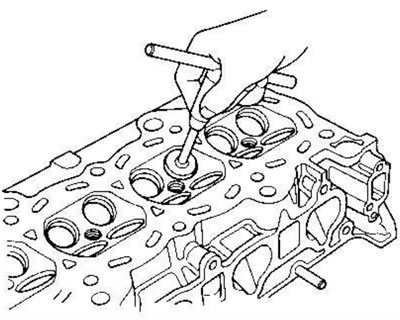
2. Restore the valve seats in the cylinder head…


3. Carefully file the seat at a 45° grinding angle, removing only as much metal as necessary to ensure a smooth, concentric seat surface.

4. Chamfer the top and bottom edges of the seat at the angles shown in the figure.
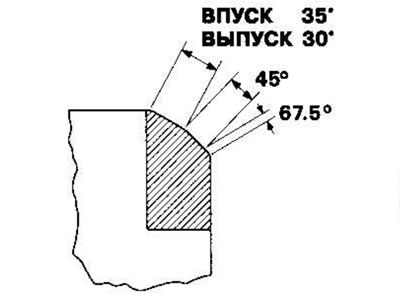
4. Chamfer the top and bottom edges of the seat…


Check the valve seat band width and adjust accordingly.

5. Make another light pass at a 45° sharpening angle and remove any burrs created by the other tool.

Valve seat belt width:

Standard (new)1.25-1.55 mm
Limit2.0 mm

6. After regrinding the seat, check whether the valve fits evenly to the seat:
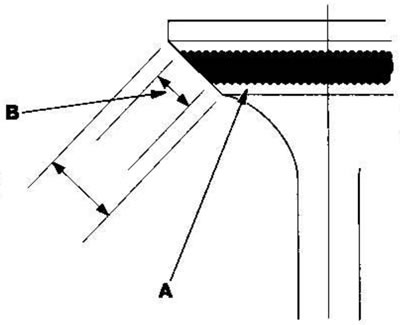


6. After regrinding the seat, check whether the…

  • Apply composition (A) containing red lead to the working surface of the valve.
  • Insert the valve into its original place in the cylinder head, then lift it up and press it against the seat several times.

7. The actual contact surface (B), indicated by the red lead compound, must be located in the center of the saddle.
  • If it is located too high (closer to the valve stem), it is necessary to re-process it with a sharpening angle of 67.5° and "lower" it, then go through it again with a sharpening angle of 45° and restore the width of the valve seat belt.
  • If it is located too low (closer to the edge of the valve), re-processing should be carried out with a sharpening angle of 35° (from the intake side) or 30° (from the release side) and "lift" it, then go over it again with a sharpening angle of 45° and restore the width of the valve seat belt.

Note: The finishing pass should always be done at a 45° sharpening angle.


8. Insert the intake and exhaust valves into the cylinder head and measure the valve stem height (A) after installation.
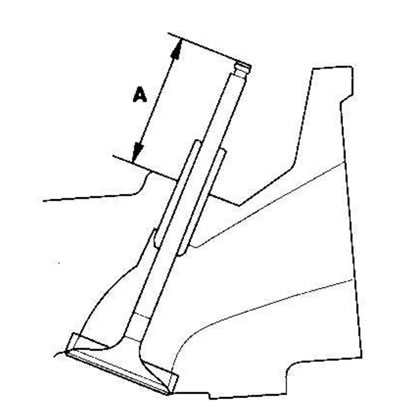
8. Insert the intake and exhaust valves into the…


Height of intake valve stem after installation: Standard (new): 40.8-41.0 mm


Height of exhaust valve stem after installation: Standard (new): 54.6-54.8 mm

9. If the valve stem height after installation exceeds the nominal value, replace the valve and recheck. If it still exceeds the nominal value, replace the cylinder head; the valve seat in the head is too deep.
This article is available at: russian, bulgarian, belarusian, ukrainian, serbian, croatian, romanian, polish, slovak, hungarian
This information has been verified: Mikhail Kopasov
Share with friends:
◀ Previous
CR-V 2: Engine repair
Next ▶

Replacing valve guide bushings
Checking the clearance between the valve stem and the valve guide
Checking the valves
Removal valves, springs and seals
Checking the camshaft
Installation of valves, springs and seals
Installing the valve rocker arms assembly
Installing the cylinder head
Installing the cylinder head cover
Cylinder block
See also other articles from Honda manuals:
Valve seats — inspection, removal and installation Honda Accord 3 (1985-1989)
Valve seats — repair Honda Civic 5 and 6 (1991-2000)
Seats — General Information Honda Fit 1 (2001-2008)
Valve seats — restoration Honda HR-V 1 (1998-2006, petrol)
Front seats — checks and adjustments Honda Avancier 1 (1999-2003, petrol)
Link in different formats to this article
Comments and feedback from visitors
No comments yet


How much will 24 + 40 ?


CR-V 2 (2002-2006, petrol) 
  • General information
  • User manual
  • Technical data
  • Maintenance
  • Power unit
  • Engine repair
  • Lubrication system
  • Cooling system
  • Exhaust system
  • Fuel system
  • Engine management
  • Engine electrical equipment
  • Transmission
  • Clutch
  • Manual gearbox
  • Automatic gearbox
  • Rear differential
  • Drive shafts
  • Chassis and running gear
  • Steering
  • Front suspension
  • Rear suspension
  • Brake system
  • Body and interior
  • Exterior (external elements)
  • Interior (internal elements)
  • Doors, locks and windows
CR-V 1 (1995-2001, petrol) 
  • General information
  • Maintenance
  • Tips for car owner
  • Power unit
  • Engine repair
  • Engine overhaul
  • Cooling and lubrication system
  • Engine electrical equipment
  • Control system
  • Fuel system
  • Transmission
  • Clutch and drive shafts
  • Car gearbox
  • Chassis and running gear
  • Front suspension
  • Rear suspension
  • Steering
  • Brake system
  • Body and interior
  • Body service
  • Exterior (external elements)
  • Interior (internal elements)
  • Electrical equipment
  • Equipment and devices
  • Electrical circuits
HondaBook.ru © 2018–2026 • Mobile version • Sitemap: EN BG BY UA RS HR RO PL SK HU • Feedback • Driver Information • Search system • Bookmark
Accord 3 (1985-1989) • Accord 6 (1997-2002) • Civic 3 and 4 (1983-1991) • Civic 5 and 6 (1991-2000) • Civic 6 (1995-2000) • Civic 7 (2000-2005) • Civic 8 (2005-2011) • Fit 1 (2001-2008) • CR-V 1 (1995-2001) • CR-V 2 (2002-2006) • HR-V 1 (1998-2006) • Avancier 1 (1999-2003) •
 
This website uses cookies to ensure proper functioning. By clicking "OK," you agree.