
Note: Do not spill brake fluid on your vehicle as it may damage the paintwork; if liquid does spill, wash it off immediately with water.
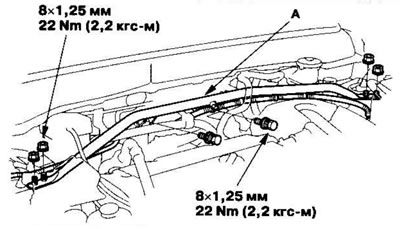
1. Loosen the engine wiring harness clamps on the tensioner (A) and remove the tensioner. On vehicles with manual transmission: Remove the clutch fluid reservoir bracket from the tensioner and move it to the side. Do not disconnect the clutch hose from the reservoir.
2. Remove the cap from the reservoir and remove the brake fluid from the master cylinder reservoir using a syringe.
3. Disconnect the connector (A) from the brake fluid level sensor.
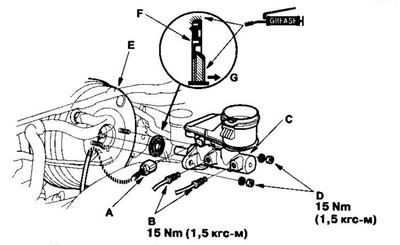
4. Disconnect the brake pipes (B) from the master cylinder (C). To avoid spilling fluid, cover the hose joints with rags or napkins
5. Loosen the master cylinder mounting nuts (D) and remove the washers.
6. Remove the master cylinder from the brake booster (E). Be careful not to bend or damage the brake lines when removing the master cylinder.
7. Remove the rod seal (F) from the master cylinder.
8. Unscrew the four mounting nuts of the amplifier.
9. Install the master cylinder in the reverse order of removal, taking into account the following:
- If removed, replace all rubber parts with new ones.
- Before installing the master cylinder, check the push rod clearance and adjust if necessary.
- When assembling, install a new seal on the stem.
- Apply the recommended seal lubricant supplied with the master cylinder kit to the inside edge and around the outside circumference of the new rod seal.
- Press the piston rod seal into the master cylinder with the groove facing the master cylinder.
- After installing the master cylinder, check the height and free play of the brake pedal and adjust if necessary.
[The original is located on the website «HONDABOOK»]