


Precautions
To safely discharge the air conditioning system, use pressure gauges:
1. With the engine off, connect the pressure gauges to the manifold.
2. Connect the red hose on the supercharger (high pressure side) of the manifold gauge to the service valve on the high pressure line. This is located on the line that runs from the compressor to the condenser. Connect the blue hose on the supercharger (low pressure side) to the suction line. This is the line that runs from the evaporator in the car to the compressor. It is usually large in diameter because of the insulation surrounding it. The valves used in the lines are called Schrader valves.
-> Use extreme caution when removing the test hoses from the Schrader rivets as some coolant will leak out under high pressure.
3. Place the free end of the center hose in a suitable container or wrap the end in a towel.
4. Slowly open the high pressure manual valve to adjust the refrigerant flow.
If you do not manage the leaking refrigerant, the pressure force will carry some of the refrigerant oil with it. This is not desirable and can damage the compressor.
5. Make sure there is no oil leaking into the container. If there is, close the manual valve slightly.
6. After the manifold pressure gauge readings become less than 350 kPa, slowly open the low pressure valve.
7. After reducing the system pressure, gradually open the high and low pressure valves until both pressure gauges show 0 kPa.
Draining and charging the system
This procedure requires a vacuum pump.
There are no procedures that will partially discharge the system of refrigerant. Since you have no idea how much refrigerant is in the system, you cannot know how much to add. To avoid severe damage to the compressor from overcharging, always completely discharge and evacuate the system.
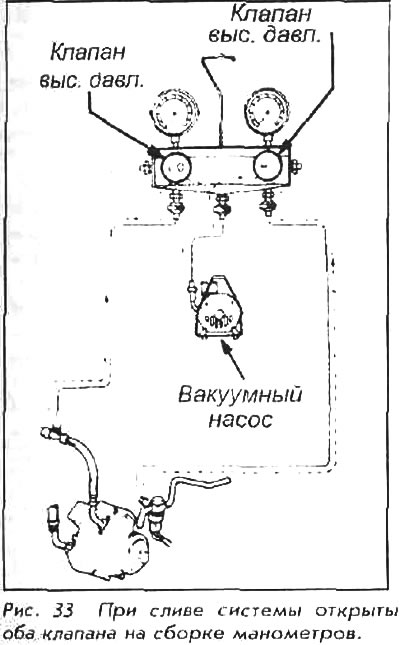
1. Connect manifold gauges.
2. Connect the central hose to the vacuum pump inlet.
3. Turn on the vacuum pump and then open both hand valves.
4. Let the vacuum pump run for about 15 minutes. Check that the low pressure gauge reading is greater than 700 mmHg.
If the reading is less than 700 mmHg, close both valves and turn off the vacuum pump. Inspect the system for leaks and repair if necessary.
6. Close the manifold gauge valves and turn off the vacuum pump.
After draining the system, always check for leaks.
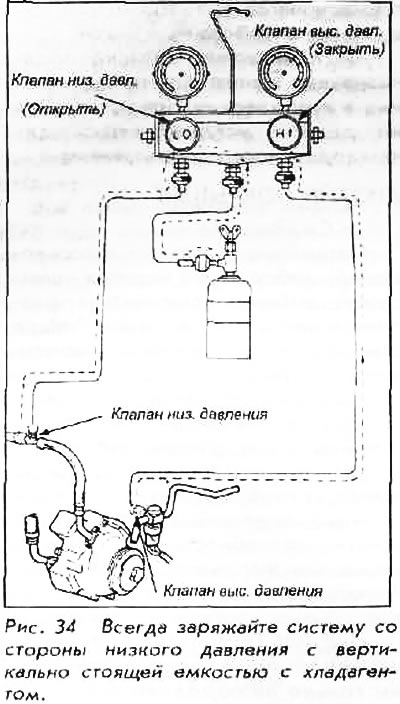
7. Install the refrigerant container valve onto the refrigerant can.
8. Connect the central hose to the valve branch.
9. Turn the handle clockwise to create drainage holes in the jar.
10. Turn the knob fully counterclockwise to fill the center hose with refrigerant. Do not open the high and low pressure valves.
11. Loosen the center hose nut connected to the center manifold gauge fitting until you hear a hissing sound. This will allow a small amount of coolant to release air from the hose. Wait a few seconds for the air to escape from the hose and then tighten the nut.
12. Hang or stand the jar so that it remains upright during the remainder of the procedure. DO NOT turn or tilt the jar during charging.
13. Open the low pressure valve; make sure the high pressure valve is securely closed.
CAUTION: Never attempt to charge the system from the high pressure side.
14. Open the front doors of the vehicle, start the engine and set the blower fan to maximum with the air conditioning system on. The engine should run at 1000 RPM. Begin filling the system. Use a spring gauge to measure the amount of refrigerant in the system. DO NOT exceed the specified weight; more is not better. Use the following amount of refrigerant when charging.
- 1984-88 Accord: 650-750 g.
- 1989 Accord: 800-900 g.
- 1990-91 Accord: 900-950 g.
- 1984-87 Prelude: 750-850 g.
- 1988 Prelude: 900-1000 g.
- 1989 Prelude: 850-950 g.
- 1990-91 Prelude: 900-950 g.
15. If necessary, change the can to fill the system with refrigerant, but do not forget to close the control valve before changing the can.
16. Once the system is completely filled, close the control valve. Keep the engine running for an additional 30 seconds to clear the line and gauges.
17. With the engine running, disconnect the low pressure side hose from the port connection. Disconnect the high pressure side; hold the hose down and quickly unscrew it to avoid loss of refrigerant.
CAUTION: Always remove the pressure gauge hoses from the service port side only! Otherwise, unexpected refrigerant leakage may occur.
18. Replace the dust caps at the line joints and stop the engine.
[Publication reprinted from the website HONDABOOK]