
HondaBook.ru
Auto companies Volkswagen Auto companies Ford Auto companies Lada Auto companies Skoda Auto companies BMW Auto companies Mazda Auto companies Peugeot
English Русский
Български
Беларускі
Український
Српски
Hrvatski
Română
Polski
Slovenský
Magyar
Bookmark Contacts Sitemap   


Accord Civic Fit / Jazz CR-V HR-V Others Articles
Accord 3 (1985-1989) Accord 6 (1997-2002)

Automatic transmission (Honda Accord 3)

  • Main
  • Honda Accord
  • 3 (1985-1989)
  • General information
  • Maintenance
  • Automatic transmission
0
Contents: Fluid Recommendations ⇊ Checking the level ⇊ Draining and filling ⇊

Fluid Recommendations


All Honda automatic transmissions use Dexron II automatic transmission fluid. This fluid directly replaces the Dexron fluid that was recommended for older models.

Checking the level


The fluid should be checked approximately once a month, and the frequency of replacement is indicated in the table at the end of the chapter. The car, before checking the fluid level, should be driven a few kilometers, allowing the oil to warm up completely, then make sure you park level and turn off the engine.

The dipstick is located on the front right side of the transmission housing, near or below the battery. It can be either a screw-in type or a small pull-out type, similar to the engine oil dipstick. To check the level, remove the dipstick, wipe it clean, and reinsert it.

The threaded dipstick does not need to be screwed in to determine the fluid level. Only the beginning of the thread should fit on the housing. By screwing the dipstick in, you will get incorrect readings.

The threaded dipstick does not need to be screwed…


Remove the dipstick. The fluid level should be within the dash marks, between the upper and lower markers. If fluid needs to be added, add Dexron II through the dipstick hole. Add only the amount required to keep the level within the control marks on the dipstick. Overfilling can damage the transmission. Between the upper and lower edges of the marks on the dipstick - less than 1 liter. When installing the dipstick in place, screw in the thread for the screw-in type of dipstick and tighten it only to finger tension; never use a key. Make sure the dipstick is fully seated.


Draining and filling


1. The car must be warmed up to operating temperature before starting. If possible, drive a few kilometers to warm up the box before starting to drain.

2. With the engine off, raise and support the front of the car. Agility and long arms will allow you to do this job without lifting, but it is much easier to do it with the car raised.

3. Place a tray under the box.

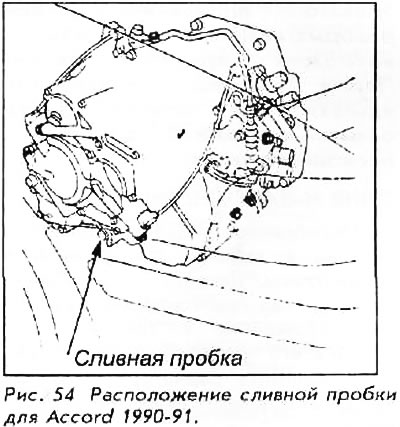
4. Remove the lower drain plug using a ratchet wrench inserted into the square recess; do not attempt to do this by grasping the round bolt with a pair of pliers. Drain the fluid.

5. Using a new washer, install the drain plug and tighten it to 40 Nm.

6. Fill the transmission with oil through the dipstick hole. On later models with a pull-out dipstick, you may need a narrow funnel. Check the level with the dipstick often. Do not overfill.

7. Lower the vehicle to the ground and check that it is level. Remove the dipstick and double check the level, adding oil as needed. Reinstall the dipstick securely.
This article is available at: russian, bulgarian, belarusian, ukrainian, serbian, croatian, romanian, polish, slovak, hungarian
This information has been verified: Yaroslav Shiryaev
Share with friends:
◀ Previous
Accord 3: Maintenance
Next ▶

Manual transmission
Changing engine oil and filter
Checking the engine oil level
Fuel recommendations
Engine Oil Recommendations
Cooling system
Master brake cylinder
Power steering pump
Steering without power assistance
Chassis lubrication
See also other articles from Honda manuals:
Checking the oil level in an automatic transmission Honda Civic 3 and 4 (1983-1991)
Driving a car with automatic transmission Honda Fit 1 (2001-2008)
Automatic transmission fluid Honda CR-V 1 (1995-2001, petrol)
Selector lever (models with automatic transmission) Honda HR-V 1 (1998-2006, petrol)
Selector lever, automatic transmission Honda Avancier 1 (1999-2003, petrol)
Link in different formats to this article
Comments and feedback from visitors
No comments yet


How much will 29 + 18 ?


Accord 6 (1997-2002) 
  • General information
  • Introduction to the guide
  • User manual
  • Maintenance
  • Power unit
  • Four-cylinder engines
  • Six-cylinder engines
  • Engine overhaul
  • Cooling system
  • Heater and air conditioner
  • Power and exhaust systems
  • Engine electrical equipment
  • Engine management
  • Transmission
  • Mechanical gearbox
  • Automatic gearbox
  • Clutch and drive shafts
  • Chassis and running gear
  • Brake system
  • Car suspension
  • Steering
  • Body and interior
  • Exterior (external elements)
  • Interior (internal elements)
  • Electrical equipment
  • Equipment and devices
  • Electrical circuits
Accord 3 (1985-1989) 
  • General information
  • Maintenance
  • Power unit
  • Engine adjustment
  • Engine repair
  • Engine electrics
  • Emission management
  • Engine management (carburetor)
  • Electronic injection
  • Programmable injection
  • Schematic of emission system
  • Fuel system
  • Feedback management
  • Transmission
  • Manual gearbox
  • Automatic gearbox
  • Clutch
  • Chassis and running gear
  • Front suspension
  • Rear suspension
  • Steering
  • Brake system
  • Electrical equipment
  • Ventilation and heating
  • Air conditioner
  • Cruise control system
  • Equipment and devices
HondaBook.ru © 2018–2026 • Mobile version • Sitemap: EN BG BY UA RS HR RO PL SK HU • Feedback • Driver Information • Search system • Bookmark
Accord 3 (1985-1989) • Accord 6 (1997-2002) • Civic 3 and 4 (1983-1991) • Civic 5 and 6 (1991-2000) • Civic 6 (1995-2000) • Civic 7 (2000-2005) • Civic 8 (2005-2011) • Fit 1 (2001-2008) • CR-V 1 (1995-2001) • CR-V 2 (2002-2006) • HR-V 1 (1998-2006) • Avancier 1 (1999-2003) •
 
This website uses cookies to ensure proper functioning. By clicking "OK," you agree.