
Fluid Recommendations
Use a quality ethylene glycol based engine coolant, especially recommended for use on vehicles with aluminum engine components that are in contact with the coolant. Note that some coolants, although labeled for use on such vehicles, may not actually be able to provide effective corrosion protection; if necessary, consult a professional.
Your best bet is to buy a top quality product that is known to perform well under these conditions. Whenever adding coolant, mix it with the prescribed amount of clean water. Never add either only water or only coolant. Mix the coolant in the ratio 50/50 in the required amount. Check the chart on the antifreeze box and stick to the proportions recommended for the lowest expected temperatures.
Level check
WARNING: Keep hands and clothing away from the radiator fan. On some vehicles, the fans may automatically come on up to 15 minutes after the engine has been turned off!
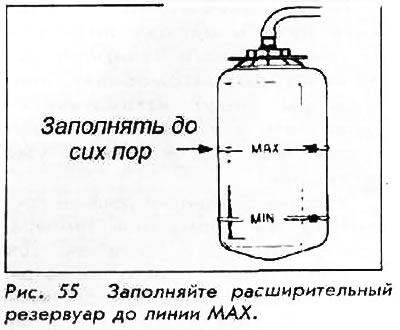
The coolant level should be checked with the engine running at normal temperature. To check the level, simply see if the refrigerant reaches the FULL line on the auxiliary tank. On newer vehicles with an additional reservoir placed behind the front guard, remove the reservoir cap and remove the plastic dipstick. Wipe it off and check the coolant level as you would check the oil level. The radiator cap should only be removed to clean or drain the system.
Add coolant to the secondary tank if the level is low and be sure to mix it with clean water. Never add cold water or coolant to a hot engine as this may result in damage to the engine and cooling system. If any coolant mixture accidentally comes into contact with a painted surface, rinse immediately with plenty of clean water. The coolant damages the paint.
CAUTION: The hot cooling system is under pressure. Removing the radiator cap when the engine is warm or overheated can result in fluid spilling or splashing, serious burns! Allow the system to cool for several hours before removing the radiator cap or hose.
Drain and fill
The coolant change intervals are indicated in the table at the end of the chapter. Do this service only when the engine is cold; chilling overnight is the best way to prevent burns.
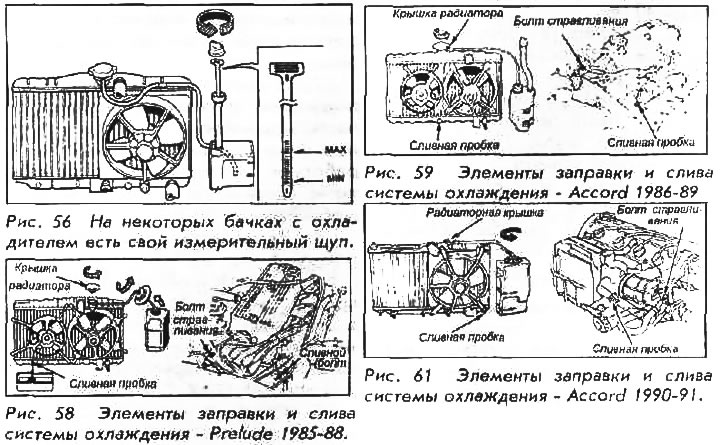
1. Remove the radiator cap. Just turn it without pressing down.
2. Place a drain pan under the radiator. Loosen the drain plug at the bottom of the radiator and drain the antifreeze. Honda engines are also equipped with a drain bolt, but this may be difficult to access. Spiv is either under the exhaust manifold or above the oil filter; in any case, it almost always requires work from under the engine to loosen it. Alternate Method: Disconnect the lowest radiator hose from the radiator.
CAUTION: Always drain coolant into a sealed container. The cooler can be reused as long as it is not dirty or too old (some years).
3. Drain the coolant from the reservoir tank by squeezing and disconnecting the hose. If the reservoir is behind a shield, use a mechanical siphon or suction tool to draw out the liquid.
4. Mix the 50% ethylene glycol solution (designed for use on aluminum engines) and 50% pure water. Use a stronger solution, as directed on the antifreeze container, if the climate in your area requires it. Tighten the drain bolt (s) and double check it (their). Install the lowermost radiator hose if it has been disconnected.
5. Loosen the cooling system bleed bolt at the top of the thermostat housing. Fill the radiator with coolant mixture. When the bleed port coolant flows are steady with no air bubbles, close the bolt and fill the radiator with coolant to the bottom of the neck.
6. To release air trapped in other parts of the cooling system, leave the radiator cap open and set the heater control to "NOT" (hot). Start the engine and let it warm up to normal operating temperature; this means that the temperature sensor is within the normal range and the radiator fan has turned on at least twice already.
7. When the engine is warm, check the level until it stabilizes; refill the coolant reservoir up to the marker "Full" (full) and make sure the radiator cap is properly tightened.
Fresh antifreeze has a cleansing effect on the channels. If the coolant has not been replaced on schedule, the new coolant may drive out system debris. If there is an extreme discoloration, the system will need a second drain.
Flushing and cleaning the system
1. Remove the thermostat from the engine (see procedures "Thermostat, removal and installation").
2. Using a water hose, direct water into the opening of the thermostat housing, allowing the water to clean the engine, heater, and radiator. Flush the system until the water flowing out of the radiator is clean.
3. After cleaning, reverse the removal procedures. Fill the cooling system with new antifreeze.