
CAUTIONS: Before replacing any of the radiator/heater hoses, always disconnect the ground cable from the battery or fan motor wiring connector. Under certain circumstances, the fan can run even when the ignition is off!
Periodically inspect the condition of the radiator and heater hoses, such as in early spring or early fall when you are performing other maintenance. Make sure the engine and cooling system are cold. Visually inspect for cracks, knots or breakage in hoses and replace if required. Run your hand along the length of the hose. If you notice weaknesses or bulges when the hose walls are compressed, replace the hose.
Watch out for small coolant hoses near the engine block, carburetor, or gas valve. Honda recommends checking hoses every 50,000 kilometers or 36 months.
Replacement
Replacing the hoses requires draining the cooling system. This nasty job requires getting under the car and draining the slippery, smelly and chemically stained antifreeze. Stock up on a large drainage pan or bucket and rags.
CAUTION: Always drain coolant into a sealed container. It can be reused many times as long as it is not dirty or too old.
1. Drain the cooling system. Always do this with a cold engine. You can drain fluid from Honda engines and radiators by opening the drain plug at the base of the radiator. If the coolant is drained this way, be sure to close the drain plug before adding antifreeze.
Alternative method:
- a. Remove the radiator cap.
- b. Place a drain pan under where the lowest radiator hose hits the radiator. Loosen the clamp on the hose and slide it back so that it is out of the way.
- c. Gently twist the hose clamp on the nozzle. Don't overdo it or you will damage the radiator hose. As soon as the hose loosens, be ready for a jet of fluid.
- d. Remove the end of the hose from the radiator and route it into the drain pan. When the drain is finished, continue replacing the damaged hose.
2. Loosen the clamps on the damaged hose with a screwdriver and either remove them or move them to the center of the hose.
3. Loosen the hose clamps at both ends using a suitable tool or twist them by hand.
4. Remove the hose.
5. Install new hose. A small amount of soapy water or glass cleaner applied to the fitting will make installation easier.
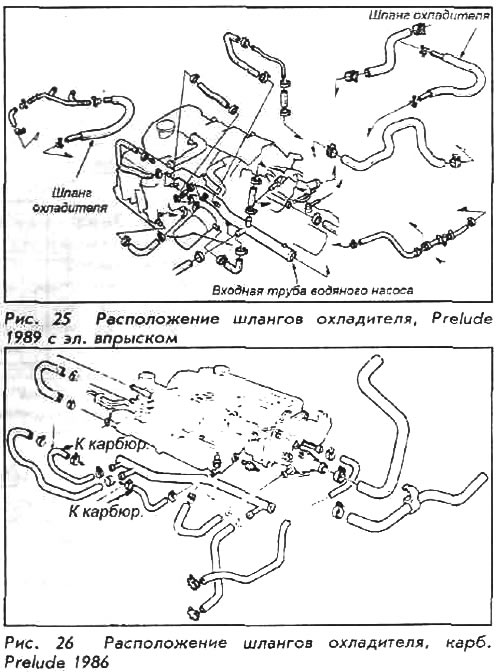
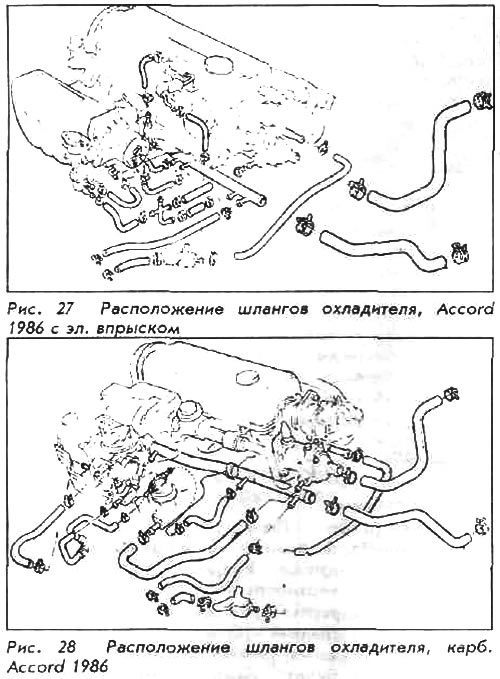
The radiator hoses must be laid without loops and, after installation, be in the same position as they were removed.
6. Push the hose clamps back into place and tighten them. When tightening the clamps, compress them only until they are sufficiently tight, but not so much as to cause internal damage to the hose.
7. Reinstall the lowest radiator hose and secure the clamp.
8. Fill the cooling system. Honda strongly recommends a 50/50 antifreeze/water coolant mix. This mixture has the best performance against solidification and boiling of liquid during year-round operation.
In cold weather, it is best to use a mixture of antifreeze and water in a 50/50 ratio. If the mixture contains 40% water or less, engine cooling will be impaired. Do not use additional anti-rust additives or other similar products. The cooling system can be damaged by incompatible fluids.
9. When adding coolant to the radiator and/or coolant reservoir, take extra care to prevent dripping on the fuse and relay group under the hood. If a leak does occur, wipe up the stain immediately.
10. Replace and tighten the radiator cap. Start the engine and visually check for leaks. Warm up the engine completely and continue checking for signs of leakage. Until the system develops full internal pressure, small leaks may not be noticed. Leaks at the ends of hoses are mainly caused by loose clamps. Large leaks may require removal of the hose again. To do this, YOU MUST WAIT UNTIL THE ENGINE IS COMPLETELY COOL. NEVER OPEN A HOT RADIATOR! After all leaks are fixed, check the coolant level in the radiator (with cooled engine) and top up if necessary.