HondaBook.ru
Auto companies Volkswagen Auto companies Ford Auto companies Lada Auto companies Skoda Auto companies BMW Auto companies Mazda Auto companies Peugeot
English Русский
Български
Беларускі
Український
Српски
Hrvatski
Română
Polski
Slovenský
Magyar
Bookmark Contacts Sitemap   


Accord Civic Fit / Jazz CR-V HR-V Others Articles
CR-V 1 (1995-2001, petrol) CR-V 2 (2002-2006, petrol)

Engine assembly (engine installation) (Honda CR-V 2)

  • Main
  • Honda CR-V
  • 2 (2002-2006, petrol)
  • Power unit
  • Engine repair
  • Engine assembly (engine installation)
0
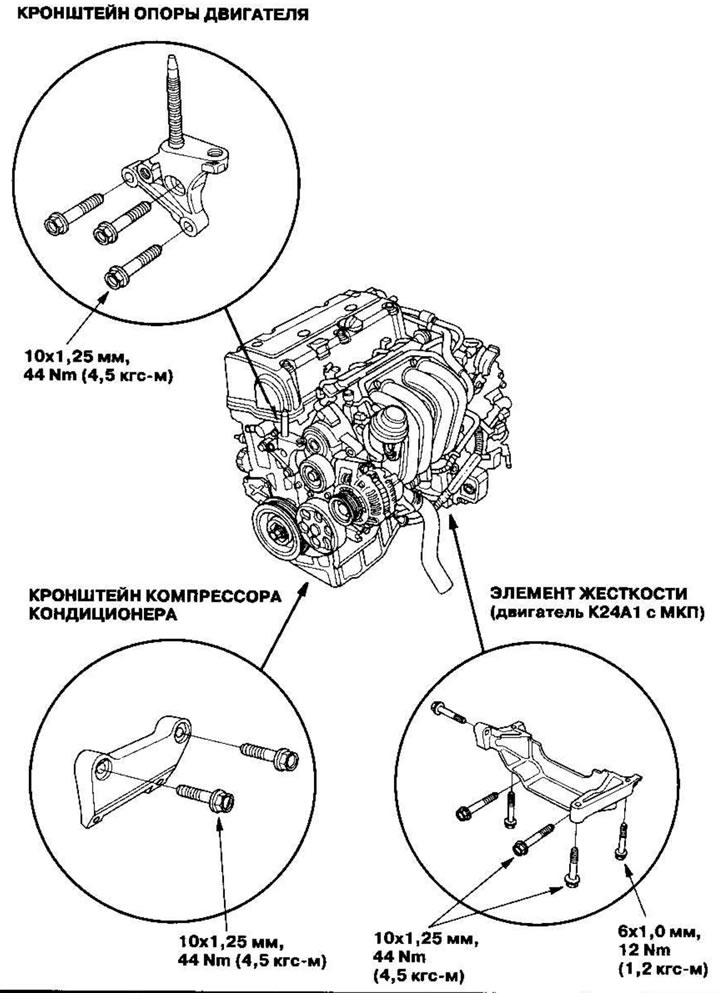
1. Install the accessory brackets and tighten the bolts and nuts to the specified torque.

1. Install the accessory brackets and tighten the…


2. Roll the engine under the car. Attach a chain winch to the engine, then lift the engine until it is in the desired position in the vehicle.

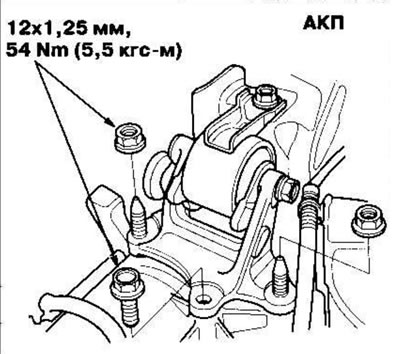
Note: Engine installation is performed in the reverse order of removal. Tighten the support mounting bolts/nuts in the sequence shown. Failure to follow this procedure may result in excessive noise and vibration and reduced bushing life.


3. Install the air conditioning compressor (A) and connect the connector (B) to the compressor coupling.
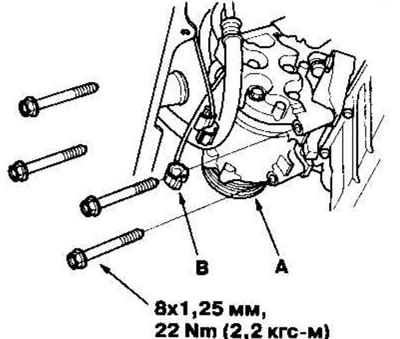
3. Install the air conditioning compressor (A)…


4. Install the subframe (A). Align the reference lines (B) on the subframe with the centers of the bolt heads, then tighten the bolts.
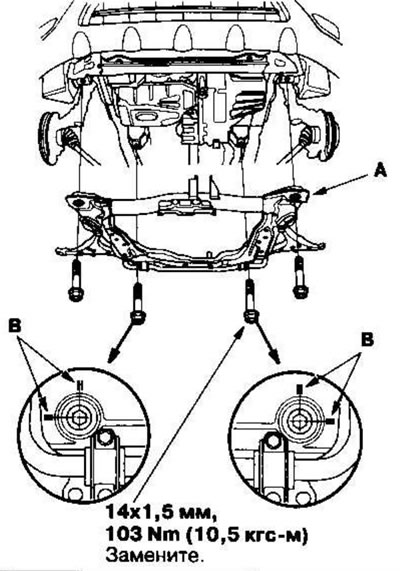


4. Install the subframe (A). Align the reference…


5. Tighten the front support mounting bolt.
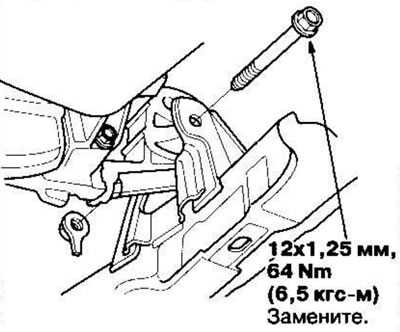
5. Tighten the front support mounting bolt.


6. Tighten the rear support mounting bolts.
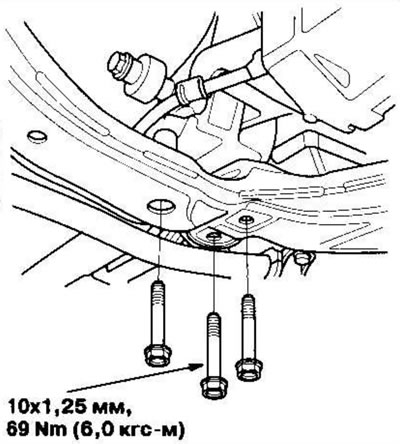
6. Tighten the rear support mounting bolts.


7. Lower the winch.

8. Tighten the upper bracket mounting bolt and nut.
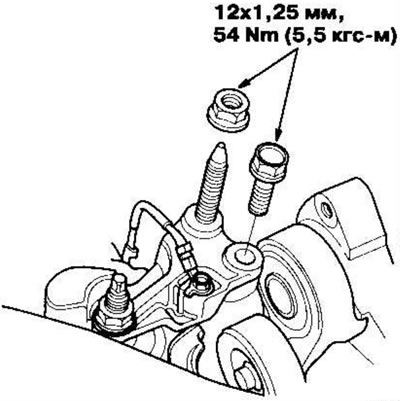
8. Tighten the upper bracket mounting bolt and…


9. Tighten the transmission mount bracket bolts/nuts.
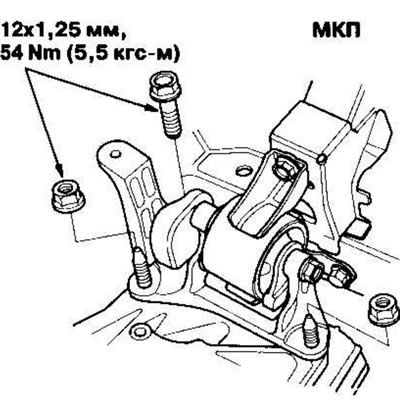


9. Tighten the transmission mount bracket…


9. Tighten the transmission mount bracket…


10. Remove the chain winch from the engine.

11. Raise the winch to its full height.

12. Place new snap rings on the ends of the drive shafts and install the drive shafts. Make sure the rings "snap" into place in the differential and on the intermediate shaft.

13. Connect the ball joints of the lower suspension arms.

14. Connect the stabilizer rods.

15. Connect the cardan shaft to the transfer case (4WD models).

16. Connect the gear shift cable (automatic transmission).

17. Install the TWC catalytic converter (A) assembly (engines K20A4, K24A1) or exhaust chamber (A) (k20A5 engines), by installing new gaskets (B) and new self-locking nuts (C).
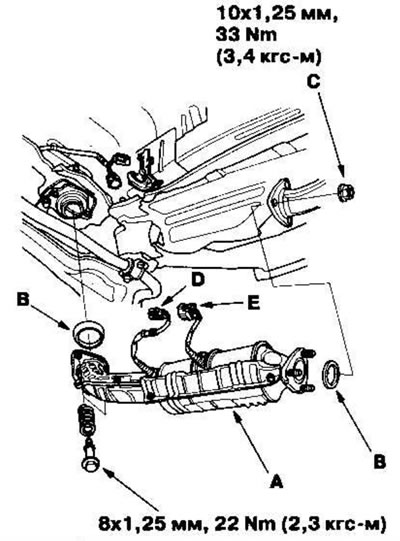
17. Install the TWC catalytic converter (A)…


18. Connect the primary heated oxygen sensor connector (D) (primary HO2S) (except for the K20A5 engine).


19. Connect the secondary heated oxygen sensor connector (E) (secondary HO2S) (models KE, KG, KS, KR, KU, KZ, KQ, FO).

20. Connect the lower hose to the radiator.
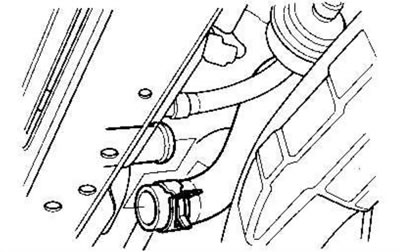
20. Connect the lower hose to the radiator.


21. Tighten the ATF filter mounting bolt (A) and connect the hoses (B) to the ATF cooler (AT).
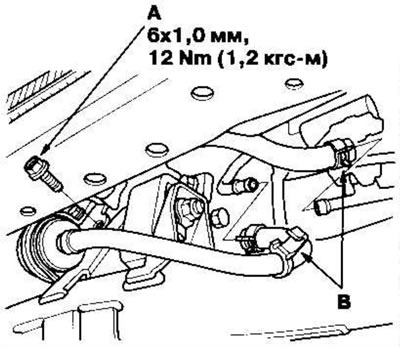
21. Tighten the ATF filter mounting bolt (A) and…


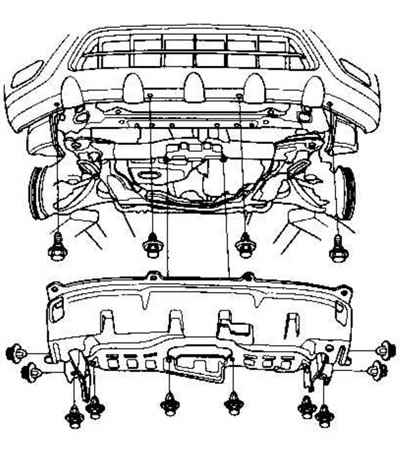
22. Install the mud deflector.

22. Install the mud deflector.


23. Lower the winch.


24. Connect the upper hose (A) to the radiator and the hoses (B) to the heater.
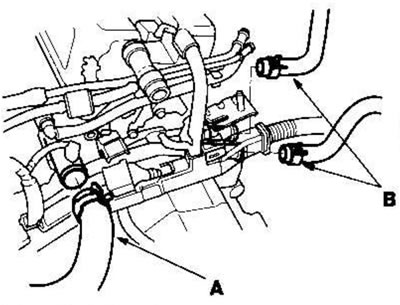
24. Connect the upper hose (A) to the radiator…


25. Install the power steering (P/S) pump.
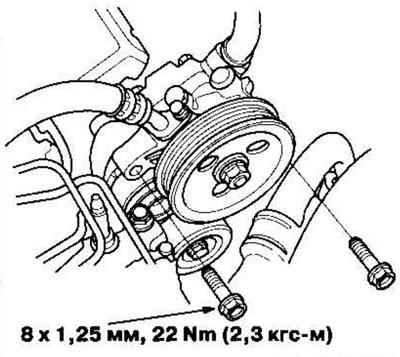
25. Install the power steering (P/S) pump.


26. Install the power steering pump (P/S) drive belt.

27. Connect the throttle cable, then adjust it.

28. Connect the cruise control cable, then adjust it.

29. Pass the ECM/PCM connectors through the bulkhead, then install the rubber grommet (A).

30. Place the clamps (B) on the harness.

Left hand drive models
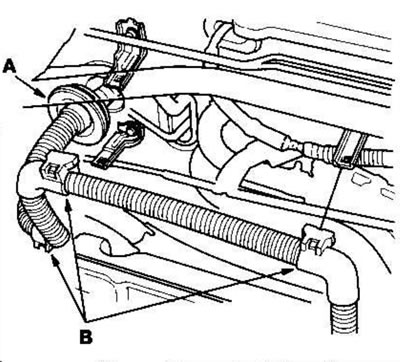
Left hand drive models


Right hand drive models
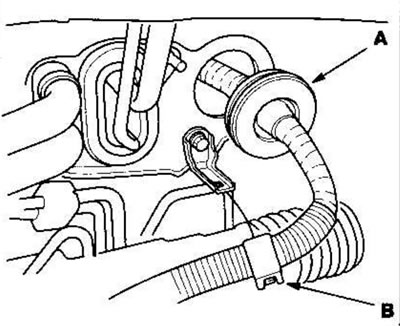


Right hand drive models


31. Connect the connectors (A) to the ECM/PCM and the main wiring harness connector (B).

Left hand drive models
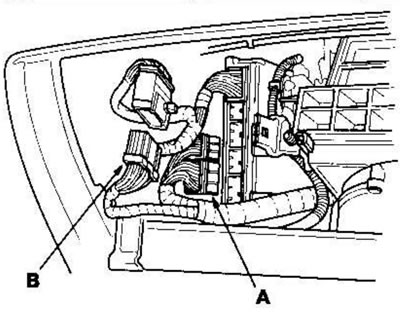
Left hand drive models


Right hand drive models
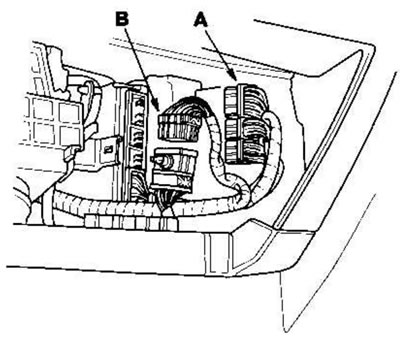
Right hand drive models


32. Connect the vacuum hose (A) to the brake booster and the hose (B) to the carbon filter (EVAP).
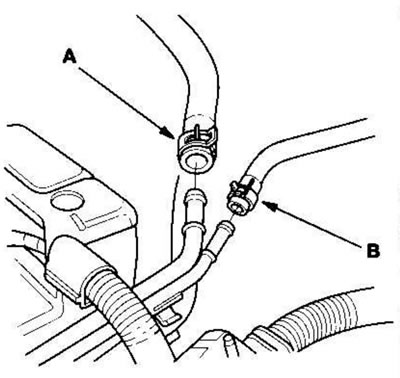
32. Connect the vacuum hose (A) to the brake…


33, Connect the fuel supply hose.

34. Connect the gear shift cable and selector cable (M gearbox).

35. Install the clutch slave cylinder and clutch line bracket (manual transmission).

36. Connect the battery cables (A) to the underhood fuse/relay box, then install cable ties (B) on the harness.
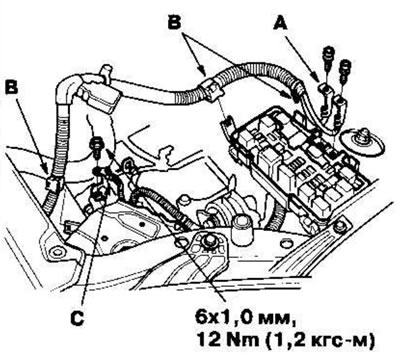
36. Connect the battery cables (A) to the…


37. Connect the ground cable (C).

38. Install the air intake.
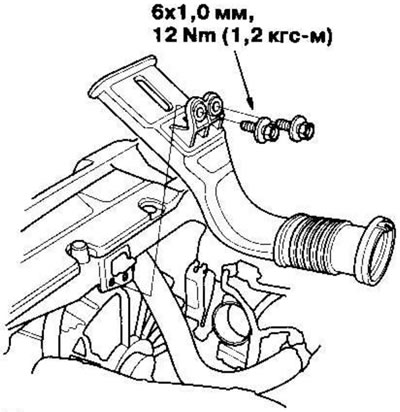
38. Install the air intake.


39. Install the air cleaner housing (A) and connect the connector (B) to the intake air temperature (IAT) sensor.
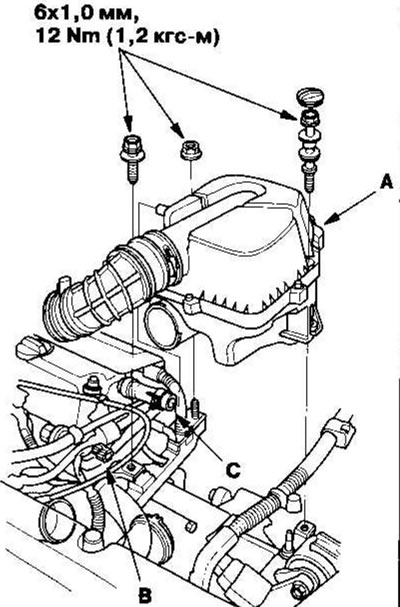
39. Install the air cleaner housing (A) and…


40. Connect the breather hose (C).

41. Install the cover on the intake manifold.
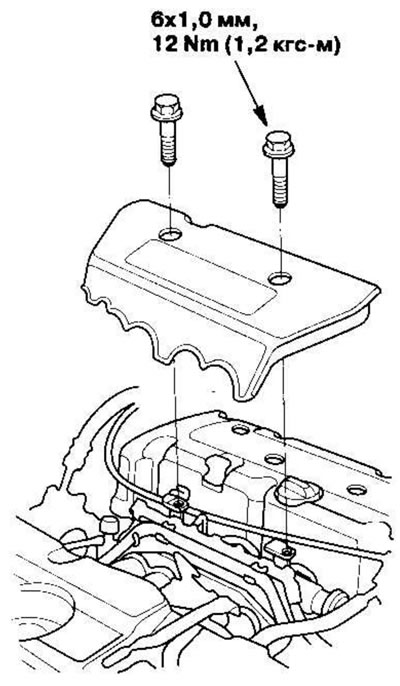
41. Install the cover on the intake manifold.


42. Install the battery. Clean the battery terminals and cable ends with sandpaper, then reassemble them and apply grease to prevent corrosion.

43. Move the selector lever through all gears and make sure that the automatic transmission range indicator follows the transmission range switch (AT).

44. Make sure that the gearbox shifts smoothly (manual transmission),

45. Check for fuel leaks. Turn the ignition key to the ON (II) position (do not turn on the starter) so that the fuel pump starts working for approximately two seconds and pressure is created in the fuel line. Repeat this operation two or three times and check if there is any fuel leakage at any point in the fuel line.

46. Fill the engine with engine oil.

47. Fill the gearbox with fluid:
  • See ch. "Manual transmission"
  • See ch. "Automatic transmission"

48. Fill the radiator with engine coolant and bleed the cooling system with the heater tap open.

49. Check the idle speed.

50. Check the ignition timing angle.

51. Check the wheel alignment angles.

[Original article on the website HondaBook.ru]
This article is available at: russian, bulgarian, belarusian, ukrainian, serbian, croatian, romanian, polish, slovak, hungarian
This information has been verified: Mikhail Kopasov
Share with friends:
◀ Previous
CR-V 2: Engine repair
Next ▶

Engine assembly (engine removal)
Cylinder head
Checking engine compression
Testing VTEC valve rocker arms
Checking the VTC drive
Adjusting valve clearances
See also other articles from Honda manuals:
Engine Oil Recommendations Honda Accord 3 (1985-1989)
Emergency engine start Honda Civic 3 and 4 (1983-1991)
Engine number and identification plates Honda Fit 1 (2001-2008)
Engine Starting Procedure Honda HR-V 1 (1998-2006, petrol)
Starting the engine Honda Avancier 1 (1999-2003, petrol)
Link in different formats to this article
Comments and feedback from visitors
No comments yet


How much will 29 + 47 ?


CR-V 2 (2002-2006, petrol) 
  • General information
  • User manual
  • Technical data
  • Maintenance
  • Power unit
  • Engine repair
  • Lubrication system
  • Cooling system
  • Exhaust system
  • Fuel system
  • Engine management
  • Engine electrical equipment
  • Transmission
  • Clutch
  • Manual gearbox
  • Automatic gearbox
  • Rear differential
  • Drive shafts
  • Chassis and running gear
  • Steering
  • Front suspension
  • Rear suspension
  • Brake system
  • Body and interior
  • Exterior (external elements)
  • Interior (internal elements)
  • Doors, locks and windows
CR-V 1 (1995-2001, petrol) 
  • General information
  • Maintenance
  • Tips for car owner
  • Power unit
  • Engine repair
  • Engine overhaul
  • Cooling and lubrication system
  • Engine electrical equipment
  • Control system
  • Fuel system
  • Transmission
  • Clutch and drive shafts
  • Car gearbox
  • Chassis and running gear
  • Front suspension
  • Rear suspension
  • Steering
  • Brake system
  • Body and interior
  • Body service
  • Exterior (external elements)
  • Interior (internal elements)
  • Electrical equipment
  • Equipment and devices
  • Electrical circuits
HondaBook.ru © 2018–2026 • Mobile version • Sitemap: EN BG BY UA RS HR RO PL SK HU • Feedback • Driver Information • Search system • Bookmark
Accord 3 (1985-1989) • Accord 6 (1997-2002) • Civic 3 and 4 (1983-1991) • Civic 5 and 6 (1991-2000) • Civic 6 (1995-2000) • Civic 7 (2000-2005) • Civic 8 (2005-2011) • Fit 1 (2001-2008) • CR-V 1 (1995-2001) • CR-V 2 (2002-2006) • HR-V 1 (1998-2006) • Avancier 1 (1999-2003) •
 
This website uses cookies to ensure proper functioning. By clicking "OK," you agree.