
 | 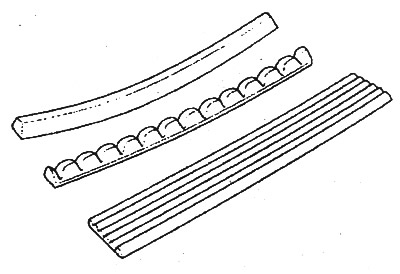
3 types of belts used on cars: 1. V-shaped wedge; 2. Gear wedge |
Corrugated wedge-shaped belt used on the vehicles in question. The same belt that rotates several units with the inside and back is sometimes called "serpentine".
Status check
Check belt tension every 24,000 km or 12 months. Check the condition of the belts for glossiness, cracks, peeling of the base and other defects. If any defects are found, replace the belt. The belt, in which tears are observed on at least 2 profile ribs, the length of which exceeds 13 mm, should be replaced.
 | 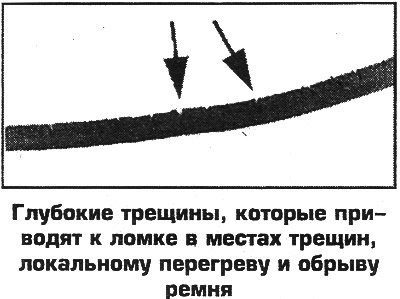 |
If 1-2 rare cracks are found across the profile ribs (not along!), then further operation of the belt is allowed. To check the condition of the belt, an indicator is provided on the tensioner lever, which should point to a rectangular mark on the tensioner bracket (photo). If the pointer goes beyond the mark, then the belt is stretched to the limit and must be replaced.
Belt tension check
Corrugated belts
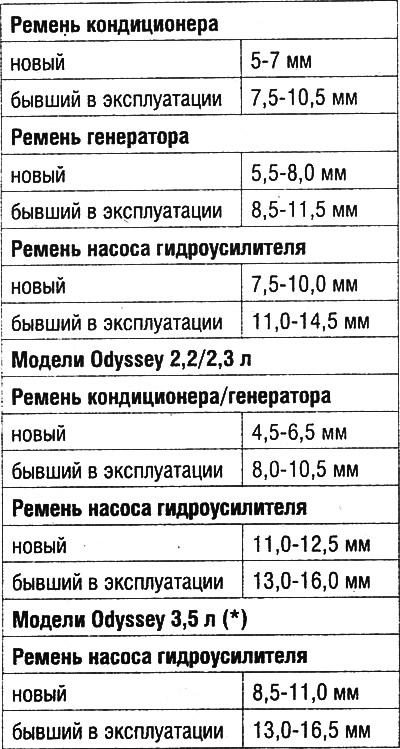
The tension of these belts is checked by deflection when a force of 10 kgf is applied in the middle between the pulleys, on the longest section of the belt. Before checking Disconnect the battery from the ground. The deflection of the belt when applying the specified force should be as follows.
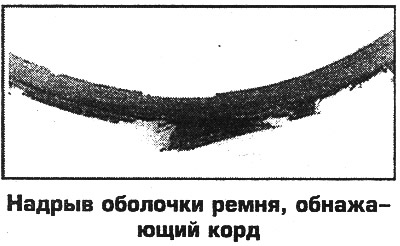
Typical corrugated belt damage: 1. Valid; 2. Invalid | 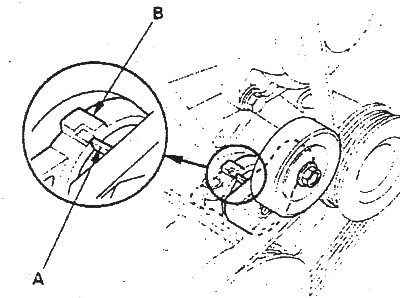
If pointer A is outside the wear indicator B, the corrugated belt must be replaced (Odyssey 3.5 l) |
Models CR-V
Corrugated V-Belts
(*) On this model, automatic tensioning of the alternator and air conditioning belts is provided. These belts are serpentine (those. rotate additional pulleys by touching it with the back side).
Serpentine belts
The tension of these belts is adjusted automatically by means of a spring-loaded roller.
The tensioner roller is also a wear indicator. When tensioned correctly, the pointer point on the tensioner arm is located within a small rectangular area on the tensioner housing. If the arrow goes beyond this area, then either the wrong type of belt is installed, or the belt is stretched. In this case, the belt should be replaced immediately. If, with the engine running, the pointer on the tensioner lever shifts noticeably, then you should check the condition of the belt, or the elasticity of the tensioner spring. To do this, do the following.
1. Remove the belt.
2. Turn away bolts and remove a tensioner.
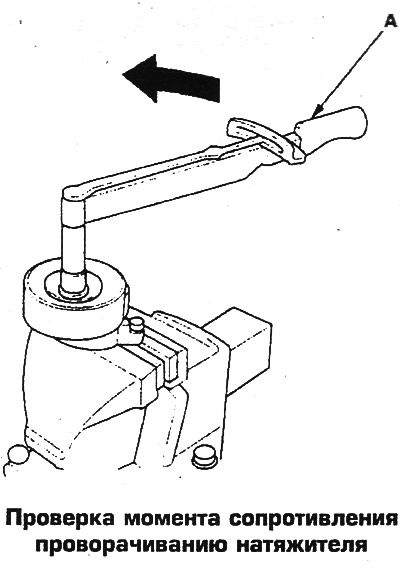
3. Insert the M6 bolts into the mounting holes of the tensioner, which are clamped in a vise, and check the moment of resistance to turning the tensioner, which must be at least 23 Nm. Otherwise, replace the tensioner.
Tension adjustment
Model CR-V
These models use 3 separate belts to drive the alternator, compressor and power steering pump.
A/C Compressor Belt
Belt tension is adjusted by moving the intermediate roller bracket in the slot. The roller bracket is attached to the engine with a bolt and nut.
1. Loosen the roller bracket axle bolt and bracket adjustment slot nut.
2. Turn the adjusting bolt to set the required belt tension.
3. Tighten the roller bracket axle bolt, then tighten the nut.
4. Check the tension, repeat the adjustment if necessary.
Generator belt
1. The tension of this belt is regulated by turning the generator about the axis with the nuts of the axle bolt and the stud fastening to the bracket released. The pin moves in the groove of the bracket.
2. After adjustment, tighten the top stud nut first, then the axle nut. Check tension, re-adjust if necessary.
Power steering pump belt
The pump is attached to the bracket with two bolts and nuts. The upper bolt is axial, and the lower one moves in the groove of the bracket.
1. Loosen the pump nuts (top first, then bottom).
2. Turn the pump with a wrench 1/2" (about 13 mm), inserted into a 4-sided hole in the pump housing near the top bolt.
3. After adjustment, tighten the upper axle nut first, then the lower axle nut. Check tension, re-adjust if necessary.
Odyssey 4-cylinder models
The Odyssey 2.2/2.3L models are fitted with corrugated profile belts, one of which is used to drive the alternator and compressor, and the other to drive the power steering pump.
Alternator/compressor belt
The tension of this belt is regulated by moving the generator in the slot of the bracket with the nuts / bolts released. The upper bolt is axial, and the lower one moves in the slot of the bracket. The generator moves by turning the adjusting bolt on the bottom bracket. Loosen the top nut first, then the bottom nut. After adjustment, tighten the top nut first, then the bottom nut. Check belt tension, readjust if necessary.
Power steering pump belt
The pump is attached to the bracket with two bolts and nuts. The upper bolt is axial, and the lower one moves in the groove of the bracket.
1. Loosen the pump nuts (top first, then bottom).
2. Adjust the belt tension by moving the pump by turning the adjusting bolt on the top bracket. Turning the bolt clockwise tightens the belt and vice versa.
3. After adjustment, tighten the upper axle nut first, then the lower one. Check tension, re-adjust if necessary.
Odyssey V6 Models
On these models, one belt is used to drive the alternator and compressor. The tension of this belt is automatically adjusted by a spring-loaded roller. A separate corrugated belt is used to drive the power steering pump. The tension is adjusted as follows.
1. Loosen the right pump fixing nut, then the left (axle bolt nut).
2. Turn the adjusting bolt to adjust the tension. Turning the bolt clockwise tightens the belt and vice versa.
3. After adjustment, tighten the right nut first, then the left. Check tension, re-adjust if necessary.
Belts - replacement
When replacing the belt, loosen the bolts / nuts securing the unit, loosen and remove the belt. The new belt should be installed so that it fits exactly on the pulley profile. Thoroughly clean the pulleys first.
Model CR-V
The belts are removed in the sequence: power steering pump belt - compressor belt - generator belt.
Generator belt
1. Remove power steering pump and compressor belts
2. Loosen the top nut, then the axle nut.
3. Move the alternator to the engine and remove the belt.
4. Installation is carried out in the reverse order. Put the new belt on the pulley with the largest diameter first. Adjust belt tension.
A/C Compressor Belt
1. Remove the power steering pump belt.
2. Loosen the roller bracket axle bolt and adjusting bolt nut. Loosen the adjusting bolt by turning it counterclockwise to the maximum slack.
3. Remove the belt.
4. Install the new belt in reverse order, first putting it on the pulley with the largest diameter. Adjust belt tension (including power steering pump belt)..
Power steering pump belt
1. Loosen the pump nuts (top first, then bottom).
2. Turn the pump with a wrench 1/2" (about 13 mm), inserted into a 4-sided hole in the pump housing near the top bolt.
3. Remove the belt.
4. Install the new belt in reverse order, first putting it on the pulley with the largest diameter. Adjust belt tension.
Odyssey 4-cylinder models
Alternator/compressor belt
1. Remove the power steering pump belt.
2. Loosen the nuts, first the top one, then the bottom one.
3. Turn the alternator adjusting bolt on the bottom bracket counterclockwise to loosen the belt and remove.
4. Install the new belt in reverse order, first putting it on the pulley with the largest diameter. Adjust belt tension.
5. Install the new belt in reverse order, first putting it on the pulley with the largest diameter. Adjust belt tension.
Power steering pump belt
1. Loosen the hydraulic booster pump mounting nuts (top first, then bottom).
2. Turn the alternator adjusting bolt on the top bracket counterclockwise to loosen the belt and remove.
3. Install the new belt in reverse order, first putting it on the pulley with the largest diameter. Tighten the top pump nut first, then the bottom (axle bolt nut). Adjust belt tension.
Odyssey V6 Models
Power steering pump belt
1. Loosen the right pump mounting nut, then the left axle bolt nut.
2. Turn the adjusting bolt on the right side of the pump to loosen the belt tension and remove the belt from the pulleys.
3. Install the new belt in reverse order, first putting it on the pulley with the largest diameter. Tighten the right pump mounting nut first, then the left one. Adjust belt tension.
Alternator/compressor belt
1. To remove the alternator/compressor belt, first remove the power steering pump belt.
2. Loosen the tensioner roller bracket bolt, move the roller and remove the belt. To retract the tensioner roller, put a socket head with an extension on the roller axle bolt. First of all, remove the belt from under the roller, then, while holding the roller, remove the belt from the adjacent pulley.
3. After removing the belt from the pulley, carefully return the roller to its original position, avoiding a sharp return under the action of the spring (as in this case the regulator mechanism may be damaged)..
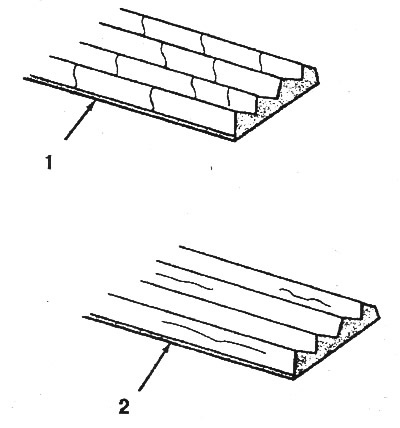
4. When installing a new belt, be especially careful to ensure that the profile of the belt exactly matches the ribbed profile of the pulleys (photo). Before removing the belt, it is recommended to mark the route of its passage in order to facilitate installation. Adjust the power steering pump belt. Warm up the engine when finished. Make sure the pointer on the tensioner is in the correct tension range.
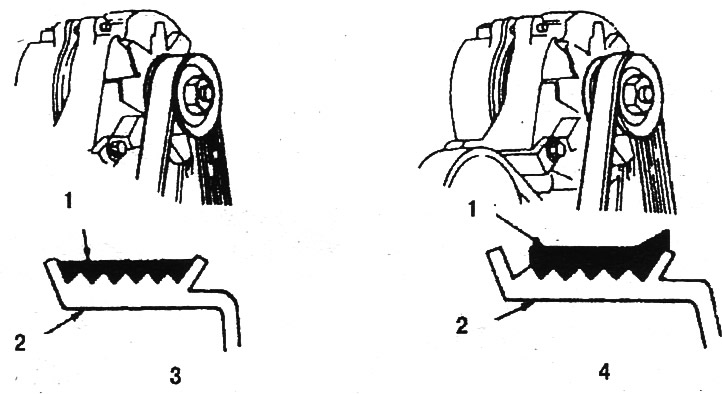
Correct location of the belt on the pulley: 1. Belt; 2. Pulley; 3. Correct; 4. Wrong