
HondaBook.ru
Auto companies Volkswagen Auto companies Ford Auto companies Lada Auto companies Skoda Auto companies BMW Auto companies Mazda Auto companies Peugeot
English Русский
Български
Беларускі
Український
Српски
Hrvatski
Română
Polski
Slovenský
Magyar
Bookmark Contacts Sitemap   


Accord Civic Fit / Jazz CR-V HR-V Others Articles
HR-V 1 (1998-2006, petrol)

Master cylinder, brake booster — check (Honda HR-V 1)

  • Main
  • Honda HR-V
  • 1 (1998-2006, petrol)
  • Chassis and running gear
  • Brake system
  • Master cylinder, brake booster — check
0
Contents: Leak test ⇊ Checking functionality ⇊ Checking the check valve ⇊

Leak test


1. Connect a vacuum gauge between the brake booster and the check valve.
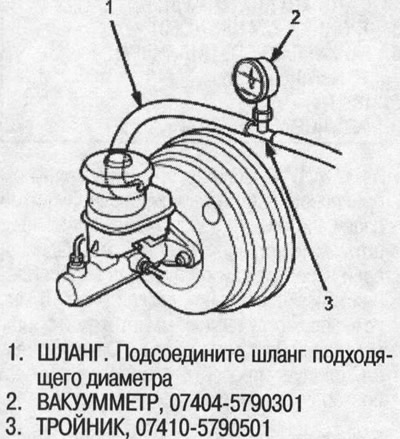
1. Connect a vacuum gauge between the brake…


2. Start the engine, adjust the engine speed with the accelerator pedal so that the vacuum gauge reading is 40.0-66.7 kPa (300-500 mmHg), then turn off the engine.

3. Take readings from the vacuum gauge.

4. If the vacuum gauge reading drops by 2.7 kPa (20 mmHg) or more after 30 seconds, check for leaks at the following components:
  • Check valve
  • Vacuum hose, tube
  • Seals
  • Brake booster
  • Master cylinder

Note: Do not attempt to disassemble the brake booster. Replace the brake booster assembly with a new one.


Checking functionality


1. Connect the vacuum gauge in the same way as when checking for leaks.

2. Using adapters (special tool), connect the oil pressure gauges to the master cylinder.

3. Release air through the fittings.
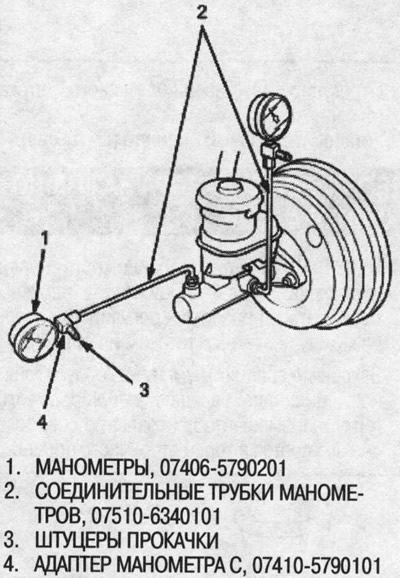
3. Release air through the fittings.


4. Start the engine and let it run at idle speed.


5. Ask an assistant to press the brake pedal with a force of 98 N (10 kgf/m).
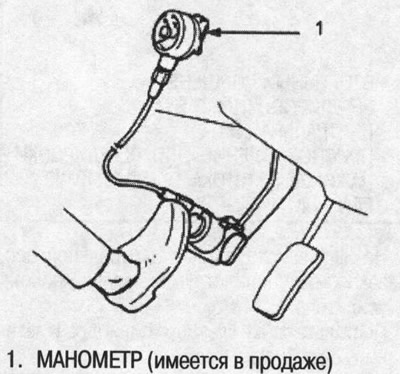
5. Ask an assistant to press the brake pedal with…


6. At each vacuum value, the following pressure values should be observed on the pressure gauges.

Vacuum, kPa (mmHg)N (kgf/m)kPa (kgf/cm²)
0(0)98 (10)0 (0)
294 (30)1400 (14)
66,7 (500)98(10)3600 (37)
294 (30)9000 (292)

7. If the reading is outside the range specified above, check the master cylinder for leaks.

Checking the check valve


1. Disconnect the vacuum hose from the brake booster.

2. Start the engine and let it idle. There should be a vacuum. If there is no vacuum, the check valve is not working properly. Replace the check valve and retest.
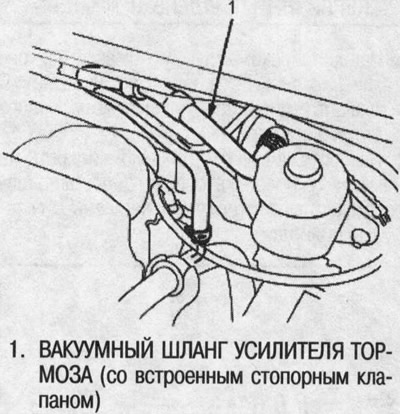
2. Start the engine and let it idle. There should…
This article is available at: russian, bulgarian, belarusian, ukrainian, serbian, croatian, romanian, polish, slovak, hungarian
This information has been verified: Emil Safonov
Share with friends:
◀ Previous
HR-V 1: Brake system
Next ▶

Adjusting the clearance of the push rod
Master Cylinder, Brake Booster — Assembly
Master cylinder, brake booster — disassembly
Master cylinder, brake booster — removal and installation
Front Brake Caliper — Disassembly and Assembly
Rear wheel drum brakes
Checking drum brakes
Replacing drum brake shoes
Slave cylinder — disassembly and inspection
Brake Hoses and Tubes — Checking and Tightening Torques
See also other articles from Honda manuals:
Master brake cylinder Honda Accord 3 (1985-1989)
Master Brake Cylinder — Brake Booster Honda Civic 5 and 6 (1991-2000)
Master Brake Cylinder — Removal and Installation Honda Fit 1 (2001-2008)
Brake master cylinder Honda CR-V 1 (1995-2001, petrol)
Master Cylinder and Brake Booster — Removal and Installation Honda Avancier 1 (1999-2003, petrol)
Link in different formats to this article
Comments and feedback from visitors
No comments yet


How much will 31 + 18 ?


HR-V 1 (1998-2006, petrol) 
  • General information
  • User manual
  • Maintenance
  • Power unit
  • Engine repair
  • Lubrication system
  • Cooling system
  • Fuel injection and control
  • Power and exhaust system
  • Engine electrical equipment
  • Transmission
  • Clutch
  • Mechanical gearbox
  • Automatic gearbox
  • Rear differential
  • Drive shafts and cardan
  • Chassis and running gear
  • Steering
  • Car suspension
  • Brake system
  • Body and interior
  • Exterior (external elements)
  • Interior (internal elements)
  • Doors, locks and windows
  • Electrical equipment
  • Equipment and devices
  • Lighting system
  • Electrical circuits
HondaBook.ru © 2018–2026 • Mobile version • Sitemap: EN BG BY UA RS HR RO PL SK HU • Feedback • Driver Information • Search system • Bookmark
Accord 3 (1985-1989) • Accord 6 (1997-2002) • Civic 3 and 4 (1983-1991) • Civic 5 and 6 (1991-2000) • Civic 6 (1995-2000) • Civic 7 (2000-2005) • Civic 8 (2005-2011) • Fit 1 (2001-2008) • CR-V 1 (1995-2001) • CR-V 2 (2002-2006) • HR-V 1 (1998-2006) • Avancier 1 (1999-2003) •
 
This website uses cookies to ensure proper functioning. By clicking "OK," you agree.