
HondaBook.ru
Auto companies Volkswagen Auto companies Ford Auto companies Lada Auto companies Skoda Auto companies BMW Auto companies Mazda Auto companies Peugeot
English Русский
Български
Беларускі
Український
Српски
Hrvatski
Română
Polski
Slovenský
Magyar
Bookmark Contacts Sitemap   


Accord Civic Fit / Jazz CR-V HR-V Others Articles
HR-V 1 (1998-2006, petrol)

Front Brake Disc — Checking Runout (Honda HR-V 1)

  • Main
  • Honda HR-V
  • 1 (1998-2006, petrol)
  • Chassis and running gear
  • Brake system
  • Front Brake Disc — Checking Runout
0
1. Slightly loosen the front wheel nuts, then raise the vehicle and secure it on safety stands. Remove the front wheels.

2. Remove the brake pads (see above).

3. Check the disc surface for damage and cracks. Clean the disc thoroughly and remove all rust.

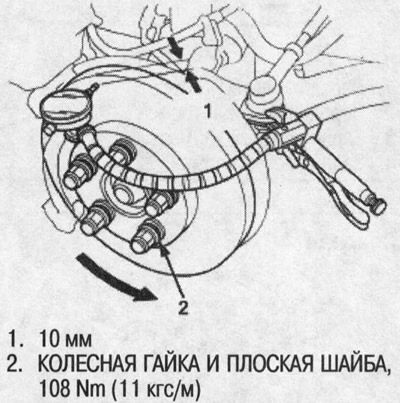
4. Securely fix the disc to the hub using wheel nuts and suitable flat washers, then install the indicator as shown in the figure and measure the runout at a distance of 10 mm from the edge of the disc.

Brake disc runout: Limit: 0.10 mm.

5. If the disc runout is greater than the allowable limit, regrind the brake disc on a lathe designed for boring brake drums on an automobile. Kwik Lathe machines manufactured by Kwik-way Manufacturing Co. and Front Brake Disc Lathe machines offered by Snap-on Tools Co. are recommended for this operation.

Regrinding limit: 21.0 mm.
Regrinding limit: 21.0 mm.


Note: A new disc must be reground if its runout exceeds 0.10 mm.
This article is available at: russian, bulgarian, belarusian, ukrainian, serbian, croatian, romanian, polish, slovak, hungarian
This information has been verified: Emil Safonov
Share with friends:
◀ Previous
HR-V 1: Brake system
Next ▶

Front Brake Pads — Checking and Replacing
Testing the brake fluid level sensor
Testing the Parking Brake Switch
Brake system indicator wiring diagram
Bleeding the brake system
Checking the thickness and parallelism of the disc
Front Brake Caliper — Disassembly and Assembly
Master cylinder, brake booster — removal and installation
Master cylinder, brake booster — disassembly
Master Cylinder, Brake Booster — Assembly
See also other articles from Honda manuals:
Front Disc Brake Pads — Inspection Honda Accord 3 (1985-1989)
Checking the condition, removing and installing the brake disc Honda Civic 6 (1995-2000)
Checking the brake fluid level Honda Fit 1 (2001-2008)
Checking the runout of the front brake disc Honda CR-V 2 (2002-2006, petrol)
Front brake discs — check for runout Honda Avancier 1 (1999-2003, petrol)
Link in different formats to this article
Comments and feedback from visitors
No comments yet


How much will 25 + 34 ?


HR-V 1 (1998-2006, petrol) 
  • General information
  • User manual
  • Maintenance
  • Power unit
  • Engine repair
  • Lubrication system
  • Cooling system
  • Fuel injection and control
  • Power and exhaust system
  • Engine electrical equipment
  • Transmission
  • Clutch
  • Mechanical gearbox
  • Automatic gearbox
  • Rear differential
  • Drive shafts and cardan
  • Chassis and running gear
  • Steering
  • Car suspension
  • Brake system
  • Body and interior
  • Exterior (external elements)
  • Interior (internal elements)
  • Doors, locks and windows
  • Electrical equipment
  • Equipment and devices
  • Lighting system
  • Electrical circuits
HondaBook.ru © 2018–2026 • Mobile version • Sitemap: EN BG BY UA RS HR RO PL SK HU • Feedback • Driver Information • Search system • Bookmark
Accord 3 (1985-1989) • Accord 6 (1997-2002) • Civic 3 and 4 (1983-1991) • Civic 5 and 6 (1991-2000) • Civic 6 (1995-2000) • Civic 7 (2000-2005) • Civic 8 (2005-2011) • Fit 1 (2001-2008) • CR-V 1 (1995-2001) • CR-V 2 (2002-2006) • HR-V 1 (1998-2006) • Avancier 1 (1999-2003) •
 
This website uses cookies to ensure proper functioning. By clicking "OK," you agree.