


Drive and cardan shafts of the car Honda HR-V 1

Checking drive shafts
1. Check the inner and outer boots on the drive shaft for cracks, damage, grease leakage, and loose boot clamps. If any damage is found, replace the boots and boot clamps. 2. Turn the drive shaft by hand and make sure...
1. Check the inner and outer boots on the drive shaft for cracks, damage, grease leakage, and loose boot clamps. If any damage is found, replace the boots and boot clamps. 2. Turn the drive shaft by hand and make sure...

Removal drive shafts
1. Loosen the wheel nuts slightly. 2. Raise the front of the vehicle and securely fasten it to the safety stands at the designated points ( see chapter 1 ). 3. Loosen the wheel nuts and remove the front wheels. 4. Bend...
1. Loosen the wheel nuts slightly. 2. Raise the front of the vehicle and securely fasten it to the safety stands at the designated points ( see chapter 1 ). 3. Loosen the wheel nuts and remove the front wheels. 4. Bend...

Disassembling drive shafts
From the inner hinge side 1. Remove the snap ring from the inner joint. 2. Remove the clips from the covers. Be careful not to damage the cover and the dynamic shock absorber. If the clamps of the covers are of the...
From the inner hinge side 1. Remove the snap ring from the inner joint. 2. Remove the clips from the covers. Be careful not to damage the cover and the dynamic shock absorber. If the clamps of the covers are of the...

Description of the design of drive shafts
1. left drive shaft; 2. Replace the retaining ring; 3. internal hinge; 4. ring clamp; 5. roller; 6. crosspiece; 7. Inner cover. Fill the cavity with grease; 8. cover clamps, replace; 9. fill the cavity with grease; 10....
1. left drive shaft; 2. Replace the retaining ring; 3. internal hinge; 4. ring clamp; 5. roller; 6. crosspiece; 7. Inner cover. Fill the cavity with grease; 8. cover clamps, replace; 9. fill the cavity with grease; 10....

Assembly of drive shafts
Note: Clean disassembled parts thoroughly with solvent and dry with compressed air. Do not wash rubber parts in solvent. Thoroughly pack both pivots and both pivot boots with the grease supplied with the new drive...
Note: Clean disassembled parts thoroughly with solvent and dry with compressed air. Do not wash rubber parts in solvent. Thoroughly pack both pivots and both pivot boots with the grease supplied with the new drive...

Installation of drive shafts
1. Place a new snap ring into the groove on the drive shaft. 2. Thoroughly clean the drive shaft and differential joint areas with solvent or carburetor cleaner and dry with compressed air. Insert the inner end of the...
1. Place a new snap ring into the groove on the drive shaft. 2. Thoroughly clean the drive shaft and differential joint areas with solvent or carburetor cleaner and dry with compressed air. Insert the inner end of the...

Removal the rear drive shaft
1. Loosen the wheel nuts slightly. 2. Raise the rear of the vehicle and secure it to the safety stands at the designated points ( see chapter 1 ). 3. Loosen the wheel nuts and remove the rear wheels. 4. Drain the oil...
1. Loosen the wheel nuts slightly. 2. Raise the rear of the vehicle and secure it to the safety stands at the designated points ( see chapter 1 ). 3. Loosen the wheel nuts and remove the rear wheels. 4. Drain the oil...

Disassembling the rear drive shaft
From the inner hinge side 1. Remove the snap ring from the inner joint. 2. Remove the clips from the covers. Be careful not to damage the cover and the dynamic shock absorber. If the clamps of the covers are of the...
From the inner hinge side 1. Remove the snap ring from the inner joint. 2. Remove the clips from the covers. Be careful not to damage the cover and the dynamic shock absorber. If the clamps of the covers are of the...
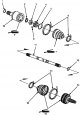
Description of the design of the rear drive shafts
Perform the assembly taking into account the following: Clean disassembled parts thoroughly with solvent and dry with compressed air. Do not wash rubber parts in solvent. Thoroughly pack both pivots and both pivot boots...
Perform the assembly taking into account the following: Clean disassembled parts thoroughly with solvent and dry with compressed air. Do not wash rubber parts in solvent. Thoroughly pack both pivots and both pivot boots...

Rear Drive Shaft Assembly
From the inner hinge side 1. To avoid damaging the inner boot, wrap the drive shaft splines with vinyl tape. 2. Install the inner boot on the drive shaft, then remove the vinyl tape. Do not damage the inner boot. 3....
From the inner hinge side 1. To avoid damaging the inner boot, wrap the drive shaft splines with vinyl tape. 2. Install the inner boot on the drive shaft, then remove the vinyl tape. Do not damage the inner boot. 3....

Installing the rear drive shaft
1. Place a new snap ring on the outer joint. 2. Using the special tool, install the rear drive shaft as shown in the figure. 3. Unscrew the two mounting bolts of the support disk. 4. Install the rear wheel hub bearing...
1. Place a new snap ring on the outer joint. 2. Using the special tool, install the rear drive shaft as shown in the figure. 3. Unscrew the two mounting bolts of the support disk. 4. Install the rear wheel hub bearing...

Removal the intermediate shaft
1. Drain the MTF or ATT fluid. 2. Remove the left drive shaft ( see above ). 3. Unscrew the three mounting bolts. 4. Remove the intermediate shaft from the differential. To avoid damaging the differential seal, hold the...
1. Drain the MTF or ATT fluid. 2. Remove the left drive shaft ( see above ). 3. Unscrew the three mounting bolts. 4. Remove the intermediate shaft from the differential. To avoid damaging the differential seal, hold the...

Installing the intermediate shaft
1. Thoroughly clean the areas where the intermediate shaft and gearbox (differential) meet with solvent or carburetor cleaner and dry with compressed air. Insert the intermediate shaft assembly into the differential. To...
1. Thoroughly clean the areas where the intermediate shaft and gearbox (differential) meet with solvent or carburetor cleaner and dry with compressed air. Insert the intermediate shaft assembly into the differential. To...

Disassembling the intermediate shaft
Note: Be careful not to damage the metal rings on the intermediate shaft during assembly. 1. Remove the retaining ring. 2. Remove the intermediate shaft outer seal from the bearing support. 3. Remove the outer ring...
Note: Be careful not to damage the metal rings on the intermediate shaft during assembly. 1. Remove the retaining ring. 2. Remove the intermediate shaft outer seal from the bearing support. 3. Remove the outer ring...

Description of the design of the intermediate shaft
Note: Clean disassembled parts thoroughly with solvent and dry with compressed air. Do not wash rubber parts in solvent. When assembling, do not damage the metal rings on the intermediate shaft. 1. intermediate shaft;...
Note: Clean disassembled parts thoroughly with solvent and dry with compressed air. Do not wash rubber parts in solvent. When assembling, do not damage the metal rings on the intermediate shaft. 1. intermediate shaft;...

Assembling the intermediate shaft
1. Using the special tool, press the intermediate shaft bearing into the bearing support as shown in the figure. 1. MARKET, 52x55 mm, 07746-0010400 2. Press in 3. MANDREL HANDLE, 07749-0010000 4. BEARING 2. Place the...
1. Using the special tool, press the intermediate shaft bearing into the bearing support as shown in the figure. 1. MARKET, 52x55 mm, 07746-0010400 2. Press in 3. MANDREL HANDLE, 07749-0010000 4. BEARING 2. Place the...

Checking the cardan shaft
1. Shift to neutral (manual transmission) or position N (automatic transmission). 2. Raise the vehicle with all four wheels off the ground and securely support it on the safety stands at the designated points. 3. Check...
1. Shift to neutral (manual transmission) or position N (automatic transmission). 2. Raise the vehicle with all four wheels off the ground and securely support it on the safety stands at the designated points. 3. Check...

Removal the propeller shaft
1. Raise the vehicle with four wheels off the ground and place it on safety stands at the designated points. 2. Apply marks to the flanges of the propeller shaft and transfer case. 3. Separate the propeller shaft from...
1. Raise the vehicle with four wheels off the ground and place it on safety stands at the designated points. 2. Apply marks to the flanges of the propeller shaft and transfer case. 3. Separate the propeller shaft from...

Installing the cardan shaft
1. Install the middle support bearing 1. Middle support bearing 2. 10x1.25 mm, 39 Nm (4.0 kgf/m) 2. Attach the driveshaft to the rear differential, aligning the marks. 1. CARDAN SHAFT 2. Tags 3. REAR DIFFERENTIAL 4....
1. Install the middle support bearing 1. Middle support bearing 2. 10x1.25 mm, 39 Nm (4.0 kgf/m) 2. Attach the driveshaft to the rear differential, aligning the marks. 1. CARDAN SHAFT 2. Tags 3. REAR DIFFERENTIAL 4....
This section is available on: russian, bulgarian, belarusian, ukrainian, serbian, croatian, romanian, polish, slovak, hungarian
Link in different formats to this section
TEXTHTMLBB Code
- General information
- User manual
- Maintenance
- Power unit
- Engine repair
- Lubrication system
- Cooling system
- Fuel injection and control
- Power and exhaust system
- Engine electrical equipment
- Transmission
- Clutch
- Mechanical gearbox
- Automatic gearbox
- Rear differential
- Drive shafts and cardan
- Chassis and running gear
- Steering
- Car suspension
- Brake system
- Body and interior
- Exterior (external elements)
- Interior (internal elements)
- Doors, locks and windows
- Electrical equipment
- Equipment and devices
- Lighting system
- Electrical circuits