
Note:
- Do not spill brake fluid on your car as it may damage the paintwork; if liquid does spill, wash it off immediately with water.
- Clean all components in brake fluid and dry in open air; blow out all channels with compressed air.
- Before assembly, make sure that the components are free of dust and other foreign particles.
- Replace parts with new ones when instructed to do so.
- Do not allow dirt or other foreign material to enter the brake fluid.
- Do not reuse drained brake fluid.
- Use only clean Genuine Honda brake fluid or equivalent DOT3 or DOT4 brake fluid.
- When assembling, lubricate all components with clean brake fluid.
- In case of disassembly, replace all rubber parts with new ones.
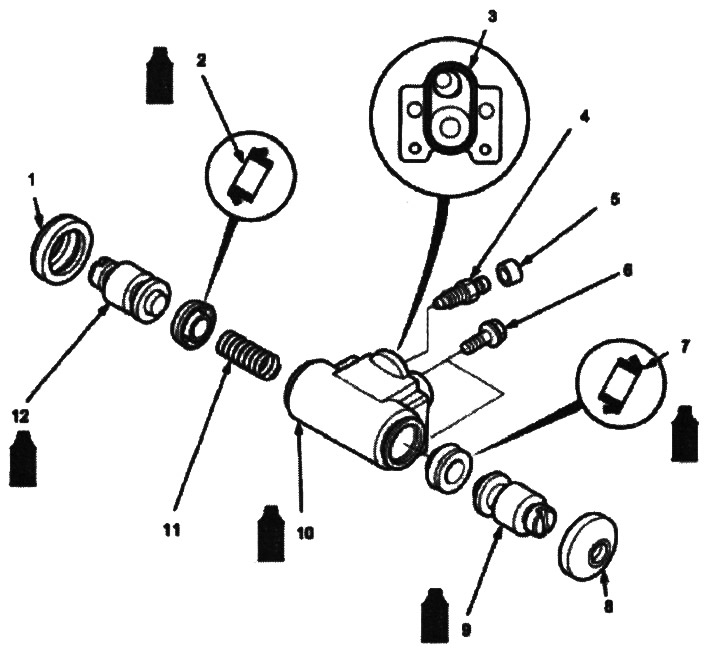
1. DUST COVER. Replace
2. PISTON CUFF. Replace.
Note: Install with the edge facing inward.
3. When installing the slave cylinder to the support plate, apply sealant to this area.
Note: Do not apply sealant to threads.
4. BLEEDER PIPE, 7 Nm (0.7 kgf/m)
5. BLEEDER CAP
6. Bolt 6 mm, 9 Nm (0.9 kgf/m)
7. PISTON CUFF. Replace
Note: Install with the edge facing inward.
8. DUST COVER. Replace
9. PISTON. Check for scratches and gouges.
10. WORKING CYLINDER. Check the cylinder walls for scratches and burrs.
11.SLAVE CYLINDER SPRING. Check for looseness and damage
12. PISTON. Check for scratches and gouges.