
HondaBook.ru
Auto companies Volkswagen Auto companies Ford Auto companies Lada Auto companies Skoda Auto companies BMW Auto companies Mazda Auto companies Peugeot
English Русский
Български
Беларускі
Український
Српски
Hrvatski
Română
Polski
Slovenský
Magyar
Bookmark Contacts Sitemap   


Accord Civic Fit / Jazz CR-V HR-V Others Articles
HR-V 1 (1998-2006, petrol)

Parking Brake Cable — Checking and Replacing (Honda HR-V 1)

  • Main
  • Honda HR-V
  • 1 (1998-2006, petrol)
  • Chassis and running gear
  • Brake system
  • Parking Brake Cable — Checking and Replacing
0
Note: Parking brake cables must not be bent or deformed. Otherwise, it will cause harsh operation and premature failure of the cable.
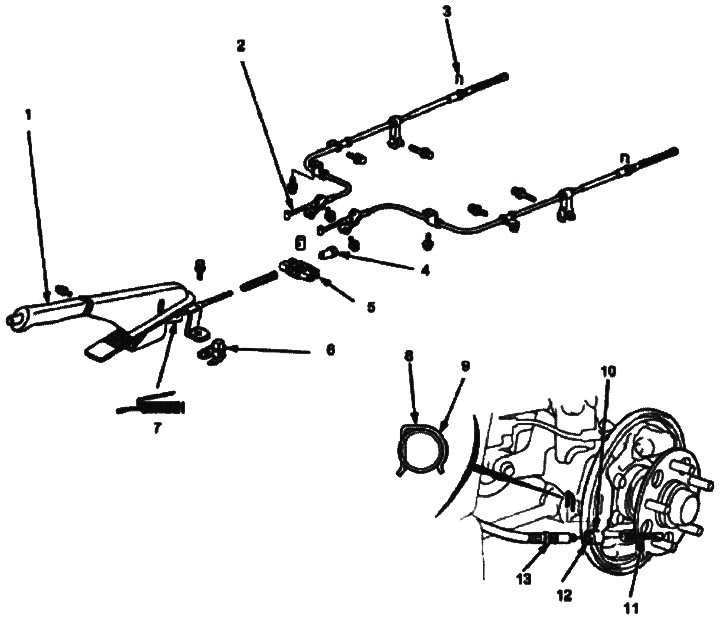

1. PARKING BRAKE LEVER. Check for smooth operation

1. PARKING BRAKE LEVER. Check for smooth operation
2. PARKING BRAKE CABLE. Check for binding
3. CLAMP
4. ADJUSTING NUT
5. EQUALIZER
6. PARKING BRAKE SWITCH
7. (Sliding surface)
8. CLAMP
9. Rounded side
10. CABLE HOLDER
11. PARKING BRAKE CABLE
12. PAZ
13. PERFORMANCE


1. Remove the brake pads (see above) and disconnect the parking brake cable from the parking brake lever.

2. Remove the clamp from the cable holder on the support plate.

3. Remove the parking brake cable end from the support disc.

4. Insert the parking brake into the cable holder and connect the cable end to the parking brake lever.

5. Align the groove of the cable holder with the lug on the cable. Place the clamp into the groove of the cable holder. Make sure the rounded side of the clamp faces outward (towards the support plate).

(You will find the original on the portal HondaBook.ru)
This article is available at: russian, bulgarian, belarusian, ukrainian, serbian, croatian, romanian, polish, slovak, hungarian
This information has been verified: Emil Safonov
Share with friends:
◀ Previous
HR-V 1: Brake system
Next ▶

Replacing brake hoses
Brake Hoses and Tubes — Checking and Tightening Torques
Slave cylinder — disassembly and inspection
Replacing drum brake shoes
Checking drum brakes
Location of ABS system components
Characteristics and design of the ABS system
Electrical diagram of the ABS system
ABS control unit pin location
ABS troubleshooting precautions
See also other articles from Honda manuals:
Checking the condition and replacing brake lines and hoses Honda Accord 6 (1997-2002)
Replacing the parking brake cable Honda Civic 3 and 4 (1983-1991)
Parking brake — checking and adjusting Honda Fit 1 (2001-2008)
Replacing the parking brake cable Honda CR-V 2 (2002-2006, petrol)
Parking Brake Cable — Assembly Honda Avancier 1 (1999-2003, petrol)
Link in different formats to this article
Comments and feedback from visitors
No comments yet


How much will 48 + 26 ?


HR-V 1 (1998-2006, petrol) 
  • General information
  • User manual
  • Maintenance
  • Power unit
  • Engine repair
  • Lubrication system
  • Cooling system
  • Fuel injection and control
  • Power and exhaust system
  • Engine electrical equipment
  • Transmission
  • Clutch
  • Mechanical gearbox
  • Automatic gearbox
  • Rear differential
  • Drive shafts and cardan
  • Chassis and running gear
  • Steering
  • Car suspension
  • Brake system
  • Body and interior
  • Exterior (external elements)
  • Interior (internal elements)
  • Doors, locks and windows
  • Electrical equipment
  • Equipment and devices
  • Lighting system
  • Electrical circuits
HondaBook.ru © 2018–2026 • Mobile version • Sitemap: EN BG BY UA RS HR RO PL SK HU • Feedback • Driver Information • Search system • Bookmark
Accord 3 (1985-1989) • Accord 6 (1997-2002) • Civic 3 and 4 (1983-1991) • Civic 5 and 6 (1991-2000) • Civic 6 (1995-2000) • Civic 7 (2000-2005) • Civic 8 (2005-2011) • Fit 1 (2001-2008) • CR-V 1 (1995-2001) • CR-V 2 (2002-2006) • HR-V 1 (1998-2006) • Avancier 1 (1999-2003) •
 
This website uses cookies to ensure proper functioning. By clicking "OK," you agree.