
HondaBook.ru
Auto companies Volkswagen Auto companies Ford Auto companies Lada Auto companies Skoda Auto companies BMW Auto companies Mazda Auto companies Peugeot
English Русский
Български
Беларускі
Український
Српски
Hrvatski
Română
Polski
Slovenský
Magyar
Bookmark Contacts Sitemap   


Accord Civic Fit / Jazz CR-V HR-V Others Articles
HR-V 1 (1998-2006, petrol)

Front Brake Caliper — Disassembly and Assembly (Honda HR-V 1)

  • Main
  • Honda HR-V
  • 1 (1998-2006, petrol)
  • Chassis and running gear
  • Brake system
  • Front Brake Caliper — Disassembly and Assembly
0
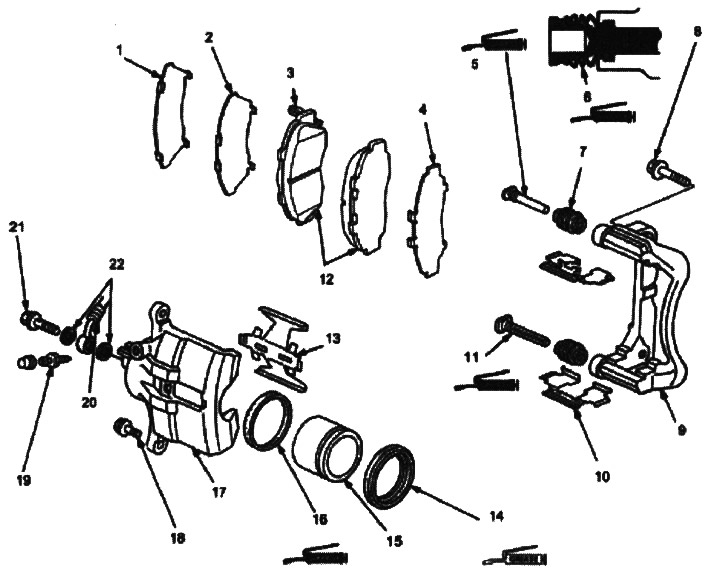
1. INNER GASKET B

1. INNER GASKET B
2. INNER GASKET A
3. WEAR INDICATOR. Install the inner pad with the wear indicator facing up.
4. OUTER BRAKE PAD GASKET
5. FINGER B
6. FINGER ANTHROAT
7. PIN BOOT. Replace
8. BOLTS WITH SHELL 12 mm, 113 Nm (11.5 kgf/m)
9. CALIPER BRACKET
10. BRAKE SHOE HOLDERS
11. FINGER A
12. BRAKE PADS
13. SHOE SPRING
14. COVER DUSTER. Replace
15. PISTON
16. PISTON SEAL. Replace
17. CALIPER HOUSING
18. CALIPER BOLTS, 49 Nm (5.0 kgf/m)
19. BLEEDER PIPE, 9 Nm (0.9 kgf/m)
20. BRAKE HOSE
21. EYE BOLT, 34 Nm (3.5 kgf/m)
22. SEALING WASHERS


Warning! Frequent inhalation of dust from brake pad surfaces, regardless of the material composition, may pose a health hazard.
  • Do not inhale dust.
  • Do not clean brake surfaces with compressed air or a brush. Use a vacuum cleaner.


Note


Do not spill brake fluid on your car as it may damage the paintwork; if liquid does spill, wash it off immediately with water.

To prevent liquid from spilling, cover the hose joints with rags or napkins.

Clean all components in brake fluid and dry in open air; blow out all channels with compressed air.

Before assembly, make sure that the components are free of dust and other foreign particles.


Replace parts with new ones when instructed to do so.

Do not allow dirt or other foreign matter to enter the brake fluid.

Dirty brake discs or pads increase braking distance.

When reusing brake pads, always install them in their original position to avoid loss of braking efficiency.

Do not reuse drained brake fluid.

Use only clean Genuine Honda brake fluid or equivalent DOT3 or DOT4 brake fluid.

Apply clean brake fluid to the piston and piston cylinder walls.

In case of disassembly, replace all rubber parts with new ones.

After installing the front wheel brake caliper:

Check for leaks at hose and tube joints or fittings and tighten if necessary.

Check that the brake hoses are not obstructed or kinked.
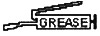
Use the recommended rubber lubricant included with the caliper seal kit.

Use the recommended seal lubricant included with the caliper seal kit.

(Original article on the website: hondabook.ru)
This article is available at: russian, bulgarian, belarusian, ukrainian, serbian, croatian, romanian, polish, slovak, hungarian
This information has been verified: Emil Safonov
Share with friends:
◀ Previous
HR-V 1: Brake system
Next ▶

Checking the thickness and parallelism of the disc
Front Brake Disc — Checking Runout
Front Brake Pads — Checking and Replacing
Testing the brake fluid level sensor
Testing the Parking Brake Switch
Master cylinder, brake booster — removal and installation
Master cylinder, brake booster — disassembly
Master Cylinder, Brake Booster — Assembly
Adjusting the clearance of the push rod
Master cylinder, brake booster — check
See also other articles from Honda manuals:
Front Brake Caliper — Removal and Installation Honda Accord 3 (1985-1989)
Disc Brake Caliper — Removal, Repair and Installation Honda Civic 3 and 4 (1983-1991)
Removal the front brake pad support Honda Fit 1 (2001-2008)
Front Wheel Brake Caliper Repair Honda CR-V 2 (2002-2006, petrol)
Front Brake Caliper — Disassembly Honda Avancier 1 (1999-2003, petrol)
Link in different formats to this article
Comments and feedback from visitors
No comments yet


How much will 26 + 41 ?


HR-V 1 (1998-2006, petrol) 
  • General information
  • User manual
  • Maintenance
  • Power unit
  • Engine repair
  • Lubrication system
  • Cooling system
  • Fuel injection and control
  • Power and exhaust system
  • Engine electrical equipment
  • Transmission
  • Clutch
  • Mechanical gearbox
  • Automatic gearbox
  • Rear differential
  • Drive shafts and cardan
  • Chassis and running gear
  • Steering
  • Car suspension
  • Brake system
  • Body and interior
  • Exterior (external elements)
  • Interior (internal elements)
  • Doors, locks and windows
  • Electrical equipment
  • Equipment and devices
  • Lighting system
  • Electrical circuits
HondaBook.ru © 2018–2026 • Mobile version • Sitemap: EN BG BY UA RS HR RO PL SK HU • Feedback • Driver Information • Search system • Bookmark
Accord 3 (1985-1989) • Accord 6 (1997-2002) • Civic 3 and 4 (1983-1991) • Civic 5 and 6 (1991-2000) • Civic 6 (1995-2000) • Civic 7 (2000-2005) • Civic 8 (2005-2011) • Fit 1 (2001-2008) • CR-V 1 (1995-2001) • CR-V 2 (2002-2006) • HR-V 1 (1998-2006) • Avancier 1 (1999-2003) •
 
This website uses cookies to ensure proper functioning. By clicking "OK," you agree.