
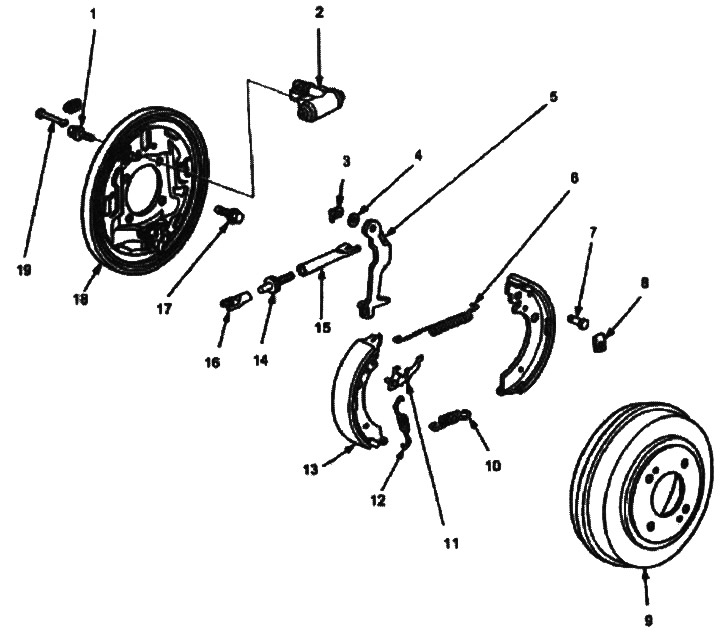
1. 9 Nm (0.9 kgf/m)
2. WORKING CYLINDER. Check for leakage. Disassembly / Inspection (see below)
3. CLAMP. Replace
4. WAVY WASHER
5. PARKING BRAKE LEVER Marked on the left and right.
6. UPPER RETURN SPRING, Check for looseness and damage
7. AXIS
8. RETAINER SPRING. Attach securely to tension pin
9. BRAKE DRUM. Examination (see below)
10. LOWER RETURN SPRING. Check for looseness and damage
11. LEVER
12. SPRING Check for looseness and damage
13. BRAKE SHOE. Examination (see below). If pads are reused, mark and install in the same position
14. REGULATOR BOLT. Check ratchet teeth for wear and damage
15. EARRING A
16. EARRING B
17.10 mm bolt, 64 Nm (6.5 kgf/m)
18. SUPPORT DISC. Has labels on the left and right.
19. TENSIONING PIN
Warning! Frequent inhalation of dust from brake pad surfaces, regardless of the composition of the material, can be hazardous to your health.
- Do not inhale dust.
- Do not clean brake surfaces with compressed air or a brush. Use a vacuum cleaner.
Note:
- Dirty brake linings or drums increase the stopping distance.
- Place wedges under the front wheels before jacking up the rear of the vehicle.
- 1. Raise the rear of the vehicle and secure it to the safety stands.
- 2. Release the parking brake and remove the brake drum from the rear wheel.