
HondaBook.ru
Auto companies Volkswagen Auto companies Ford Auto companies Lada Auto companies Skoda Auto companies BMW Auto companies Mazda Auto companies Peugeot
English Русский
Български
Беларускі
Український
Српски
Hrvatski
Română
Polski
Slovenský
Magyar
Bookmark Contacts Sitemap   


Accord Civic Fit / Jazz CR-V HR-V Others Articles
CR-V 1 (1995-2001, petrol) CR-V 2 (2002-2006, petrol)

Removal the crankshaft and pistons (Honda CR-V 2)

  • Main
  • Honda CR-V
  • 2 (2002-2006, petrol)
  • Power unit
  • Engine repair
  • Removal the crankshaft and pistons
0
1. Remove the engine assembly.

2. Remove the gearbox.

3. Remove the oil pan.

4. Remove the oil pump.

5. Remove the cylinder head.

6. Remove the mud deflectors.
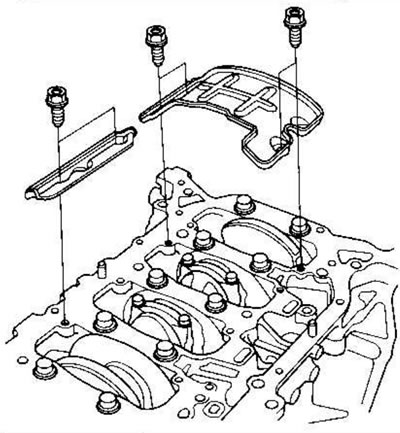
6. Remove the mud deflectors.


7. Remove the 8mm bolts.
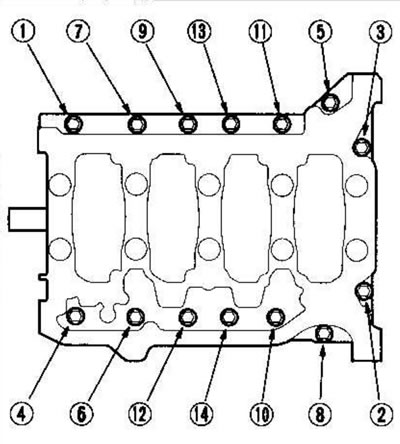
7. Remove the 8mm bolts.


8. Unscrew the bearing cap bolts. To avoid warping, loosen the bolts sequentially 1/3 turn at a time; repeat the operation until all bolts are loosened.
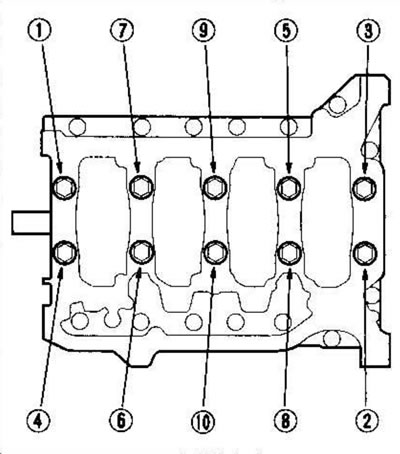
8. Unscrew the bearing cap bolts. To avoid…


9. Remove the lower block and bearings. Place the bearings in order.


10. Remove the bearings/connecting rod caps. Place all caps/bearings in order.
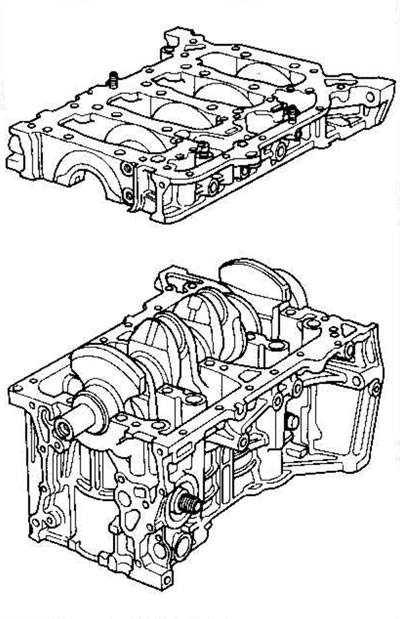
10. Remove the bearings/connecting rod caps.…


11. Remove the crankshaft from the engine, being careful not to damage the journals.
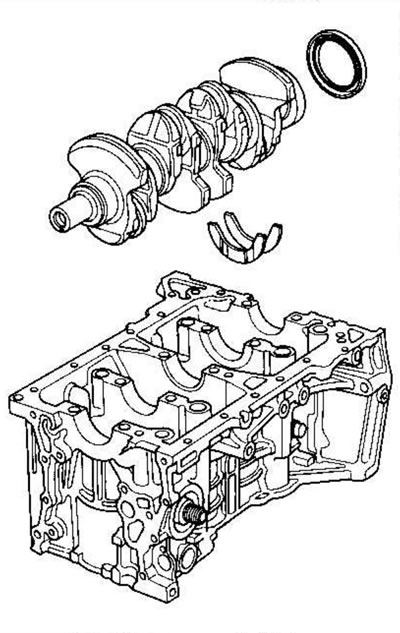
11. Remove the crankshaft from the engine, being…


12. Remove the upper bearing shells from the connecting rods and set them aside along with the caps.

13. If you feel a ring of metal or hard carbon deposits on the top of the cylinders, remove it with a reamer (A). Follow the reamer manufacturer's instructions. If the ring lip is not removed, it can damage the pistons when they are pushed out.
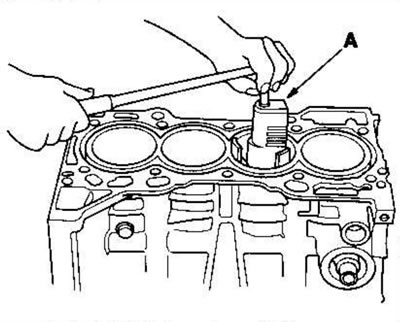
13. If you feel a ring of metal or hard carbon…


14. Push out the pistons (B) with the wooden handle of the hammer (A).
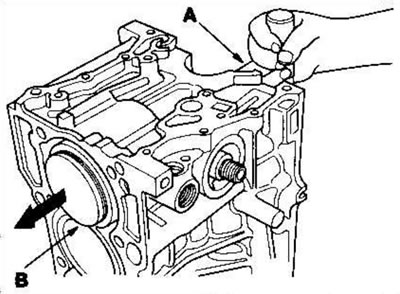


14. Push out the pistons (B) with the wooden…


15. Reinstall the lower block and bearings into the engine in the proper order.

16. After removing the connecting rod and piston groups, reinstall the connecting rod bearings and their caps.

17. To avoid confusion during reassembly, mark each connecting rod and piston group according to its cylinder number.

The number on the connecting rod does not indicate its location in the engine, but the diameter of the large head of the connecting rod.
This article is available at: russian, bulgarian, belarusian, ukrainian, serbian, croatian, romanian, polish, slovak, hungarian
This information has been verified: Mikhail Kopasov
Share with friends:
◀ Previous
CR-V 2: Engine repair
Next ▶

Removal the oil pan
Replacing connecting rod bearings
Selection of main bearings
Replacing the crankshaft main bearings
Checking the axial play of the connecting rod and crankshaft
Checking the crankshaft
Checking the cylinder block and pistons
Clearance between piston and cylinder wall
Cylinder wall honing
Replacement of pistons, piston pins and connecting rods
See also other articles from Honda manuals:
Pistons and connecting rods — removal Honda Accord 3 (1985-1989)
Pistons and crankshaft Honda Civic 5 and 6 (1991-2000)
Removal the crankshaft and pistons Honda Fit 1 (2001-2008)
Pistons and Crankshaft — Removal Honda HR-V 1 (1998-2006, petrol)
Replacing the crankshaft pulley and pulley bolt Honda Avancier 1 (1999-2003, petrol)
Link in different formats to this article
Comments and feedback from visitors
No comments yet


How much will 23 + 12 ?


CR-V 2 (2002-2006, petrol) 
  • General information
  • User manual
  • Technical data
  • Maintenance
  • Power unit
  • Engine repair
  • Lubrication system
  • Cooling system
  • Exhaust system
  • Fuel system
  • Engine management
  • Engine electrical equipment
  • Transmission
  • Clutch
  • Manual gearbox
  • Automatic gearbox
  • Rear differential
  • Drive shafts
  • Chassis and running gear
  • Steering
  • Front suspension
  • Rear suspension
  • Brake system
  • Body and interior
  • Exterior (external elements)
  • Interior (internal elements)
  • Doors, locks and windows
CR-V 1 (1995-2001, petrol) 
  • General information
  • Maintenance
  • Tips for car owner
  • Power unit
  • Engine repair
  • Engine overhaul
  • Cooling and lubrication system
  • Engine electrical equipment
  • Control system
  • Fuel system
  • Transmission
  • Clutch and drive shafts
  • Car gearbox
  • Chassis and running gear
  • Front suspension
  • Rear suspension
  • Steering
  • Brake system
  • Body and interior
  • Body service
  • Exterior (external elements)
  • Interior (internal elements)
  • Electrical equipment
  • Equipment and devices
  • Electrical circuits
HondaBook.ru © 2018–2026 • Mobile version • Sitemap: EN BG BY UA RS HR RO PL SK HU • Feedback • Driver Information • Search system • Bookmark
Accord 3 (1985-1989) • Accord 6 (1997-2002) • Civic 3 and 4 (1983-1991) • Civic 5 and 6 (1991-2000) • Civic 6 (1995-2000) • Civic 7 (2000-2005) • Civic 8 (2005-2011) • Fit 1 (2001-2008) • CR-V 1 (1995-2001) • CR-V 2 (2002-2006) • HR-V 1 (1998-2006) • Avancier 1 (1999-2003) •
 
This website uses cookies to ensure proper functioning. By clicking "OK," you agree.