
Withdrawal
1. Disconnect the battery from the ground.
2. Remove the bolt at the bottom of the washer reservoir.
3. Open the hood and use spacers to fix it in a vertical position.
4. Remove the air filter, resonator cover and air duct.
5. Remove the battery, battery tray, disconnect the wire clamps, and remove the relay post and battery bracket.
6. Raise the vehicle and drain the transmission fluid.
7. Disconnect the cooler hoses, disconnect the wires and remove the starter.
8. Designate and disconnect the connectors from the transmission, unscrew the bolts of the connector brackets and the wiring cover, remove the cover from the transmission hook.
9. Turn away a nut of a forward support of the engine, disconnect a vacuum tube lying nearby.
10. Turn away the top bolts of fastening of transmission.
11. Remove decorative covers of the engine.
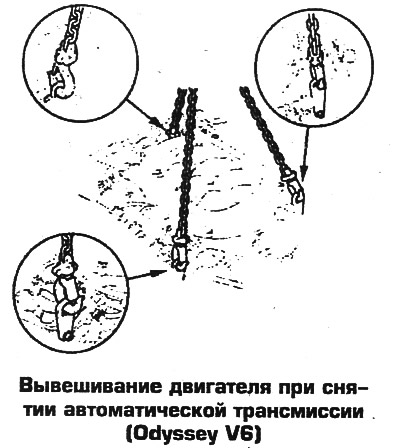
12. Hang the engine with 3 hoists, slightly lifting it up.
13. Remove the bottom guard of the engine.
14. Remove the front exhaust pipe along with the converter.
15. Disconnect the stabilizer link and lower ball joints.
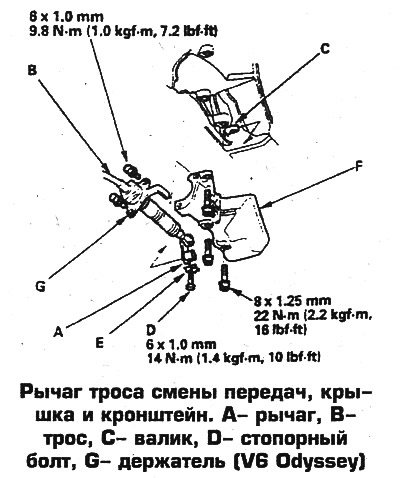
16. Turn away bolts and remove a cover of a cable of management of transmission, turn away a bolt and disconnect a cable.
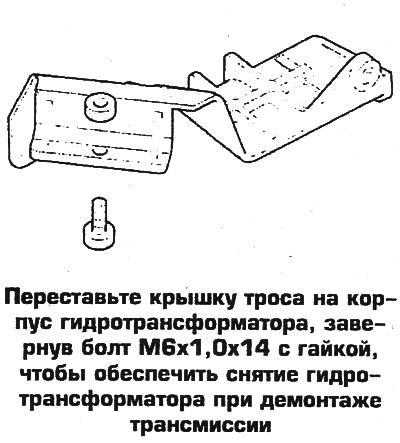
17. Move the cable cover to the torque converter housing by screwing the M6x1.0x14 bolt with a nut.
18. Remove the torque converter cover and unscrew the 8 torque converter mounting bolts one at a time, turning the crankshaft.
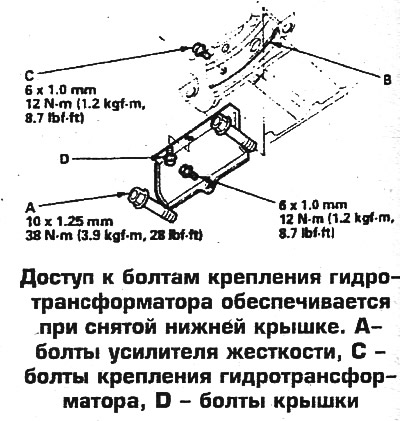
19. Turn away bolts of fastening of the amplifier of rigidity.
20. Remove the power steering hose bracket and power steering tube bracket, unscrew the steering gear mounting bolt. Remove the stiffener from the steering mechanism. -
21. Turn away bolts of fastening of a flange of a back driveshaft.
22. Turn away bolts of an arm of the hydraulic booster, release tubes from collars.
23. Turn away the bottom nuts of fastening of transmission.
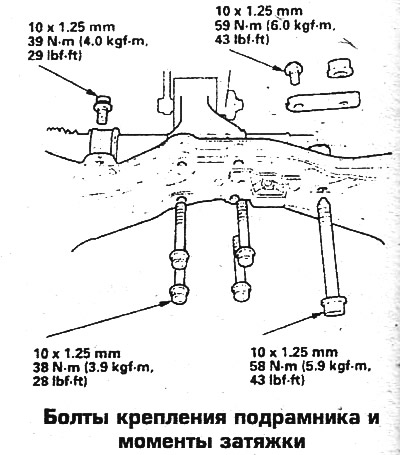
24. Mark the position of the subframe relative to the body, unscrew the bolts and remove the subframe.
25. Fasten the end of the steering mechanism on the passenger side to the body by wrapping it with a strong rope.
26. Remove the lower transmission mounts.
27. Disconnect from the transmission and from the intermediate shaft of the axle shaft, prying them up and moving them to the side.
28. Turn away bolts and remove an intermediate shaft of a semiaxis.
29. With all transmission mountings removed, lower the transmission and carefully tilt the engine until the transmission is clear of the subframe.
30. Place a jack cart under the transmission, shift the transmission so that it is off the pins and lower it onto the jack cart. If the torque converter does not move away from the drive plate, then feed it towards the transmission through the starter opening.
31. Remove the rearranged cable cover together with the torque converter.
Installation
32. Flush the transmission cooling line with a high pressure jet using Honda's (or Kent-Moore) J38405-A (composition of a different type is prohibited) with hot water. The concentration of the composition is 600 g/l, the flushing pressure is 5.5-8.3 atm. The washing procedure is indicated in the instructions attached to the composition.
33. Install the lower transmission support and tighten the bolts to 38 Nm.
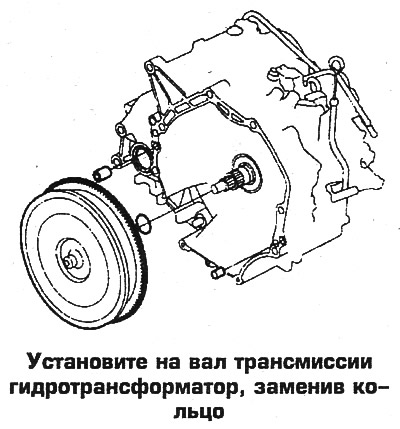
34. Install the torque converter on the transmission shaft, replacing the ring.
35. Install 14 and 10 mm guide pins into the converter housing.
36. Place the transmission on a jack and raise to the level of the engine. Install the transmission in place and tighten the bolts evenly to 64 Nm.
37. Install the front support bracket, tighten the bolts to 38 Nm.
38. Install the stiffener and tighten the bolts to 38 Nm.
39. Wrap 8 bolts of fastening of the hydrotransformer to a leading disk. Tighten the bolts evenly in 2 stages, in the 1st stage with a torque of 6 Nm, in the 2nd stage with a torque of 12 Nm. After tightening, check the freedom of rotation of the torque converter.
40. Install the torque converter housing cover.
41. Check the torque of the flywheel bolt, which should be 245 Nm.
42. Install cable and cable cover.
43. Establish semiaxes, having replaced lock rings.
44. Install the subframe, aligning the marks made during disassembly (lift the subframe with a jack, laying wooden bars). Tighten the bolts with the torques shown in the photo and at the end of this Chapter
45. Wrap nuts of the bottom fastening of transmission.
46. Install the power steering tube bracket.
47. Attach the driveshaft to the transmission shaft flange.
48. Install the stiffener on the steering mechanism and tighten the bolts to a torque of 58 Nm.
49. Wrap a bolt of fastening of the steering mechanism and fix a collar of a tube of the hydraulic booster on an arm.
50. Install the stabilizer bar removed, attach the ball joints.
51. Install the front exhaust pipe, replacing the gasket.
52. Install the engine bottom shield.
53. Wrap the upper transmission mounting bolts, tighten them with a torque of 64 Nm.
54. Install all other removed parts in reverse order, attach cables and wires. Fill the transmission with fluid when finished (see Chap. 1) and check the front wheel alignment. Warm up the Engine. Drive, after which loosen the engine mount nut and tighten again with a torque of 54 Nm.
 |  |