
Withdrawal
1. Disconnect the battery from the ground, move the transmission selector to position N.
2. Remove the air filter and air duct.
3. Identify and disconnect all wires preventing transmission removal, disconnect transmission throttle cable, move aside and secure, remove wire holders (cables). Disconnect the wires from the starter, remove the starter wire holder by unscrewing the bolts.
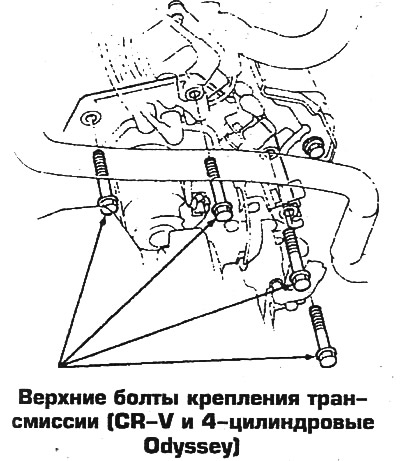
4. Loosen the 4 upper bolts securing the transmission to the engine, do not completely unscrew the bolts. If necessary, slightly feed the lower radiator hose up and towards the cylinder block.
5. Release 3 bolts of fastening of an arm of a forward support of the engine.
6. Raise the vehicle, remove the front wheels and any necessary mudguards that prevent access to the transmission and subframe beam.
7. Drain the transmission fluid. Disconnect hoses from transmission and shut off.
8. Remove the central beam of the subframe.
9. Disconnect the ball joints from the suspension arms.
10. Disconnect the lower fork of the right shock absorber from the suspension strut by unscrewing the pinch bolt.
11. Turn away bolts and disconnect a bar from the right suspension arm, remove a bar from a forward beam of a subframe.
12. Pry off with a mount and remove the axle shaft from the differential, take it aside and fix it. Attach the right axle shaft to the suspension arm.
13. Remove an intermediate shaft, having turned away bolts of fastening of an arm to the block of cylinders.
14. Remove the torque converter housing cover and shift cable retainer.
15. Turn away a bolt and remove a cable of management of transmission. Remove the drive lever from the transmission shaft, do not disconnect the lever from the cable. Take the cable aside, without bending, and secure.
16. On CR-V models, remove the shaft flange mounting bolts on the transfer case.
17. Turn away bolts of fastening of the hydrotransformer, turning a crankshaft..
18. Install a jack under the transmission. Remove the support from the transmission case, do not remove the bracket.
19. Turn away the top and bottom bolts of fastening of transmission. Remove the rear support bracket from the transmission case. First unscrew the through bolt of the bracket.
20. Remove the transmission by applying from the engine (so that the transmission comes off the pins) and lowered.
Installation
21. Flush the transmission cooling line with a high pressure jet using Honda or Kent-Moore J38405-A (composition of a different type is prohibited). The concentration of the composition is 600 g/l, the flushing pressure is 5.5-8.3 atm. The washing procedure is indicated in the instructions attached to the composition.
22. Check for the presence of 14 mm pins on the converter housing.
23. Install the torque converter on the transmission shaft, replacing the ring. Install the starter on the transmission case and tighten the bolts.
24. Install the transmission and evenly tighten the bolts to 65 Nm.
25. Install the rear support bracket to the transmission case, replacing the 3 bolts. Tighten the through bolt with a torque of 64 Nm. (if this bolt is released).
26. Install the manifold stand.
27. Install the transmission support. Tighten the through bolt by hand. Tighten the nuts from the support to 38 Nm, then tighten the through bolt to 65 Nm.
28. Tighten the three front support bracket bolts to 38 Nm.
29. Remove the jack from under the transmission.
30. Wrap 8 bolts of fastening of the hydrotransformer to a leading disk. Tighten the bolts evenly in 2 stages, in the 1st stage with a torque of 6 Nm, in the 2nd stage with a torque of 12 Nm. After tightening, check the freedom of rotation of the torque converter.
31. Reinstall all removed parts in reverse order. Check the flywheel bolt torque, which should be 177 Nm on CR-V models and 245 Nm on 4-cylinder Odyssey models. When assembling the disassembled suspension connections, place a jack under the right steering knuckle so that the weight of the car is perceived by the jack. Tighten the strut damper fork coupling bolt to 44 Nm, the rod bolts to 103 Nm, and the rod nut to 32 Nm. While holding the yoke with a wrench, tighten the nut to 55 Nm. When finished, fill the transmission with fluid.
32. Do not disconnect the flush hose from the transmission cooler until the end of the assembly. Upon completion of assembly, run the engine for 30 seconds, or until about 0.9 liters of coolant has been released. This completes the coolant flush process. Remove the flush hose and connect the hose from the car's radiator.
33. At the end, warm up the engine, drive and check the tightness of the transmission mounts, check the angles of the front wheels.