HondaBook.ru
Auto companies Volkswagen Auto companies Ford Auto companies Lada Auto companies Skoda Auto companies BMW Auto companies Mazda Auto companies Peugeot
English Русский
Български
Беларускі
Український
Српски
Hrvatski
Română
Polski
Slovenský
Magyar
Bookmark Contacts Sitemap   


Accord Civic Fit / Jazz CR-V HR-V Others Articles
CR-V 1 (1995-2001, petrol) CR-V 2 (2002-2006, petrol)

Testing of cruise control units and mechanisms (Honda CR-V 2)

  • Main
  • Honda CR-V
  • 2 (2002-2006, petrol)
  • Power unit
  • Engine electrical equipment
  • Testing of cruise control units and mechanisms
0
Contents: Testing/replacing the main switch ⇊ Testing/replacing the…⇊ Testing the drive ⇊ Replacing the drive/cable ⇊ Adjusting the drive cable ⇊ Testing the Clutch Pedal Position…⇊

Testing/replacing the main switch


Testing/replacing the main switch


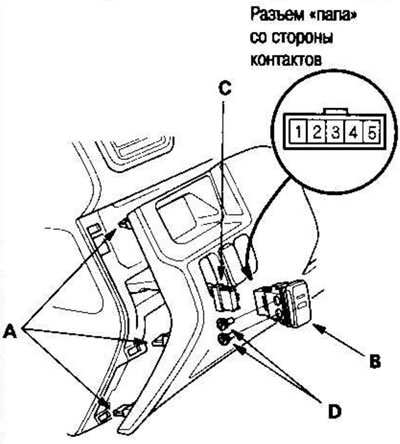
1. Separate the three clips (A) and create a gap between the bulkhead and the instrument panel.

2. Release the main switch clamps and push the main switch (B) out of the panel, then disconnect the 5-pin connector (C) from the main switch.

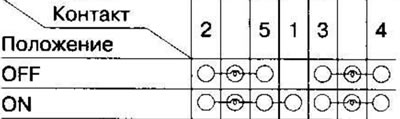
3. Check if there is conductivity between the contacts in each switch position according to the table. If there is no continuity, replace the backlight bulbs (D) or the switch.
3. Check if there is conductivity between the…


Testing/replacing the SET/RESUME/CANCEL switch


Testing/replacing the SET/RESUME/CANCEL switch


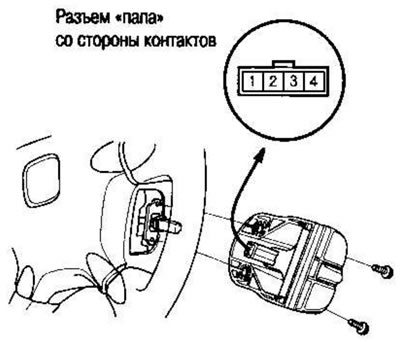
1. Remove the two screws, then remove the switch.


2. Check if there is conductivity between the contacts in each switch position according to the table.
  • If continuity is present and within the table, but the cruise control unit input test fails to switch, check the wiring harness in the switching circuit and troubleshoot.
  • If there is no continuity in one or both positions, replace the switch.
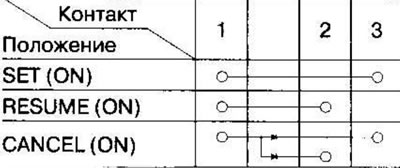
If there is no continuity in one or both…


Testing the drive


1. Disconnect the 4-pin connector (A) from the actuator (B).
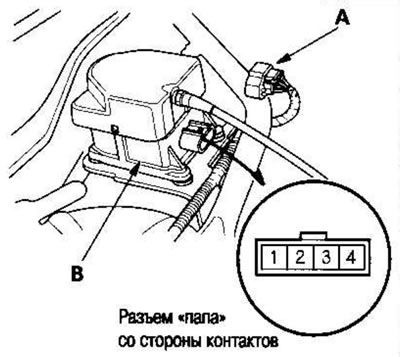
1. Disconnect the 4-pin connector (A) from the…


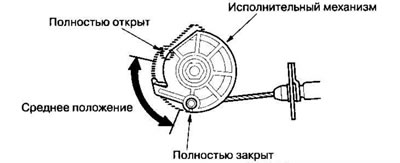
2. Remove the cover (A) and check if the actuator (B) moves smoothly.
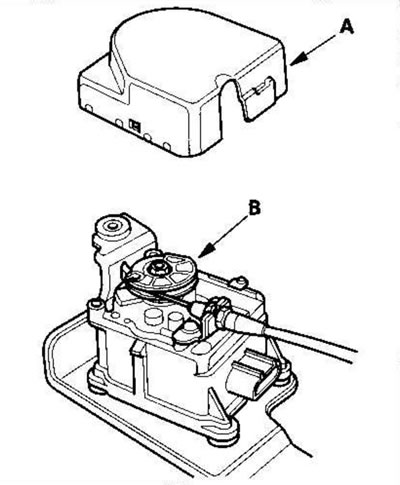
2. Remove the cover (A) and check if the actuator…


3. Apply battery power to pin #2 and ground to pin #1.


4, Check whether the magnetic clutch makes a clicking sound. The actuator must be locked.

5. If the actuator is not locked, replace the actuator assembly.

6. Check the operation of the drive motor in each position of the actuator according to the table. You should hear the engine noise.

7. If the drive motor does not operate as specified, replace the drive assembly.

Polarity of battery power supplyPosition of the actuator
(+)(-)COMPLETELY CLOSEDMIDDLE POSITIONFULLY OPEN
Contact #4Contact #3The engine is runningThe engine is runningThe engine is not working
Contact #3Contact #4The engine is not workingThe engine is runningThe engine is running

Contact #3Contact #4The engine is not workingThe…


Replacing the drive/cable


1. Remove the throttle cable cover (A), fully open the cruise control rod by hand, then remove the cruise control cable (B) from the rod. Loosen the lock nut (C) and remove the cable from the bracket.
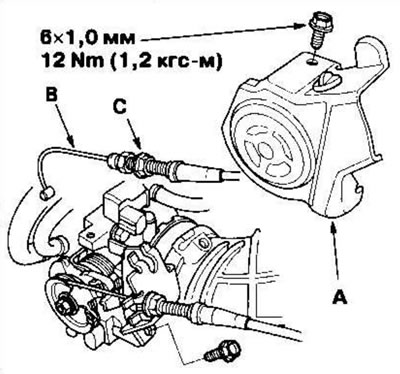
1. Remove the throttle cable cover (A), fully…


2. Disconnect the 4-pin connector and remove the two bolts securing the drive.
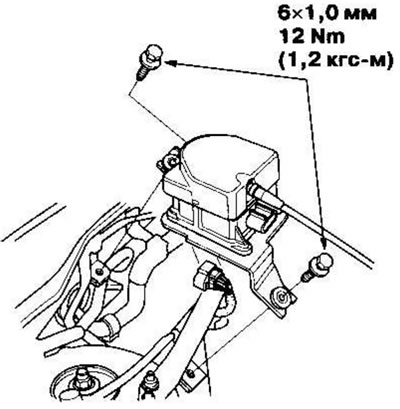


2. Disconnect the 4-pin connector and remove the…


3. Remove the cover (A) from the drive, then remove the cable (B) from the drive.

4. Installation is carried out in the reverse order of removal. After connecting the cable to the drive, adjust the play on the throttle linkage.

Left hand drive models
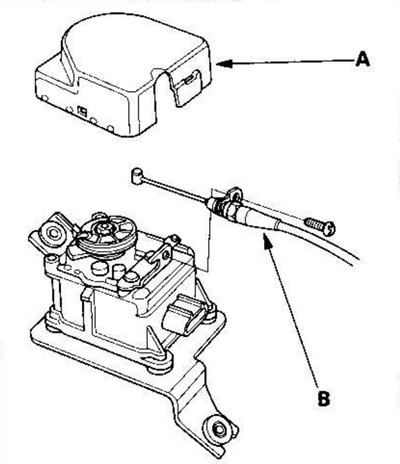


Left hand drive models


Right hand drive models
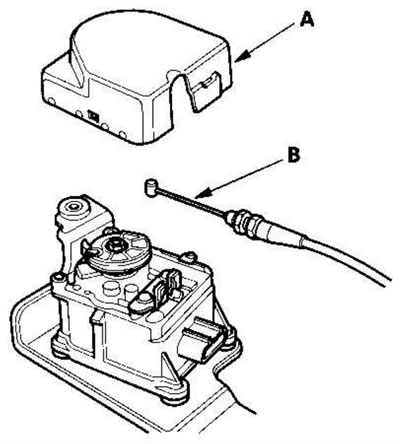


Right hand drive models


Adjusting the drive cable


1. Make sure the drive cable (A) moves smoothly without binding or sticking.
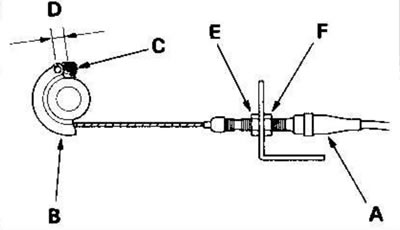


1. Make sure the drive cable (A) moves smoothly…


2. Measure the stroke of the actuator (B) until the engine speed begins to increase. At first the actuator should be in the fully closed position (C). The clearance should be 3.75±0.5 mm.

3. If the play is large, loosen the lock nut (E) and turn the adjusting nut (F) until the required play is achieved, then tighten the lock nut.

Testing the Clutch Pedal Position Switch


1. Disconnect the 2-pin connector from the clutch pedal position switch (A).
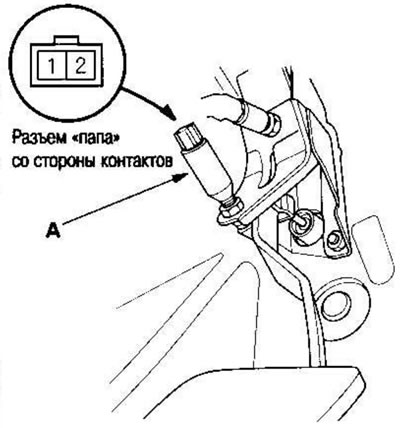
1. Disconnect the 2-pin connector from the clutch…


2. Remove the clutch pedal position switch.

3. Check if there is conductivity between the contacts according to the table.
  • If the continuity is not as specified, replace the clutch pedal position switch.
  • If it does, install the clutch pedal position switch and adjust the pedal height.
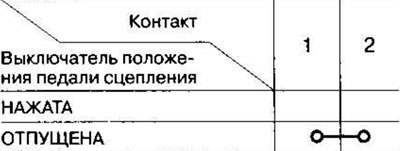

If it does, install the clutch pedal position…


[The original text of the article is located on the website: HondaBook.ru]
This article is available at: russian, bulgarian, belarusian, ukrainian, serbian, croatian, romanian, polish, slovak, hungarian
This information has been verified: Mikhail Kopasov
Share with friends:
◀ Previous
CR-V 2: Engine electrical equipment
Next ▶

Testing the signal at the input of the cruise control unit
Cruise control
Car Generator
Generator belt
Charging system
 
See also other articles from Honda manuals:
Cruise Control Diagnostic Chart — 1986-89 Accord Honda Accord 3 (1985-1989)
Vehicle speed control system (cruise control) Honda Civic 3 and 4 (1983-1991)
Windscreen wiper and washer control Honda Fit 1 (2001-2008)
Testing the Generator Control System (KG, KE, KQ and KU Models) Honda HR-V 1 (1998-2006, petrol)
Adaptive Cruise Control (IHCC) System — Device Honda Avancier 1 (1999-2003, petrol)
Link in different formats to this article
Comments and feedback from visitors
No comments yet


How much will 20 + 20 ?


CR-V 2 (2002-2006, petrol) 
  • General information
  • User manual
  • Technical data
  • Maintenance
  • Power unit
  • Engine repair
  • Lubrication system
  • Cooling system
  • Exhaust system
  • Fuel system
  • Engine management
  • Engine electrical equipment
  • Transmission
  • Clutch
  • Manual gearbox
  • Automatic gearbox
  • Rear differential
  • Drive shafts
  • Chassis and running gear
  • Steering
  • Front suspension
  • Rear suspension
  • Brake system
  • Body and interior
  • Exterior (external elements)
  • Interior (internal elements)
  • Doors, locks and windows
CR-V 1 (1995-2001, petrol) 
  • General information
  • Maintenance
  • Tips for car owner
  • Power unit
  • Engine repair
  • Engine overhaul
  • Cooling and lubrication system
  • Engine electrical equipment
  • Control system
  • Fuel system
  • Transmission
  • Clutch and drive shafts
  • Car gearbox
  • Chassis and running gear
  • Front suspension
  • Rear suspension
  • Steering
  • Brake system
  • Body and interior
  • Body service
  • Exterior (external elements)
  • Interior (internal elements)
  • Electrical equipment
  • Equipment and devices
  • Electrical circuits
HondaBook.ru © 2018–2026 • Mobile version • Sitemap: EN BG BY UA RS HR RO PL SK HU • Feedback • Driver Information • Search system • Bookmark
Accord 3 (1985-1989) • Accord 6 (1997-2002) • Civic 3 and 4 (1983-1991) • Civic 5 and 6 (1991-2000) • Civic 6 (1995-2000) • Civic 7 (2000-2005) • Civic 8 (2005-2011) • Fit 1 (2001-2008) • CR-V 1 (1995-2001) • CR-V 2 (2002-2006) • HR-V 1 (1998-2006) • Avancier 1 (1999-2003) •
 
This website uses cookies to ensure proper functioning. By clicking "OK," you agree.