
Note: Before performing any starter function tests, make sure that the hard starting condition is not caused by a low battery level.
If the starter does not turn at all when the ignition key is turned to the START position, first of all, perform the following simple checks:
- a) Check the battery charge level, as well as the condition and reliability of the wires on the battery terminals and the starter solenoid relay;
- b) Check the condition of the battery cables (see Section Checking the condition and replacing battery wires). Replace defective components;
- c) Check the battery status (see Section Checking the battery status and replacing it). If necessary, replace it with a new one;
- d) Check the condition of the starter wiring and terminal connections;
- e) Check that the starter mounting bolts are securely tightened;
- f) If equipped, check the condition of the fuse links in the fuse box in the engine compartment of the vehicle (see Chapter On-board electrical equipment). If any of the inserts fail, investigate and eliminate the causes of the overload. Also check the proper functioning of the ignition switch circuit (see Chapter On-board electrical equipment);
- g) Check the proper operation of the start enable switch (models with automatic transmission)/starter circuit cut-off switch (models with manual transmission). The engine can only be started when the gear selector lever is in the "P" or "N" position (automatic transmission), or the clutch pedal is fully depressed (manual transmission).
- h) Check the proper functioning of the starter relay located in the fuse/relay box in the engine compartment of the vehicle (see Chapter On-board electrical equipment).
If the starter does not turn when the ignition key is turned to the START position, check for proper battery power to the solenoid. Connect a voltmeter to the "S" terminal of the solenoid and have an assistant crank the engine. The voltmeter should read the battery voltage. If you do not have a voltmeter, refer to the wiring diagrams in Chapter On-board electrical equipment of this Manual and check the condition of all fuses and relays connected in series to the engine charging circuit. Locate the fuse box on the left under the dashboard of the car and check fuse No.13 for 7.5 A. Also check the correct operation of the starter cut-off relay. If voltage is present, but the starter does not turn, remove the starter assembly from the engine (see Section Removal and installation the starter) and test it on the workbench.
If the starter turns the crankshaft too slowly, it is necessary to check the value of the supply voltage to it. The check is carried out without removing the starter from the car. Do not turn on the starter for more than 10 seconds at a time. During engine cranking, the voltage should not fall below 8.0 V on models with a manual transmission and below 8.5 V on models with automatic transmission. Using an ammeter, measure the current flowing in the starter circuit. Nominal values are no more than 380 A for models with automatic transmission and no more than 280 A for models with automatic transmission, otherwise replace the assembly. Various parameters can affect the serviceability of the starter cranking. For example, the battery must be fully charged, the terminal connections of its wires must not be damaged by corrosion, the engine block must not be overcooled.
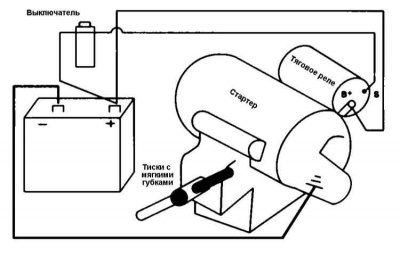
If the starter does not rotate, despite the correct power supply to it, remove the assembly and transfer it to a workbench. Most likely, there is an internal defect in the electric motor. In some cases, the cause is a jammed engine and to eliminate this, it is necessary to check the correct operation of turning the crankshaft manually by the pulley (see Chapter Engine). Clamp the starter assembly with the solenoid relay in a vice with soft jaws and connect its negative terminal (-) to the housing with a jumper wire. Use a second jumper wire to connect the positive terminal of the battery to the B+ terminal of the starter. Connect the starter switch and apply power to the S terminal of the solenoid relay (for no more than 10 seconds). Make sure that the plunger of the solenoid relay extends forward, accordingly displacing the drive lever and overrunning clutch, and that the extended starter pinion begins to rotate properly. If the pinion extends but does not rotate, then the electric motor is faulty. If the plunger does not extend, despite the correct clicking of the relay, any component of the assembly may be faulty. In good condition, the pinion should extend and rotate when power is applied.
(The article was taken from the website www.hondabook.ru)