
HondaBook.ru
Auto companies Volkswagen Auto companies Ford Auto companies Lada Auto companies Skoda Auto companies BMW Auto companies Mazda Auto companies Peugeot
English Русский
Български
Беларускі
Український
Српски
Hrvatski
Română
Polski
Slovenský
Magyar
Bookmark Contacts Sitemap   


Accord Civic Fit / Jazz CR-V HR-V Others Articles
Accord 3 (1985-1989) Accord 6 (1997-2002)

Checking the ignition timing setting (Honda Accord 6)

  • Main
  • Honda Accord
  • 6 (1997-2002)
  • Power unit
  • Engine electrical equipment
  • Checking the ignition timing setting
0
Note: The procedure described below is intended only to check the basic settings made at the factory. No adjustments are possible, therefore, the only purpose of this test is to assess the correct operation of the on-board processor. If during the diagnostics of the ignition system (see Section Checking the functioning of the ignition system) it is not possible to identify the reasons for the violation of the ignition timing settings, the PCM should be replaced, for which the car must be taken to a service station.


1. Start the engine and warm it up to normal operating temperature.

2. Check and, if necessary, adjust the idle speed (see Chapter Settings and ongoing maintenance).
2. Check and, if necessary, adjust the idle speed…


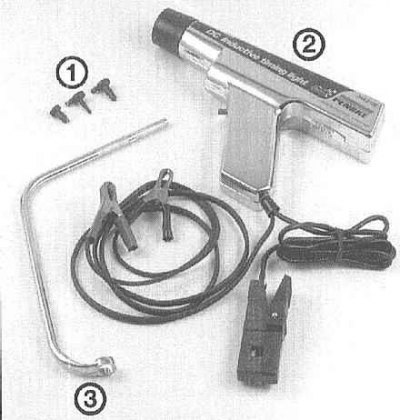
3. With the ignition off, locate the VECI label under the hood and carefully read the instructions on setting the ignition timing. It is especially important to set the idle speed correctly, as the engine speed is directly related to the ignition timing. Prepare all the necessary tools.
  • 1 - Vacuum Plugs - All disconnected vacuum hoses must be plugged immediately. Plugs of various sizes and configurations are available for this purpose
  • 2 - Stroboscope with inductive connection - Provides pulsation of a bright, highly focused beam, synchronized with the moments of spark formation on the electrodes of the spark plug of the first cylinder. Connects to the high-voltage wire of the spark plug of the first cylinder in accordance with the manufacturers' instructions
  • 3 - Special wrench - On some models, access to the distributor clamp bolt is limited and it becomes extremely difficult to loosen it using a regular wrench

4. With the ignition off, connect the stroboscope in accordance with the manufacturers instructions. The stroboscope is usually powered by the on-board battery. The inductive receiving sensor of the lamp is installed on the high-voltage wire of the spark plug of the first cylinder (see Specifications in Chapter Engine).


5. Using a jumper wire, short-circuit terminals 8 and 13 of the diagnostic connector (DLC) together - this will put the PCM into the basic ignition timing setting mode.
5. Using a jumper wire, short-circuit terminals 8…


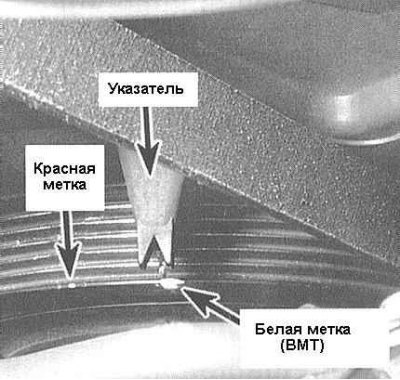
6. Locate the timing marks on the crankshaft pulley.

7. Start the engine at normal operating temperature and point the strobe light at the timing indicator.

8. The red mark on the crankshaft pulley illuminated by the stroboscope beam, while remaining stationary, should be aligned with the pointer.

9. If any faults are found in the settings, take the vehicle to a service station to have the PCM diagnosed.

10. Turn off the engine and remove the stroboscope.

11. Remove the jumper wire from the diagnostic connector terminals.
This article is available at: russian, bulgarian, belarusian, ukrainian, serbian, croatian, romanian, polish, slovak, hungarian
This information has been verified: Timofey Goryachev
Share with friends:
◀ Previous
Accord 6: Engine electrical equipment
Next ▶

Removal and installation the ignition distributor
Checking the proper operation and replacing the ignition control module (ICM)
Checking the condition and replacing the ignition coil
Checking the functioning of the ignition system
Ignition system — general information
Charging system — general information and precautions
Checking the status of the charging system
Removal and installation the generator
Replacing the voltage regulator and generator brushes
Starting System — General Information and Precautions
See also other articles from Honda manuals:
Checking the installation and adjusting the ignition timing angle Honda Civic 6 (1995-2000)
Checking the ignition timing angle Honda Fit 1 (2001-2008)
Setting the ignition timing Honda CR-V 1 (1995-2001, petrol)
Checking and adjusting the ignition timing angle Honda HR-V 1 (1998-2006, petrol)
Checking the ignition timing angle Honda Avancier 1 (1999-2003, petrol)
Link in different formats to this article
Comments and feedback from visitors
No comments yet


How much will 45 + 48 ?


Accord 6 (1997-2002) 
  • General information
  • Introduction to the guide
  • User manual
  • Maintenance
  • Power unit
  • Four-cylinder engines
  • Six-cylinder engines
  • Engine overhaul
  • Cooling system
  • Heater and air conditioner
  • Power and exhaust systems
  • Engine electrical equipment
  • Engine management
  • Transmission
  • Mechanical gearbox
  • Automatic gearbox
  • Clutch and drive shafts
  • Chassis and running gear
  • Brake system
  • Car suspension
  • Steering
  • Body and interior
  • Exterior (external elements)
  • Interior (internal elements)
  • Electrical equipment
  • Equipment and devices
  • Electrical circuits
Accord 3 (1985-1989) 
  • General information
  • Maintenance
  • Power unit
  • Engine adjustment
  • Engine repair
  • Engine electrics
  • Emission management
  • Engine management (carburetor)
  • Electronic injection
  • Programmable injection
  • Schematic of emission system
  • Fuel system
  • Feedback management
  • Transmission
  • Manual gearbox
  • Automatic gearbox
  • Clutch
  • Chassis and running gear
  • Front suspension
  • Rear suspension
  • Steering
  • Brake system
  • Electrical equipment
  • Ventilation and heating
  • Air conditioner
  • Cruise control system
  • Equipment and devices
HondaBook.ru © 2018–2026 • Mobile version • Sitemap: EN BG BY UA RS HR RO PL SK HU • Feedback • Driver Information • Search system • Bookmark
Accord 3 (1985-1989) • Accord 6 (1997-2002) • Civic 3 and 4 (1983-1991) • Civic 5 and 6 (1991-2000) • Civic 6 (1995-2000) • Civic 7 (2000-2005) • Civic 8 (2005-2011) • Fit 1 (2001-2008) • CR-V 1 (1995-2001) • CR-V 2 (2002-2006) • HR-V 1 (1998-2006) • Avancier 1 (1999-2003) •
 
This website uses cookies to ensure proper functioning. By clicking "OK," you agree.