
Signal lamp test
Note: See the wiring diagram of the fuel gauge in Ch. «Body electrical equipment».
1. Before testing, check the INSTRUMENT LIGHT fuse (7.5 A) in the fuse/relay box under the dash.
2. Park your car on level ground.
3. Empty the fuel tank: Disconnect the fuel return pipe from the fuel pressure regulator and connect a suitable hose to the regulator fitting. Dip the other end of the hose into a container suitable for gasoline. Start the engine and let it run until the tank is empty (the engine will stall).
4. Add less than 6.9 liters of fuel and turn the ignition key to the ON position (II). The low fuel warning light should come on after four minutes.
Low fuel warning light
- If the lamp lights up after four minutes, go to step 9.
- If the lamp does not light up after four minutes, go to step 5.
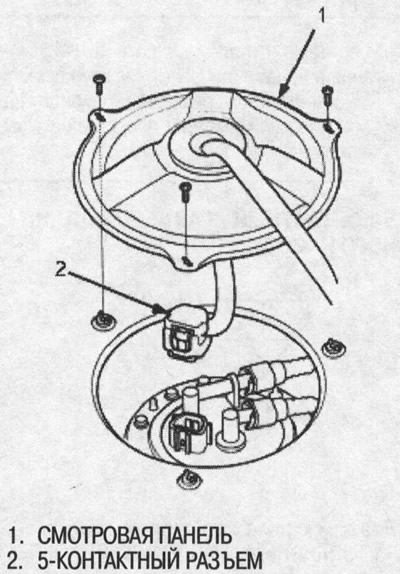
5. Remove the access panel from the floor.
6. Turn the ignition key to the OFF position, then disconnect the 5-pin connector from the fuel pump.
7. Turn the ignition key to the ON position (II).
- If the lamp lights up, replace the fuel gauge sensor (see above).
- If the lamp does not light up, check:
- Is there an open in the BLACK/YELLOW wire between the fuel gauge sensor and the fuel gauge assembly.
- Has the light bulb burned out?
- Bad grounding (G501).
- Has the fuel gauge assembly failed?
8. Add 4 liters of fuel. The lamp should go out after four minutes.
- If the lamp does not go out, check:
- Is there an open in the BLACK/YELLOW wire between the fuel gauge sensor and the fuel gauge assembly.
- Has the fuel gauge assembly failed?
- If the lamp goes out, the low fuel warning lamp is OK.