


Interior (internal body elements) of the car Honda Avancier 1

Layout of interior components
Components marked with an asterisk are related to the passive restraint system (airbags), therefore refer to the Supplemental Restraint System (SRS) section when performing work.
Components marked with an asterisk are related to the passive restraint system (airbags), therefore refer to the Supplemental Restraint System (SRS) section when performing work.

Removal and installation of interior trim
Do not damage the components being removed. Perform work wearing gloves. When using a screwdriver, protect the components with protective tape or cloth. Also, wrap the screwdriver with tape so as not to damage the...
Do not damage the components being removed. Perform work wearing gloves. When using a screwdriver, protect the components with protective tape or cloth. Also, wrap the screwdriver with tape so as not to damage the...

Removal and installation ceiling trim
Attention. Avoid damaging the instrument panel, trim components and removable components. When removing the trim from the interior, do not fold or damage it. When using a screwdriver, protect the components with...
Attention. Avoid damaging the instrument panel, trim components and removable components. When removing the trim from the interior, do not fold or damage it. When using a screwdriver, protect the components with...

Removal and installation the ceiling console
Attention. Avoid damaging the instrument panel, trim components and removable components. Connect the connectors securely. When installing the B clamps, first pull out the inner part, then insert it into the socket and...
Attention. Avoid damaging the instrument panel, trim components and removable components. Connect the connectors securely. When installing the B clamps, first pull out the inner part, then insert it into the socket and...

Installing the console pocket
1. Insert the spring. 2. Insert the boss on which the spring is mounted into the hole in the console. 3. Insert the opposite boss into the hole in the console. After installing the pocket, make sure it opens and closes...
1. Insert the spring. 2. Insert the boss on which the spring is mounted into the hole in the console. 3. Insert the opposite boss into the hole in the console. After installing the pocket, make sure it opens and closes...

Removal and installation of floor coverings
Since there are components of the additional passive safety system near the floor covering, during the work see chapter Supplemental Restraint System (SRS) . Attention. Perform work wearing gloves. Avoid damaging the...
Since there are components of the additional passive safety system near the floor covering, during the work see chapter Supplemental Restraint System (SRS) . Attention. Perform work wearing gloves. Avoid damaging the...

Removal and installation the center lower trim
Do not damage the instrument panel, steering column or removable components. Secure the components with clamps so that no gaps are formed. When working with a screwdriver, protect the components with protective tape or...
Do not damage the instrument panel, steering column or removable components. Secure the components with clamps so that no gaps are formed. When working with a screwdriver, protect the components with protective tape or...

Removal and installation the instrument cluster panel
Attention. Do not damage the instrument panel, steering column or removable components. When using a screwdriver, protect the components with protective tape or cloth. Also, wrap the screwdriver with tape so as not to...
Attention. Do not damage the instrument panel, steering column or removable components. When using a screwdriver, protect the components with protective tape or cloth. Also, wrap the screwdriver with tape so as not to...

Removal and installation the center panel
Attention: Do not damage the instrument panel, steering column or removable components. When using a screwdriver, protect the components with protective tape or cloth. Also, wrap the screwdriver with tape so as not to...
Attention: Do not damage the instrument panel, steering column or removable components. When using a screwdriver, protect the components with protective tape or cloth. Also, wrap the screwdriver with tape so as not to...

Removal and installation the lower instrument panel cover on the front passenger side
Attention. Do not damage the instrument panel or removed components. When using a screwdriver, protect the components with protective tape or cloth. Also, wrap the screwdriver with tape so as not to damage the...
Attention. Do not damage the instrument panel or removed components. When using a screwdriver, protect the components with protective tape or cloth. Also, wrap the screwdriver with tape so as not to damage the...

Removal and installation the glove box
Since the components of the airbag system are located nearby, during the work see chapter Supplemental Restraint System (SRS) . Attention. Do not damage the instrument panel or removed components. When using a...
Since the components of the airbag system are located nearby, during the work see chapter Supplemental Restraint System (SRS) . Attention. Do not damage the instrument panel or removed components. When using a...

Removal and installation the driver's side deflector
Attention. Do not damage the instrument panel or removed components. When using a screwdriver, protect the components with protective tape or cloth. Also, wrap the screwdriver with tape so as not to damage the...
Attention. Do not damage the instrument panel or removed components. When using a screwdriver, protect the components with protective tape or cloth. Also, wrap the screwdriver with tape so as not to damage the...

Removal and installation the deflector on the front passenger side
Attention. Do not damage the instrument panel or removed components. When using a screwdriver, protect the components with protective tape or cloth. Also, wrap the screwdriver with tape so as not to damage the...
Attention. Do not damage the instrument panel or removed components. When using a screwdriver, protect the components with protective tape or cloth. Also, wrap the screwdriver with tape so as not to damage the...

Removal and installation side deflectors trim
The figure shows the deflector on the driver's side. The deflector on the front passenger side is similar to the one under consideration. Remove the instrument panel (see below). Remove the following components from the...
The figure shows the deflector on the driver's side. The deflector on the front passenger side is similar to the one under consideration. Remove the instrument panel (see below). Remove the following components from the...

Removal and installation the instrument panel
Since the components of the airbag system are located in the instrument panel, during work see chapter Supplemental Restraint System (SRS) . Attention. Do not cut your hands while working, work with gloves. Do not...
Since the components of the airbag system are located in the instrument panel, during work see chapter Supplemental Restraint System (SRS) . Attention. Do not cut your hands while working, work with gloves. Do not...

Removal and installation the steering beam
Since there are components of the airbag system, during the work see chapter Supplemental Restraint System (SRS) . Attention. Avoid cutting your hands while working, wear gloves. Do not damage the instrument panel....
Since there are components of the airbag system, during the work see chapter Supplemental Restraint System (SRS) . Attention. Avoid cutting your hands while working, wear gloves. Do not damage the instrument panel....

Seat component arrangement
On models with side airbags during work see chapter Supplemental Restraint System (SRS) .
On models with side airbags during work see chapter Supplemental Restraint System (SRS) .

Removal and installation front seats
Attention. Avoid staining the finish while working. Do not damage the instrument panel or removed components. Disconnect the battery cables and wait at least 3 minutes (on models with side airbags). Install in the...
Attention. Avoid staining the finish while working. Do not damage the instrument panel or removed components. Disconnect the battery cables and wait at least 3 minutes (on models with side airbags). Install in the...

Disassembly and assembly of front seats
Attention. Avoid staining the finish while working. Wear gloves when working. When using a screwdriver, protect the components with protective tape or cloth. Also, wrap the screwdriver with tape so as not to damage the...
Attention. Avoid staining the finish while working. Wear gloves when working. When using a screwdriver, protect the components with protective tape or cloth. Also, wrap the screwdriver with tape so as not to damage the...
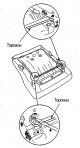
Removal and installation the front seat torsion bar
Attention. Avoid staining the seat trim while working. Wear gloves when working. Remove the seat cushion (see above) and remove the torsion bar in numbered order. Install in the reverse order of removal.
Attention. Avoid staining the seat trim while working. Wear gloves when working. Remove the seat cushion (see above) and remove the torsion bar in numbered order. Install in the reverse order of removal.
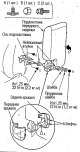
Removal and installation front seat armrests
Attention. Avoid staining the seat trim while working. When using a screwdriver, protect the components with protective tape or cloth. Also, wrap the screwdriver with tape so as not to damage the components. Install in...
Attention. Avoid staining the seat trim while working. When using a screwdriver, protect the components with protective tape or cloth. Also, wrap the screwdriver with tape so as not to damage the components. Install in...

Disassembly and assembly of the front seat mechanisms
Seat with electric sliding cushion and backrest tilt Avoid staining the seat trim while working. Wear gloves when working. Assembly is carried out in the reverse order of disassembly. Apply grease to the rubbing...
Seat with electric sliding cushion and backrest tilt Avoid staining the seat trim while working. Wear gloves when working. Assembly is carried out in the reverse order of disassembly. Apply grease to the rubbing...

Front Seat Trim Replacement
Avoid staining the finish while working. Carry out work wearing gloves. Seat with side airbag Since there are components of the airbag system (side airbag, passenger presence sensor), during the work, see chapter...
Avoid staining the finish while working. Carry out work wearing gloves. Seat with side airbag Since there are components of the airbag system (side airbag, passenger presence sensor), during the work, see chapter...

Removal and installation the rear seat
Avoid staining the seat trim while working. Avoid damaging interior trim components and bodywork. When using a screwdriver, protect the components with protective tape or cloth. Also, wrap the screwdriver with tape so...
Avoid staining the seat trim while working. Avoid damaging interior trim components and bodywork. When using a screwdriver, protect the components with protective tape or cloth. Also, wrap the screwdriver with tape so...

Removal and installation the rear seat cushion frame assembly and steering axis bracket
Attention. Avoid staining the seat trim while working. Wear gloves when working. To avoid damaging interior and body trim components, use protective material. Remove the following components: Rear seat cushions. Rear...
Attention. Avoid staining the seat trim while working. Wear gloves when working. To avoid damaging interior and body trim components, use protective material. Remove the following components: Rear seat cushions. Rear...

Disassembling and assembling the rear seat cushion frame assembly
Attention. Avoid staining the seat trim while working. Wear gloves when working. Assembly is performed in the reverse order of disassembly. Check the clamps for damage and replace with new ones if necessary. Apply...
Attention. Avoid staining the seat trim while working. Wear gloves when working. Assembly is performed in the reverse order of disassembly. Check the clamps for damage and replace with new ones if necessary. Apply...

Removal and installation the rear seat armrest
Attention. Do not stain or damage the components. When using a screwdriver, protect the components with protective tape or cloth. Also, wrap the screwdriver with tape so as not to damage the components. Install in the...
Attention. Do not stain or damage the components. When using a screwdriver, protect the components with protective tape or cloth. Also, wrap the screwdriver with tape so as not to damage the components. Install in the...

Removal and installation the rear seat back lock
Attention. Do not stain or damage the components. Carry out work wearing gloves. Remove the seat back (see above) and separate the section, cushion and frame (see below). Install in the reverse order of removal....
Attention. Do not stain or damage the components. Carry out work wearing gloves. Remove the seat back (see above) and separate the section, cushion and frame (see below). Install in the reverse order of removal....

Rear Seat Trim Replacement
Attention. Do not stain or damage the components. Wear gloves when working. Seat cushion Remove the cushion and armrest (see above). Remove the components in the order shown in the illustration. The right cushion of the...
Attention. Do not stain or damage the components. Wear gloves when working. Seat cushion Remove the cushion and armrest (see above). Remove the components in the order shown in the illustration. The right cushion of the...

Location of seat belt components
The front seat belts are connected to the additional passive safety system, so during the work see chapter Supplemental Restraint System (SRS) .
The front seat belts are connected to the additional passive safety system, so during the work see chapter Supplemental Restraint System (SRS) .

Removal and installation front seat belts
The belt tensioners (with pretensioners) are connected to the additional passive safety system, therefore during the work see chapter Supplemental Restraint System (SRS) . Before and after installing the seat belts,...
The belt tensioners (with pretensioners) are connected to the additional passive safety system, therefore during the work see chapter Supplemental Restraint System (SRS) . Before and after installing the seat belts,...

Removal and installation front seat belt buckles
Caution: Do not damage the body or removable components. Remove the following components: Seat center covers (see above). Central tables (see above). Install in the reverse order of removal. If the anchor bolts were...
Caution: Do not damage the body or removable components. Remove the following components: Seat center covers (see above). Central tables (see above). Install in the reverse order of removal. If the anchor bolts were...

Removal and installation rear seat belts
Before and after installing the seat belts, check them (see below). Attention. Do not damage the body or removed components. When storing the removed seat belts, keep them away from direct sunlight, oil, and grease....
Before and after installing the seat belts, check them (see below). Attention. Do not damage the body or removed components. When storing the removed seat belts, keep them away from direct sunlight, oil, and grease....

Removal and installation the rear seat center belt
Before and after installing the seat belts, check them (see below). Attention. Do not damage the body or removed components. When storing the removed seat belts, keep them away from direct sunlight, oil, and grease....
Before and after installing the seat belts, check them (see below). Attention. Do not damage the body or removed components. When storing the removed seat belts, keep them away from direct sunlight, oil, and grease....

Removal and installation rear seat belt buckles
Caution: Do not damage the body or removable components. Remove the rear seat cushion (see above). If the anchor bolts were unscrewed, do not mix up the order of the washers during installation (see below). Install in...
Caution: Do not damage the body or removable components. Remove the rear seat cushion (see above). If the anchor bolts were unscrewed, do not mix up the order of the washers during installation (see below). Install in...

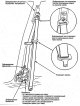
Checking seat belts
If there are any defects as shown in the figure, replace the belt. Checking the tensioners Attention. Do not disassemble the tensioner. The front seat belt tensioners have pretensioners, so when performing work see...
If there are any defects as shown in the figure, replace the belt. Checking the tensioners Attention. Do not disassemble the tensioner. The front seat belt tensioners have pretensioners, so when performing work see...
This section is available on: russian, bulgarian, belarusian, ukrainian, serbian, croatian, romanian, polish, slovak, hungarian
Link in different formats to this section
TEXTHTMLBB Code
- General information
- Controls and instruments
- User manual
- Power unit
- Engine maintenance
- Engine repair
- Cooling system
- Engine management
- Power and exhaust system
- Transmission
- Automatic gearbox
- Drive shafts and differential
- Chassis and running gear
- Steering
- Car suspension
- Brake system
- Body and interior
- Doors, locks and windows
- Interior (internal elements)
- Exterior (external elements)
- Air conditioner
- Electrical equipment
- Power devices
- Equipment and devices
- Headlights and lighting
- Electrical circuits