
HondaBook.ru
Auto companies Volkswagen Auto companies Ford Auto companies Lada Auto companies Skoda Auto companies BMW Auto companies Mazda Auto companies Peugeot
English Русский
Български
Беларускі
Український
Српски
Hrvatski
Română
Polski
Slovenský
Magyar
Bookmark Contacts Sitemap   


Accord Civic Fit / Jazz CR-V HR-V Others Articles
CR-V 1 (1995-2001, petrol) CR-V 2 (2002-2006, petrol)

Removal/installing the lower cover of the central section of the instrument panel — models with manual transmission (Honda CR-V 2)

  • Main
  • Honda CR-V
  • 2 (2002-2006, petrol)
  • Body and interior
  • Interior (internal elements)
  • Removal/installing the lower cover of the central section of the instrument panel — models with manual transmission
0
This area contains the Supplemental Restraint System (SRS) components. Review the SRS component locations, precautions, and procedures before performing repairs or maintenance.

Note:
  • When pressing components with a flat-head screwdriver, wrap it with protective tape to avoid damage and apply tape to adjacent components.
  • Avoid scratching the instrument panel and adjacent components.
  • The picture shows a left-hand drive model; the arrangement on the right-hand drive model is symmetrical.


1. Remove the following components:
  • Front seat center table.
  • Lower dashboard panel on the passenger side.
  • Heater control panel.

2. Remove the handle from the shift lever.
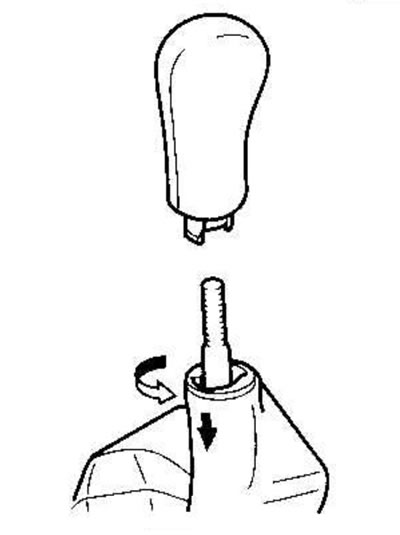
2. Remove the handle from the shift lever.


3. Using a flat-head screwdriver, pry up the caps (A) from the inside edge and release the hooks (B), pull up on the caps and release the hooks (C), then remove the caps from both sides.
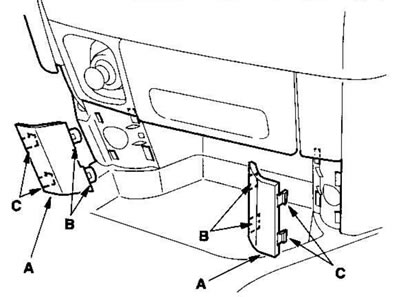
3. Using a flat-head screwdriver, pry up the caps…


4. Remove the screws (A) and clips (B) from the lower cover of the center section of the instrument panel (C).
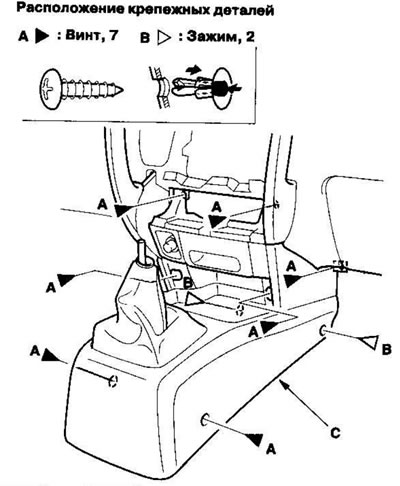


4. Remove the screws (A) and clips (B) from the…


5. Remove the lower cover of the center section of the instrument panel (A).
  • Pull the cover section around the parking brake lever and release the clips (B).
  • Pull the cover and release the clamps (C, D).
  • Disconnect the cigarette lighter connector (E) and the ashtray lamp socket (F) (on some models).
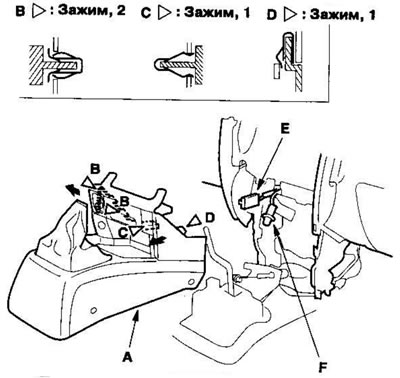

Disconnect the cigarette lighter connector (E)…


6. If necessary, remove the screws, then separate the center console (A) from the center section lower cover (B).
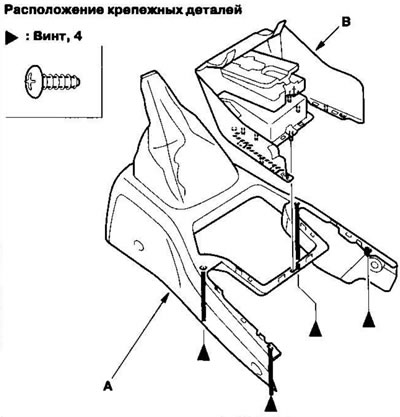
6. If necessary, remove the screws, then separate…


7. The cover is installed in the reverse order of removal, taking into account the following:
  • Replace damaged clamps.
  • Make sure the cigarette lighter connector is securely connected and the ashtray lamp socket is properly connected.


(The article was copied from the website «www.HondaBook.ru»)
This article is available at: russian, bulgarian, belarusian, ukrainian, serbian, croatian, romanian, polish, slovak, hungarian
This information has been verified: Mikhail Kopasov
Share with friends:
◀ Previous
CR-V 2: Interior (internal elements)
Next ▶

Removal and installation the lower cover of the central section of the…
Removal and installation the heater control panel
Removal and installation the central tray of the instrument panel
Removal and installation the central section of the instrument panel
Removal and installation the lower dashboard panel on the driver's side
Removal and installation the lower shield on the passenger side
Removal and installation the glove box
Removal and installation side vent grilles
Removal and installation the instrument panel
Replacing the steering bracket beam
See also other articles from Honda manuals:
Removal and installation the main section of the instrument panel Honda Accord 6 (1997-2002)
Central lower instrument panel trim Honda Civic 7 (2000-2005)
Central instrument panel trim Honda Fit 1 (2001-2008)
Removal and installation the central section of the instrument panel Honda HR-V 1 (1998-2006, petrol)
Removal and installation the lower instrument panel cover on the… Honda Avancier 1 (1999-2003, petrol)
Link in different formats to this article
Comments and feedback from visitors
No comments yet


How much will 13 + 43 ?


CR-V 2 (2002-2006, petrol) 
  • General information
  • User manual
  • Technical data
  • Maintenance
  • Power unit
  • Engine repair
  • Lubrication system
  • Cooling system
  • Exhaust system
  • Fuel system
  • Engine management
  • Engine electrical equipment
  • Transmission
  • Clutch
  • Manual gearbox
  • Automatic gearbox
  • Rear differential
  • Drive shafts
  • Chassis and running gear
  • Steering
  • Front suspension
  • Rear suspension
  • Brake system
  • Body and interior
  • Exterior (external elements)
  • Interior (internal elements)
  • Doors, locks and windows
CR-V 1 (1995-2001, petrol) 
  • General information
  • Maintenance
  • Tips for car owner
  • Power unit
  • Engine repair
  • Engine overhaul
  • Cooling and lubrication system
  • Engine electrical equipment
  • Control system
  • Fuel system
  • Transmission
  • Clutch and drive shafts
  • Car gearbox
  • Chassis and running gear
  • Front suspension
  • Rear suspension
  • Steering
  • Brake system
  • Body and interior
  • Body service
  • Exterior (external elements)
  • Interior (internal elements)
  • Electrical equipment
  • Equipment and devices
  • Electrical circuits
HondaBook.ru © 2018–2026 • Mobile version • Sitemap: EN BG BY UA RS HR RO PL SK HU • Feedback • Driver Information • Search system • Bookmark
Accord 3 (1985-1989) • Accord 6 (1997-2002) • Civic 3 and 4 (1983-1991) • Civic 5 and 6 (1991-2000) • Civic 6 (1995-2000) • Civic 7 (2000-2005) • Civic 8 (2005-2011) • Fit 1 (2001-2008) • CR-V 1 (1995-2001) • CR-V 2 (2002-2006) • HR-V 1 (1998-2006) • Avancier 1 (1999-2003) •
 
This website uses cookies to ensure proper functioning. By clicking "OK," you agree.