
HondaBook.ru
Auto companies Volkswagen Auto companies Ford Auto companies Lada Auto companies Skoda Auto companies BMW Auto companies Mazda Auto companies Peugeot
English Русский
Български
Беларускі
Український
Српски
Hrvatski
Română
Polski
Slovenský
Magyar
Bookmark Contacts Sitemap   


Accord Civic Fit / Jazz CR-V HR-V Others Articles
CR-V 1 (1995-2001, petrol) CR-V 2 (2002-2006, petrol)

Cylinder Block — Disassembly and Inspection (Honda CR-V 1)

  • Main
  • Honda CR-V
  • 1 (1995-2001, petrol)
  • Power unit
  • Engine overhaul
  • Cylinder Block — Disassembly and Inspection
0
Contents: Removal the flange ⇊ Disassembly ⇊ Visual inspection of the block ⇊ Checking the alignment of the main…⇊ Checking the deformation of the…⇊

Removal the flange


A flange is formed on the cylinder wall as a result of wear and prevents the piston and connecting rod from being removed. The flange is removed using a special reamer. In this case, set the piston to BDC.

Disassembly


Remove all belts, sprockets (gears), shafts, oil level indicator pipe and other parts from the engine, remove the flange on the cylinder walls. Place the engine on the stand with the crankshaft facing up. Mark the connecting rods and crankshaft main bearing caps with a punch or stamp according to their cylinder assignment (cylinder N1 is located near the front of the engine). Install the engine so that the connecting rods and piston are accessible. Unscrew the nuts, remove the connecting rod cover and the bearing shell. Place the rubber hoses on the bolts and gently push the connecting rod with the piston through a wooden spacer by about 25 mm using light hammer blows. Remove the second connecting rod bearing, push the connecting rod with the piston and remove it from the cylinder. Install the liners and cover, hand tighten.
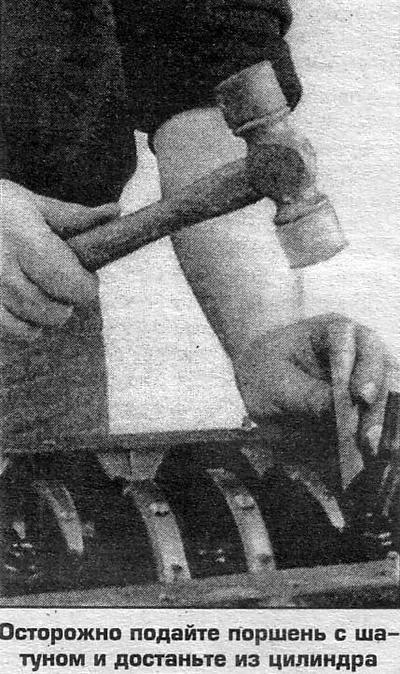
Remove all belts, sprockets (gears), shafts, oil…


Repeat the procedure for the remaining cylinders. When disassembling a V-engine, first remove all pistons with connecting rods on one side, then on the other. Evenly loosen the nuts (bolts) of the main bearing caps, remove the caps and remove the crankshaft. Clean all removed parts.


Visual inspection of the block


Check the condition of the cylinder block for cracks. If the engine overheated, or there was an increased consumption of coolant or oil, it is recommended to check the cylinder block for microcracks in a car service using Magnaflux methods (magnetic flaw detection technique for cast iron blocks), or Zyglo (technique of spraying fluorescent composition for aluminum alloy blocks).

Checking the alignment of the main bearing beds


Check the condition of the main bearings. If the bearings are badly damaged or there are signs of bearing rotation, the alignment of the main bearing beds should be checked. Place the gauge on the surface of the beds. If there is a gap between the bearing seat and the gauge, the bearings should be centered. This is ensured by processing the beds by pulling with the main bearing caps installed.

Checking the deformation of the cylinder block split plane


The deformation of the cylinder block split plane is checked after thorough cleaning with a gauge and feeler gauge diagonally and along the block surface along the center line. If the deviation from the plane exceeds 0.076 mm over a 152 mm section, or 0.152 mm over the entire length of the head, the cylinder block plane should be reground.
This article is available at: russian, bulgarian, belarusian, ukrainian, serbian, croatian, romanian, polish, slovak, hungarian
This information has been verified: Emil Safonov
Share with friends:
◀ Previous
CR-V 1: Engine overhaul
Next ▶

Cylinder head — assembly
Restoration of cylinder head and valve mechanism parts
Checking the general condition of the cylinder head
Checking the cylinder head split plane
Valve stem guides and seats
Checking cylinders, pistons and connecting rods
Cylinder block — repair
Cylinder Block — Assembly
Starting and running in the repaired engine
Engine technical data (specifications)
See also other articles from Honda manuals:
Master brake cylinder Honda Accord 3 (1985-1989)
Installing the cylinder head rocker arm block Honda Civic 8 (2005-2011)
Disassembly and assembly of the cylinder block Honda Fit 1 (2001-2008)
Cylinder Block — Checking and Honing Honda HR-V 1 (1998-2006, petrol)
Cylinder head component arrangement Honda Avancier 1 (1999-2003, petrol)
Link in different formats to this article
Comments and feedback from visitors
No comments yet


How much will 43 + 48 ?


CR-V 2 (2002-2006, petrol) 
  • General information
  • User manual
  • Technical data
  • Maintenance
  • Power unit
  • Engine repair
  • Lubrication system
  • Cooling system
  • Exhaust system
  • Fuel system
  • Engine management
  • Engine electrical equipment
  • Transmission
  • Clutch
  • Manual gearbox
  • Automatic gearbox
  • Rear differential
  • Drive shafts
  • Chassis and running gear
  • Steering
  • Front suspension
  • Rear suspension
  • Brake system
  • Body and interior
  • Exterior (external elements)
  • Interior (internal elements)
  • Doors, locks and windows
CR-V 1 (1995-2001, petrol) 
  • General information
  • Maintenance
  • Tips for car owner
  • Power unit
  • Engine repair
  • Engine overhaul
  • Cooling and lubrication system
  • Engine electrical equipment
  • Control system
  • Fuel system
  • Transmission
  • Clutch and drive shafts
  • Car gearbox
  • Chassis and running gear
  • Front suspension
  • Rear suspension
  • Steering
  • Brake system
  • Body and interior
  • Body service
  • Exterior (external elements)
  • Interior (internal elements)
  • Electrical equipment
  • Equipment and devices
  • Electrical circuits
HondaBook.ru © 2018–2026 • Mobile version • Sitemap: EN BG BY UA RS HR RO PL SK HU • Feedback • Driver Information • Search system • Bookmark
Accord 3 (1985-1989) • Accord 6 (1997-2002) • Civic 3 and 4 (1983-1991) • Civic 5 and 6 (1991-2000) • Civic 6 (1995-2000) • Civic 7 (2000-2005) • Civic 8 (2005-2011) • Fit 1 (2001-2008) • CR-V 1 (1995-2001) • CR-V 2 (2002-2006) • HR-V 1 (1998-2006) • Avancier 1 (1999-2003) •
 
This website uses cookies to ensure proper functioning. By clicking "OK," you agree.