
Tightening the axle nuts will cause excessive bearing friction and result in difficult rotation and possible bearing failure. Therefore, follow the procedures in Chapter 8 exactly, using the necessary tools.
Cleaning and reinstalling
Serviceable rear wheel bearings are only available on the 1984-85 Accord and 1984-87 Prelude. All other bearings of both the rear and front wheels are pressed in. Pressed bearings are considered components for the life of the vehicle and are only replaced in the event of a mechanical failure. Replacing pressed bearings is discussed in Chapter 7.
CAUTION: Servicing wheel bearings will affect the brake pads or liners. Brake pads or liners contain asbestos, which can cause cancer. Never clean brake surfaces with compressed air.
Prelude (1984-87)
This procedure requires a torque wrench.
1. Slightly loosen the wheel bracket nuts. Raise and secure the rear of the vehicle.
2. Release the parking brake. Remove the rear wheel assembly.
3. If installed, remove the brake caliper. Disconnect the parking brake wire from the caliper. Remove the caliper mounting bolts with the suspension and hang the caliper on the wire; do not disconnect the brake hose.
4. Remove the caliper bracket bolts and the brackets themselves.
5. Remove the grease cap, lock pin, lock nut, spindle nut, thrust washer and bearing. Pull the disk assembly off the spindle.
6. Using a hammer and drift will free the bearing from the bushing.
When removing bearing shells, use a cross gauge to avoid getting them into the hub bores.
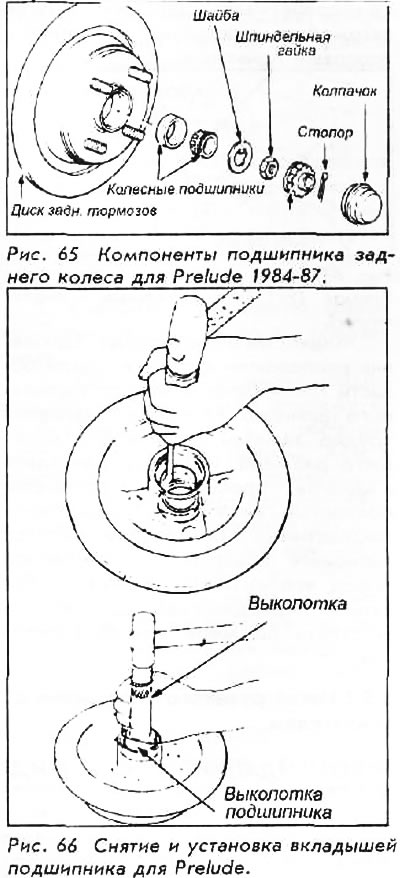
7. Rotate the hub and slide the bearing inner race and sealing gland off the hub; do not reuse the removed seal.
8. Using solvent, clean the hub, liners and bearing races. Let them air dry; do not use compressed air for this.
9. Using the correct size driver's tool, such as Honda's 07749-0010000 and 07946-4920100 or equivalent, will guide the bearing races evenly into the hub.
10. Using multi-purpose grease, assemble the wheel hub and wheel bearings. The bearings must be completely and carefully assembled. Lightly grease the flanges. Install the inner race to the hub.
11. Tapping on the stuffing box (using cross method) drive it back on the hub.
12. To install the hub, fit the outer bearing shell onto the disc. Loosely holding the bearing in place with your thumb, install the disc and bearing on the hub.
13. Assemble and install the washer and spindle nut. Hand tighten the spindle nut.
14. Using a torque wrench, tighten the spindle nut as follows:
- a. Tighten the spindle nut to 25 Nm. Rotate the brake disc two or three turns. Retighten the spindle nut. Continue these rotations and the process of tightening the nut until it is completely stabilized, after turning the disk by 25 Nm.
- b. Loosen the spindle nut to 0. The nut should only become loose, not loosened more than required.
- c. Tighten the nut to 5.5 Nm.
- d. Install the lock nut and align the slot with the hole on the spindle.
If the stopper holes do not line up, try to remove and re-attach, after a little rotation, the lock nut. If they are still not aligned, tighten the spindle nut until they are aligned.
- e. Using a new stopper, install it into the holes of the lock nut and axle.
15. To complete the installation, fill the cap with multi-purpose grease and install it on the disc. Make sure it sits firmly and evenly.
16. Establish bolts of fastening of brackets of a support and fixing brackets. Tighten the bolts to 38 Nm.
17. Install the caliper and brake pads. Tighten the caliper mounting bolts with suspension to 23 Nm.
18. Connect the parking brake cable to the caliper.
19. Install the brake caliper if removed.
20. Install the wheel and tighten the mounting nuts evenly.
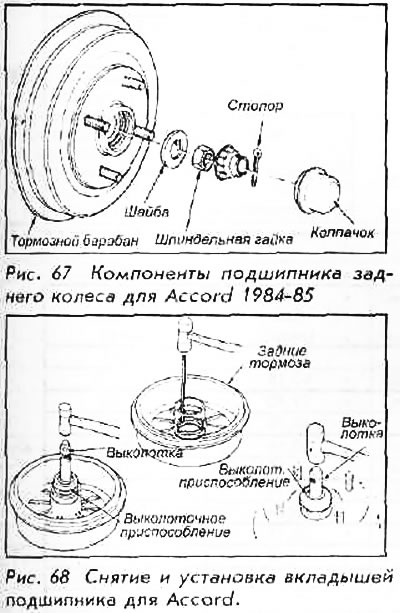
Accord (1884-87)
This procedure requires a torque wrench.
1. Slightly loosen the wheel bracket nuts. Raise and secure the rear of the vehicle.
2. Release the parking brake. Remove the rear wheel assembly.
3. Remove the grease cap, lock pin, lock nut, spindle nut, thrust washer and bearing. Pull the rear drum off the spindle.
4. Remove the inner seal, then the inner bearing shell.
5. Using a hammer and punch will release the outer bushing from the disc hub.
When removing bearing shells, use a cross gauge to avoid getting them into the hub bores.
7. Rotate the hub and slide the bearing inner race off the hub; do not reuse the removed seal.
8. Using solvent, clean the hub, bushings, bearing races, and inner hub area of the drum. Let them air dry; do not use compressed air for this.
9. Using the correct size driver's tool, such as Honda's 07749-0010000 and 07946-4920100 or equivalent, will guide the bearing races evenly into the hub.
10. Using multi-purpose grease, assemble the wheel hub and wheel bearings. The bearings must be completely and carefully assembled. Lightly grease the flanges. Install the inner race to the hub.
11. Tapping on the stuffing box (using cross method) drive it back on the hub.
12. To install the hub, fit the outer bearing shell onto the drum. Loosely holding the bearing in place with your thumb, install the drum and bearing on the hub.
13. Assemble and install the washer and spindle nut. Hand tighten the spindle nut.
14. Using a torque wrench, tighten the spindle nut as follows:
- a. Tighten the spindle nut to 25 Nm. Rotate the drum two or three turns.
- b. Loosen the spindle nut to 0. The nut should only become loose, not loosened more than required.
- c. Tighten the nut to 5.5 Nm.
- d. Install the lock nut and align the slot with the hole on the spindle.
If the stopper holes do not line up, try to remove and re-attach, after a little rotation, the lock nut. If they are still not aligned, tighten the spindle nut until they are aligned.
- e. Using a new stopper, install it in the holes of the lock nut and axle.
13. To complete the installation, fill the cap with multi-purpose grease and install it on the disc. Make sure it sits firmly and evenly.
14. Install the wheel and tighten the fixing nuts by hand.
15. Lower the vehicle to the ground and tighten the nuts evenly.