HondaBook.ru
Auto companies Volkswagen Auto companies Ford Auto companies Lada Auto companies Skoda Auto companies BMW Auto companies Mazda Auto companies Peugeot
English Русский
Български
Беларускі
Український
Српски
Hrvatski
Română
Polski
Slovenský
Magyar
Bookmark Contacts Sitemap   


Accord Civic Fit / Jazz CR-V HR-V Others Articles
CR-V 1 (1995-2001, petrol) CR-V 2 (2002-2006, petrol)

Fuel pump — check (Honda CR-V 1)

  • Main
  • Honda CR-V
  • 1 (1995-2001, petrol)
  • Power unit
  • Fuel system
  • Fuel pump — check
0
Contents: Checking the fuel pump circuit ⇊ Checking fuel pressure ⇊

Checking the fuel pump circuit


The serviceability of the pump circuit is indicated by the characteristic sound of the running electric motor after the ignition is turned on. The pump is switched on by the main relay of the injection system. After 2 seconds from the ignition being turned on, the relay is powered through the engine processor unit. Therefore, if there is a suspicion of unsatisfactory operation of the pump, the reasons may be a malfunction of the ignition switch, the processor unit and the condition of the wiring. To check the connection between the pump and the relay, do the following.

1. Turn off the ignition and disconnect the pump connector on the fuel tank. To do this, on CR-V and Odyssey V6 models, remove the floor panel; on 4-cylinder Odysseys, jack up the vehicle and remove the cap that covers the fuel tank hoses.

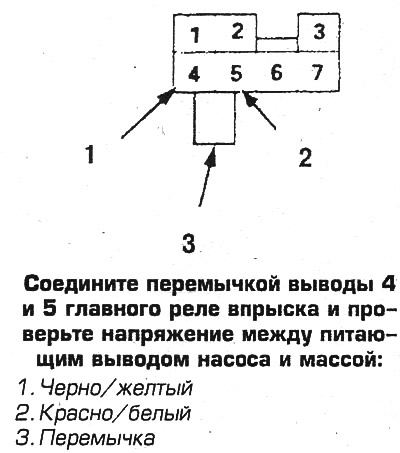
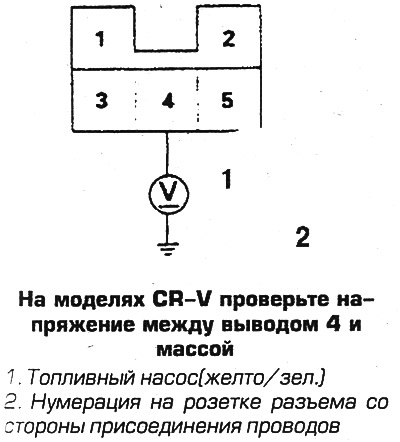
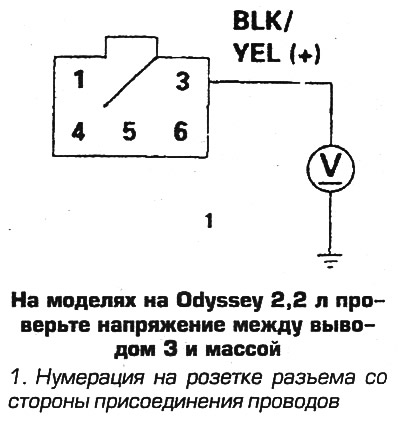
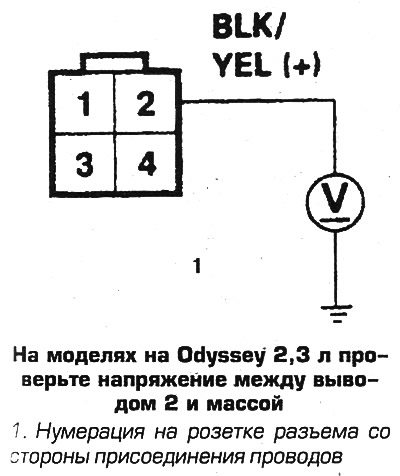
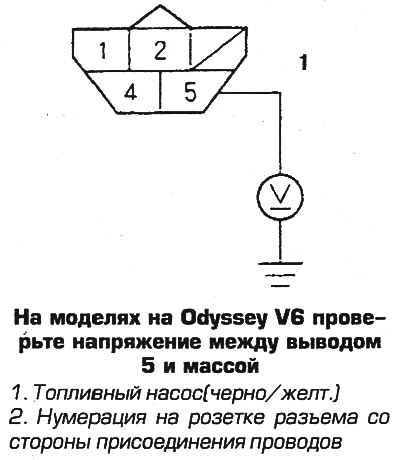
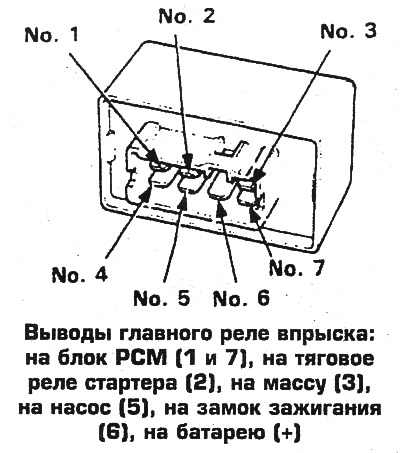
2. Connect terminals 4 and 5 of the main injection relay with a jumper and check the voltage between the following terminals of the pump and ground, which, when the ignition is on, should be equal to the battery voltage:
  • on CR-V models with terminal 4 and ground,
  • on Odyssey 2.2 l - terminal 3 and ground,
  • on Odyssey 2.3 l - terminal 2 and ground,
  • on 6-cylinder Odysseys - terminal 5 and ground.

3. If there is voltage, check the connection of the pump to ground, otherwise check the condition of the wires and the fuel pressure.

Checking fuel pressure


1. Decompress the fuel system.


2. Connect the pressure gauge through the tee, having first disassembled the connection:
  • on CR-V models - on the fuel filter outlet fitting,
  • on Odyssey 2.2L models - on the fuel distributor nipple,
  • on Odyssey 2.3L models - on the fuel filter outlet fitting,
  • on Odyssey V6 models - between the pulsation damper and the fuel distributor.

3. Start the engine (after turning the ignition on and off several times) and check the pressure, which should be:
  • 2.6-3.1 kgf/cm² on B20B4 engines (cR-V models),
  • 2.7-3.2 kgf/cm² on B20Z2 engines (cR-V models),
  • 2.6-3.1 kgf/cm² on the Odyssey 2.2 l model,
  • 3.2-3.7 kgf/cm² on the Odyssey 2.3 l model,
  • 2.8-3.3 kgf/cm² on the Odyssey V6 model.

4. If the pressure is higher than normal, check the cleanliness of the return fuel line.

5. If the pressure is below normal, check the condition of the pressure regulator, the cleanliness of the filter and fuel lines. If these devices are in good working order and the fuel lines are not clogged, then replace the fuel pump.

6. When assembling the system, replace the gaskets of the fittings.
6. When assembling the system, replace the…

6. When assembling the system, replace the…

6. When assembling the system, replace the…
This article is available at: russian, bulgarian, belarusian, ukrainian, serbian, croatian, romanian, polish, slovak, hungarian
This information has been verified: Emil Safonov
Share with friends:
◀ Previous
CR-V 1: Fuel system
Next ▶

Fuel pump — removal and installation
Fuel system decompression procedure
Multi-nozzle programmable injection system
Fuel lines and connections — removal and installation
Throttle body — removal and installation
Injectors — removal and installation, inspection
Fuel distributor — removal and installation
Fuel pressure regulator — removal and installation
Main injection system relay — check
See also other articles from Honda manuals:
Fuel injection check Honda Accord 3 (1985-1989)
Fuel pump — removal and installation Honda Civic 3 and 4 (1983-1991)
Fuel pump Honda Fit 1 (2001-2008)
Fuel pump — testing Honda HR-V 1 (1998-2006, petrol)
Power Steering Pump — Check Honda Avancier 1 (1999-2003, petrol)
Link in different formats to this article
Comments and feedback from visitors
No comments yet


How much will 18 + 10 ?


CR-V 2 (2002-2006, petrol) 
  • General information
  • User manual
  • Technical data
  • Maintenance
  • Power unit
  • Engine repair
  • Lubrication system
  • Cooling system
  • Exhaust system
  • Fuel system
  • Engine management
  • Engine electrical equipment
  • Transmission
  • Clutch
  • Manual gearbox
  • Automatic gearbox
  • Rear differential
  • Drive shafts
  • Chassis and running gear
  • Steering
  • Front suspension
  • Rear suspension
  • Brake system
  • Body and interior
  • Exterior (external elements)
  • Interior (internal elements)
  • Doors, locks and windows
CR-V 1 (1995-2001, petrol) 
  • General information
  • Maintenance
  • Tips for car owner
  • Power unit
  • Engine repair
  • Engine overhaul
  • Cooling and lubrication system
  • Engine electrical equipment
  • Control system
  • Fuel system
  • Transmission
  • Clutch and drive shafts
  • Car gearbox
  • Chassis and running gear
  • Front suspension
  • Rear suspension
  • Steering
  • Brake system
  • Body and interior
  • Body service
  • Exterior (external elements)
  • Interior (internal elements)
  • Electrical equipment
  • Equipment and devices
  • Electrical circuits
HondaBook.ru © 2018–2026 • Mobile version • Sitemap: EN BG BY UA RS HR RO PL SK HU • Feedback • Driver Information • Search system • Bookmark
Accord 3 (1985-1989) • Accord 6 (1997-2002) • Civic 3 and 4 (1983-1991) • Civic 5 and 6 (1991-2000) • Civic 6 (1995-2000) • Civic 7 (2000-2005) • Civic 8 (2005-2011) • Fit 1 (2001-2008) • CR-V 1 (1995-2001) • CR-V 2 (2002-2006) • HR-V 1 (1998-2006) • Avancier 1 (1999-2003) •
 
This website uses cookies to ensure proper functioning. By clicking "OK," you agree.