
HondaBook.ru
Auto companies Volkswagen Auto companies Ford Auto companies Lada Auto companies Skoda Auto companies BMW Auto companies Mazda Auto companies Peugeot
English Русский
Български
Беларускі
Український
Српски
Hrvatski
Română
Polski
Slovenský
Magyar
Bookmark Contacts Sitemap   


Accord Civic Fit / Jazz CR-V HR-V Others Articles
CR-V 1 (1995-2001, petrol) CR-V 2 (2002-2006, petrol)

Checking the generator (Honda CR-V 1)

  • Main
  • Honda CR-V
  • 1 (1995-2001, petrol)
  • Power unit
  • Engine electrical equipment
  • Checking the generator
0
Contents: Generator Voltage Drop Test ⇊ Checking the generator output voltage ⇊
To access the generator terminals for inspection, you must remove the air filter or raise the vehicle.

Generator Voltage Drop Test


1. The test is performed on a warm engine.

2. Connect the tachometer, start the engine and turn on all powerful consumers (heater fan, high beam headlights, etc.).

3. Bring the speed up to 2400 rpm and without changing the speed, do the following.

4. Check the voltage between the (+) battery terminal and the stud (not with a nut!) terminals B+ of the generator, which should not be higher than 0.6 V. If the voltage is higher than 0.6 V, then touch the nut and the tip of the wire on the generator. If the voltage drops below 0.6 V, this indicates poor contact in the connection. In this way, any section of the circuit can be checked if there is a suspicion of a connection fault.

5. Check the voltage between the (-) battery terminal and the ground connection stud on the generator housing, which should not be higher than 0.3 V. If the voltage is higher than 0.3 V, touch the nut and the wire tip on the generator. If the voltage drops below 0.3 V, this indicates poor contact in the connection.

Checking the generator output voltage


To perform this test you need to have a VAT-40 automotive tester (or equivalent) complete with rheostat and current transformer.

1. Check the battery charge level and belt tension.

2. Check the contacts in all connections for voltage drop (see above).


3. Warm up the engine.

4. Connect the VAT-40 tester according to the instructions.

5. Start the engine and increase the speed to 3000 rpm (all consumers must be disconnected). After turning on the fan, let the engine idle for 15 minutes.

6. Increase the speed to 2000 rpm. The voltage should not be higher than 15.1 V. Otherwise, check the charging current with the current transformer that covers the terminal B wire on the generator.

7. To do this, increase the speed to 2000 rpm. The voltage should not be lower than 13.5 V. Otherwise, replace the generator.
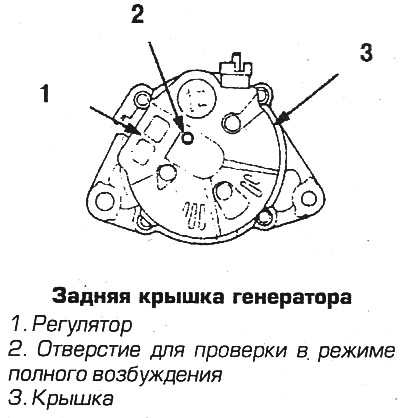
7. To do this, increase the speed to 2000 rpm.…


8. Connect the tester's equivalent load and set the current so that the voltage drops to 12-13.5 V. If the charging current is less than 75 A, check the voltage regulator and the generator in the full excitation mode of the generator. To do this, insert the probe from the tester kit into the hole in the rear cover of the generator and bring the engine speed to 2000 rpm. If the current is more than 65 A (CR-V) or 75 A (Odyssey), replace the voltage regulator; if it is less than the specified values, replace the generator.

[Publication reprinted from the website www.hondabook.ru]
This article is available at: russian, bulgarian, belarusian, ukrainian, serbian, croatian, romanian, polish, slovak, hungarian
This information has been verified: Emil Safonov
Share with friends:
◀ Previous
CR-V 1: Engine electrical equipment
Next ▶

Battery Charging System — General Information
Engine operating order
Ignition Coil Pack — Checking and Replacing
Ignition system without distributor
Ignition distributor — removal and installation
Removal and installation the generator
Checking the starter
Traction relay — checking and replacement
Removal and installation the starter
Coolant temperature sensor
See also other articles from Honda manuals:
Checking the performance of the pulse speed generator Honda Accord 3 (1985-1989)
Checking the fluid level in the power steering Honda Civic 3 and 4 (1983-1991)
Checking the generator Honda Fit 1 (2001-2008)
Checking the Generator Brushes (Denso) Honda HR-V 1 (1998-2006, petrol)
Checking the generator rectifier Honda Avancier 1 (1999-2003, petrol)
Link in different formats to this article
Comments and feedback from visitors
No comments yet


How much will 17 + 42 ?


CR-V 2 (2002-2006, petrol) 
  • General information
  • User manual
  • Technical data
  • Maintenance
  • Power unit
  • Engine repair
  • Lubrication system
  • Cooling system
  • Exhaust system
  • Fuel system
  • Engine management
  • Engine electrical equipment
  • Transmission
  • Clutch
  • Manual gearbox
  • Automatic gearbox
  • Rear differential
  • Drive shafts
  • Chassis and running gear
  • Steering
  • Front suspension
  • Rear suspension
  • Brake system
  • Body and interior
  • Exterior (external elements)
  • Interior (internal elements)
  • Doors, locks and windows
CR-V 1 (1995-2001, petrol) 
  • General information
  • Maintenance
  • Tips for car owner
  • Power unit
  • Engine repair
  • Engine overhaul
  • Cooling and lubrication system
  • Engine electrical equipment
  • Control system
  • Fuel system
  • Transmission
  • Clutch and drive shafts
  • Car gearbox
  • Chassis and running gear
  • Front suspension
  • Rear suspension
  • Steering
  • Brake system
  • Body and interior
  • Body service
  • Exterior (external elements)
  • Interior (internal elements)
  • Electrical equipment
  • Equipment and devices
  • Electrical circuits
HondaBook.ru © 2018–2026 • Mobile version • Sitemap: EN BG BY UA RS HR RO PL SK HU • Feedback • Driver Information • Search system • Bookmark
Accord 3 (1985-1989) • Accord 6 (1997-2002) • Civic 3 and 4 (1983-1991) • Civic 5 and 6 (1991-2000) • Civic 6 (1995-2000) • Civic 7 (2000-2005) • Civic 8 (2005-2011) • Fit 1 (2001-2008) • CR-V 1 (1995-2001) • CR-V 2 (2002-2006) • HR-V 1 (1998-2006) • Avancier 1 (1999-2003) •
 
This website uses cookies to ensure proper functioning. By clicking "OK," you agree.