
2. Remove the 4mm cotter pin and loosen, but do not completely remove, the spindle nut. Loosen the mounting nuts.
3. Raise and securely support the front of the vehicle with jacks. Check the reliability of the support carefully.
4. Loosen the wheel nuts and remove the wheel.
5. Remove the retaining pins and remove the large spindle nut.
6. Drain the oil from the gearbox.
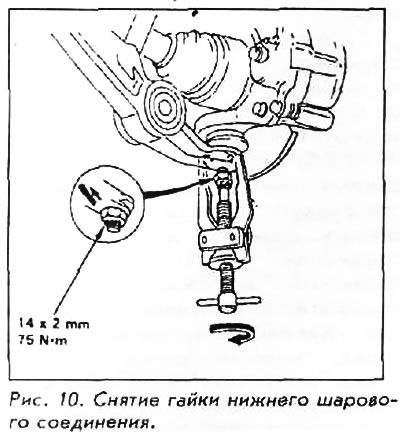
7. Using a ball joint puller, remove the lower control arm ball joints from the knuckle. Disconnect the tie rods from the steering control.
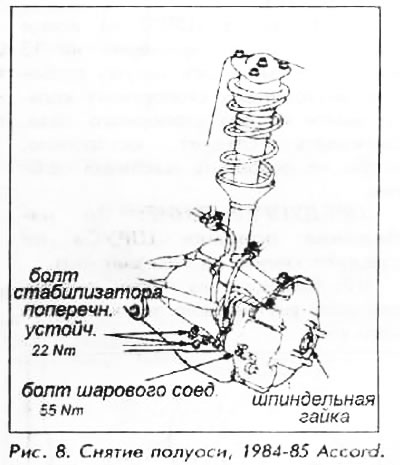
WARNING: On models with a lower control arm, always place a jack under the ball joint of the control arm and check that the jack support is secure. Otherwise, when removing the ball joint, the lower control arm may suddenly "jump out" of the steering knuckle.
8. On models with a lower control arm, remove the anti-roll bar retaining bolts and release the bar.
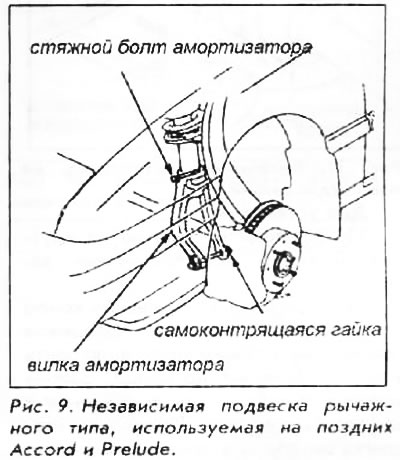
9. On the latest models with independent lever-type suspension, you should unscrew the shock absorber fork bolt and the shock absorber clamp bolt.
10. To remove the drive shaft, pull the knuckle toward you, then pull the shaft out of the knuckle.
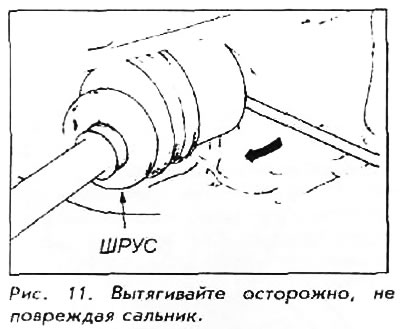
11. Pull the CV joint out at the end of the gearbox about 13 mm. Pulling the axle out allows the inner snap ring to come out of its retaining groove. Pull carefully to avoid damaging the oil seal.
WARNING: To avoid damaging the CV joint, do not pull on the joint itself.
12. Remove the inner part of the drive shaft from the differential cup.
To install:
13. Reinstall the spring clip onto the inner end of the axle.
14. Insert the inner end of the axle into the gearbox. The spline joint and clamp should go all the way into their positions. The clamp will snap into the locking position with a noticeable click. Check it by pulling it slightly in the opposite direction. Do not pull on the CV joint to check.
15. Pull the front hub outward and install the outer end of the axle shaft.
16. Assemble the suspension and steering ball joints. Use new cotter pins and new self-locking nuts when assembling each unit. Tighten individual parts as follows:
- 1984-85 Accord: Sway Bar Bolts - 22 Nm; lower ball joint - 55 Nm; connecting rod crown nut - 44 Nm.
- 1986-91 Accord: Shock Absorber Pinch Bolt - 44 Nm, Shock Absorber Fork or Lower Locknut - 65 Nm; lower ball joint crown nut - 55 Nm.
- 1984-91 Prelude: Shock absorber pinch bolt - 44 Nm, shock absorber fork or lower locknut - 65 Nm.
- 1984-87 and 1990-91 Prelude: Lower Ball Joint Castle Nut - 55 Nm.
- 1988-89 Prelude: Lower Ball Joint Castle Nut - 75 Nm.
17. Install the washer and NEW spindle nut. Tighten this nut very snugly, but do not tighten it to the max while the vehicle is still off the ground.
18. Install the wheel and lower the car to the ground.
19. Tighten the spindle nut. The tightening torque of the spindle nut is as follows:
- 1984-89 Accord: 185 Nm
- 1990-91 Accord: 245 Nm
- 1984-87 Prelude: 190 Nm
- 1988-89 Prelude: 185 Nm
- 1990-91 Prelude: 250 Nm
20. Using a drift or punch, deform the spindle nut ring so that it fits into the groove in the axle. This will secure the nut.
21. Tighten the mounting nuts.
22. Fill the gearbox with oil.