
Before disassembly, all wires and hoses must be marked. This will greatly facilitate the assembly process.
1. Disconnect the ground wire from the battery and transmission housing. Unlock the steering column. Set the lever to neutral.
2. Disconnect the following cables and wires:
- A. Clutch cable on release lever.
- b. Reversing light switch wires.
- V. TCS switch wires (transmission-controlled ignition spark).
- d. Starter solenoid wire.
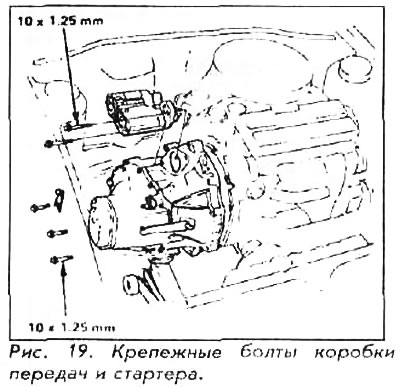
3. Release the engine wiring harness from the clip on the clutch housing. Remove the two upper gearbox mounting bolts.
4. Raise and support securely with stands in front of the vehicle. Make sure the racks are secure. Drain the gearbox oil.
5. Remove the front wheels. Place a suitable jack under the gearbox.
6. Disconnect the speedometer cable.
When disconnecting the speedometer cable, it is not necessary to remove the entire cable attachment assembly. Remove the end cover, then the cable fixing clip. and pull out the rope. It is not allowed to disassemble the cable mount unless absolutely necessary.
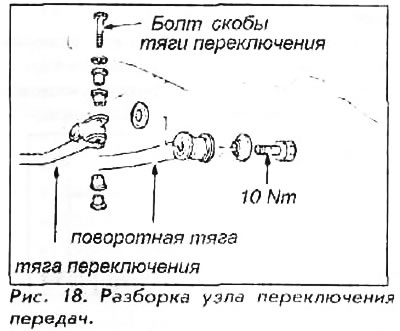
7. Disconnect the gearshift lever pivot rod from the clutch housing. Remove the bolt from the shift rod bracket.
8. Disconnect the tie rod ball joints and remove them with a ball joint remover.
9. Remove the lower control arm ball joint bolt on the right side of the lower control arm. Pull the ball joint out of the knuckle with a puller. Loosen the shock absorber bolt.
10. Disconnect drive shafts (axle shafts) from the gearbox. Move the axles so that they do not interfere, but do not leave them hanging, but fasten them to a wire or twine. Remove the right torque rod.
11. Remove the shock absorber bracket from the box. Unscrew the clutch housing mounting bolts from the front gearbox support.
12. Remove the clutch housing mounting bolts from the gearbox rear bracket. Remove the clutch housing.
13. Remove the starter mounting bolts and pull the starter assembly through the chassis. Loosen the gearbox mounting bolts.
14. Pull the gearbox out of the engine block until it is off the two 14mm dowel pins and jack it down.
WARNING: Do not leave the gearbox hanging on the input shaft. It is necessary to remove the gearbox at one time and to the end.
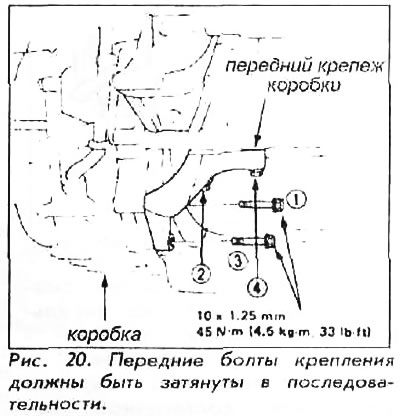
For installation:
15. Support a transmission a jack. Clean and lubricate the sliding surface of the release bearing.
16. Check that the two dowel pins are in place in the clutch housing.
17. Raise the assembly so that the pins are flush with the input sockets in the cylinder block.
18. Move the gearbox towards the engine and insert the input shaft into the grooves of the clutch disc. If the left suspension has not been disassembled and is in place, then install new spring clips on both axles and carefully insert the left axle into the differential at the same time as installing the gearbox.
19. Move the transmission assembly until it is flush with the edge of the engine block.
20. Tighten the bolts so that the clutch housing is against the engine block.
21. Screw on the bolts of the front gearbox support, and then tighten them one by one to a torque of 45 Nm.
22. Establish a back support of a transmission, having tightened bolts up to the moment of 45 Nm.
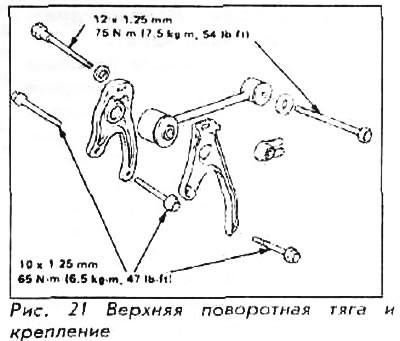
23. Install the top swivel link with its brackets. Tighten the bracket fixing bolts to 65 Nm and the tie bolts to 75 Nm.
24. Carefully remove the jack from under the gearbox.
25. Install the starter.
26. Install drive shafts if not already installed.
27. Install the lower arm and tie rod ball joints. Tighten the shock absorber bolts.
28. Connect draft of a gear change.
29. Connect the shift lever.
30. Connect the shift lever pivot rod to the clutch housing. Tighten the 8 mm bolts to 22 Nm.
31. Install the front wheels.
32. Carefully check that the Gearbox drain plug is in place and tight.
33. Lower the machine to the ground.
34. Connect the clutch cable to the release lever.
35. Lubricate the new O-ring with clean oil and install it in the speedometer cartridge. Install the chuck in the gearbox and secure with the key bolt.
36. Attach the engine wiring harness to the clamp on the clutch housing.
37. Connect the electrical wiring from the engine compartment to the starter, starter solenoid, and reversing light switch.
38. Fill the gearbox with the required amount of oil.