


Vehicle drive shafts and differential Honda Avancier 1

Drive shafts — check
Check the drive shaft boots for cracks and cuts. Replace the boots and clamps if necessary. Check for loose clamps and grease leaks. Replace clamps if necessary. Check the drive shafts for deformation and cracks....
Check the drive shaft boots for cracks and cuts. Replace the boots and clamps if necessary. Check for loose clamps and grease leaks. Replace clamps if necessary. Check the drive shafts for deformation and cracks....

Front Drive Shafts — Removal
Caution: Before carrying out any work, support the rear wheels with chocks and apply the parking brake. 1. Loosen the front wheel nuts. 2. Jack up the front of the vehicle and place stands on it. 3. Drain the oil from...
Caution: Before carrying out any work, support the rear wheels with chocks and apply the parking brake. 1. Loosen the front wheel nuts. 2. Jack up the front of the vehicle and place stands on it. 3. Drain the oil from...

Front Drive Shafts — Disassembly
Caution: Mark the removed parts so that they can be installed in their original locations during subsequent assembly. From the inner hinge side 1. Remove the ring clamp from the inner joint. 2. Remove the clamps without...
Caution: Mark the removed parts so that they can be installed in their original locations during subsequent assembly. From the inner hinge side 1. Remove the ring clamp from the inner joint. 2. Remove the clamps without...

Front Drive Shafts — Dynamic Damper Replacement
Models with a clamp 1. Remove the inner joint (see above). 2. Remove the dynamic damper clamp in the same way as the inner joint clamp (see above). If the clamps are welded or low profile, cut them off. If double loop...
Models with a clamp 1. Remove the inner joint (see above). 2. Remove the dynamic damper clamp in the same way as the inner joint clamp (see above). If the clamps are welded or low profile, cut them off. If double loop...

Front Drive Shafts — Assembly
Attention. Wash all components except rubber with flushing oil and blow with an air gun. Install Omega type clamps on the outer hinge covers. Lubricate the hinges and boots with the recommended grease. From the inner...
Attention. Wash all components except rubber with flushing oil and blow with an air gun. Install Omega type clamps on the outer hinge covers. Lubricate the hinges and boots with the recommended grease. From the inner...

Front Drive Shafts — Installation
Caution: Before installation, make sure that there is no dirt on the rubbing surfaces and splines. 1. Install the ring clamp onto the inner joint or intermediate shaft. 2. Insert the drive shaft until it clicks (the...
Caution: Before installation, make sure that there is no dirt on the rubbing surfaces and splines. 1. Install the ring clamp onto the inner joint or intermediate shaft. 2. Insert the drive shaft until it clicks (the...

Intermediate Shaft (4WD Models) — Removal
1. Remove the left drive shaft (see above). 2. Loosen the 10mm flange bolt and 10mm mounting bolts. 3. Remove the intermediate shaft from the differential. Caution: To avoid damaging the differential seal when removing...
1. Remove the left drive shaft (see above). 2. Loosen the 10mm flange bolt and 10mm mounting bolts. 3. Remove the intermediate shaft from the differential. Caution: To avoid damaging the differential seal when removing...

Intermediate Shaft (4WD Models) — Disassembly
1. Remove the ring clamp. 2. Remove the intermediate shaft outer oil seal. 3. Remove the outer snap ring. 4. Press the intermediate shaft out of the bearing. Caution: Do not damage the metal rings of the intermediate...
1. Remove the ring clamp. 2. Remove the intermediate shaft outer oil seal. 3. Remove the outer snap ring. 4. Press the intermediate shaft out of the bearing. Caution: Do not damage the metal rings of the intermediate...

Intermediate Shaft (4WD Models) — Assembly
Attention. Wash all components except rubber with flushing oil and blow with an air gun. Do not damage the metal rings on the intermediate shaft while performing work. When installing the outer seal, make sure that the...
Attention. Wash all components except rubber with flushing oil and blow with an air gun. Do not damage the metal rings on the intermediate shaft while performing work. When installing the outer seal, make sure that the...

Intermediate Shaft (4WD Models) — Installation
1. Insert the intermediate shaft into the differential. Caution: To avoid damaging the differential seal when installing the shaft, keep it horizontal. 2. Tighten the 10mm flange bolt and 10mm set bolts. 3. Install the...
1. Insert the intermediate shaft into the differential. Caution: To avoid damaging the differential seal when installing the shaft, keep it horizontal. 2. Tighten the 10mm flange bolt and 10mm set bolts. 3. Install the...

Rear Drive Shafts (4WD Models) — Removal
Caution: Before carrying out any work, support the front wheels with chocks and apply the parking brake. 1. Loosen the rear wheel nuts. 2. Jack up the rear of the vehicle and place stands on it. 3. Remove the rear...
Caution: Before carrying out any work, support the front wheels with chocks and apply the parking brake. 1. Loosen the rear wheel nuts. 2. Jack up the rear of the vehicle and place stands on it. 3. Remove the rear...

Rear Drive Shafts (4WD Models) — Disassembly
The procedure for disassembling and assembling the outer hinge is the same as the inner hinge, so only the inner hinge is considered below. Do the work with a cloth underneath. Mark the removed parts so that they can be...
The procedure for disassembling and assembling the outer hinge is the same as the inner hinge, so only the inner hinge is considered below. Do the work with a cloth underneath. Mark the removed parts so that they can be...

Rear Drive Shafts (4WD Models) — Assembly
Attention. Wash all components except rubber parts with flushing oil and blow with an air gun. Pack the inner/outer hinges and boots with the recommended grease. Recommended lubricant: NIPPON OIL CO., LTD. U131-15 BS №1...
Attention. Wash all components except rubber parts with flushing oil and blow with an air gun. Pack the inner/outer hinges and boots with the recommended grease. Recommended lubricant: NIPPON OIL CO., LTD. U131-15 BS №1...

Rear Drive Shafts (4WD Models) — Installation
Caution: Before installation, make sure that there is no dirt on the rubbing surfaces and splines. 1. Install the ring clamp onto the inner joint. 2. Insert the outer joint into the rear wheel hub. Insert strictly in...
Caution: Before installation, make sure that there is no dirt on the rubbing surfaces and splines. 1. Install the ring clamp onto the inner joint. 2. Insert the outer joint into the rear wheel hub. Insert strictly in...

Driveshaft (4WD models) — Inspection
Checking the play in the connections and checking the covers 1. Shift into neutral. 2. Using a jack, raise the vehicle and install supports. 3. Check for any play in the area where the central bearing support and...
Checking the play in the connections and checking the covers 1. Shift into neutral. 2. Using a jack, raise the vehicle and install supports. 3. Check for any play in the area where the central bearing support and...

Driveshaft (4WD models) — removal and installation
1. Remove the cardan shaft guard No.1. 2. Place marks on the #2 driveshaft and the rear differential where they connect. 3. Remove the four 12-point bolts and separate the #2 driveshaft from the rear differential. 4....
1. Remove the cardan shaft guard No.1. 2. Place marks on the #2 driveshaft and the rear differential where they connect. 3. Remove the four 12-point bolts and separate the #2 driveshaft from the rear differential. 4....

Rear Differential (4WD Models) — Features of this Model
This 4WD model does not have the ability to mechanically switch to 2WD mode. Therefore, free-spinning rollers must be used to check the speedometer. Notes when using free-spinning rollers Do not press the accelerator...
This 4WD model does not have the ability to mechanically switch to 2WD mode. Therefore, free-spinning rollers must be used to check the speedometer. Notes when using free-spinning rollers Do not press the accelerator...
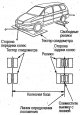
Rear Differential (4WD Models) — Test Sequence
1. Install the rollers according to the wheelbase of the vehicle. Caution: The rollers and speedometer tester must be installed parallel to each other. 2. Place the car with the front wheels on the tester and the rear...
1. Install the rollers according to the wheelbase of the vehicle. Caution: The rollers and speedometer tester must be installed parallel to each other. 2. Place the car with the front wheels on the tester and the rear...

Real time 4WD fault diagnostics (Dual pump system)
When starting off or accelerating in forward gears (4WD mode) 1. Raise the vehicle with all four wheels off the ground. 2. Place a mark on the drive shaft. The mark can be applied to any cardan shaft (No. 1 or No.2). 3....
When starting off or accelerating in forward gears (4WD mode) 1. Raise the vehicle with all four wheels off the ground. 2. Place a mark on the drive shaft. The mark can be applied to any cardan shaft (No. 1 or No.2). 3....

Rear Differential Fault Diagnosis
Caution: When performing noise diagnostics, do not confuse differential noise with engine noise and noise in other chassis components.
Caution: When performing noise diagnostics, do not confuse differential noise with engine noise and noise in other chassis components.

Rear Differential Oil — Checking and Replacing
Caution: Install the jack and stands in the designated places. Examination 1. Stop the vehicle on a level surface and make sure the oil is level with the lower edge of the filler hole. 2. If the oil level is low, add...
Caution: Install the jack and stands in the designated places. Examination 1. Stop the vehicle on a level surface and make sure the oil is level with the lower edge of the filler hole. 2. If the oil level is low, add...

Removal and installation the rear differential
1. Drain the oil from the rear differential. 2. Remove the muffler. 3. Mark the coupling flange and propeller shaft and disconnect them. 4. Remove the 7 rear differential bracket A/rubber isolator A mounting bolts. 5....
1. Drain the oil from the rear differential. 2. Remove the muffler. 3. Mark the coupling flange and propeller shaft and disconnect them. 4. Remove the 7 rear differential bracket A/rubber isolator A mounting bolts. 5....

Differential housing
Eliminating oil leaks 1. Loosen the mounting bolts crosswise, unscrew them and remove the differential housing. Remove the seals. 2. Apply sealant to the sealing surfaces. Attention. Use Honda 1216 sealant. Remove old...
Eliminating oil leaks 1. Loosen the mounting bolts crosswise, unscrew them and remove the differential housing. Remove the seals. 2. Apply sealant to the sealing surfaces. Attention. Use Honda 1216 sealant. Remove old...

Seals — replacement
Differential housing 1. Remove the oil seal from the differential housing. 2. Press in the oil seal. Apply Honda 1216 sealant to the clearance areas between the oil seal and the differential housing (4 areas). Caution:...
Differential housing 1. Remove the oil seal from the differential housing. 2. Press in the oil seal. Apply Honda 1216 sealant to the clearance areas between the oil seal and the differential housing (4 areas). Caution:...

Seals — disassembly
1. Disconnect the breather hose, unscrew the filler and drain hole bolts. 2. Chisel the lock nut (24 mm). 3. Install the special tool on the rear differential. 4. Loosen the lock nut slightly so that the caulking point...
1. Disconnect the breather hose, unscrew the filler and drain hole bolts. 2. Chisel the lock nut (24 mm). 3. Install the special tool on the rear differential. 4. Loosen the lock nut slightly so that the caulking point...

Seals — assembly
1. Install the oil pump pin, magnet and automatic transmission oil filter to the differential housing assembly. Caution: Before installing the oil filter, apply automatic transmission oil to its rubber surfaces. 2....
1. Install the oil pump pin, magnet and automatic transmission oil filter to the differential housing assembly. Caution: Before installing the oil filter, apply automatic transmission oil to its rubber surfaces. 2....
This section is available on: russian, bulgarian, belarusian, ukrainian, serbian, croatian, romanian, polish, slovak, hungarian
Link in different formats to this section
TEXTHTMLBB Code
- General information
- Controls and instruments
- User manual
- Power unit
- Engine maintenance
- Engine repair
- Cooling system
- Engine management
- Power and exhaust system
- Transmission
- Automatic gearbox
- Drive shafts and differential
- Chassis and running gear
- Steering
- Car suspension
- Brake system
- Body and interior
- Doors, locks and windows
- Interior (internal elements)
- Exterior (external elements)
- Air conditioner
- Electrical equipment
- Power devices
- Equipment and devices
- Headlights and lighting
- Electrical circuits