


Vehicle owner's manual Honda Avancier 1

Starting the engine
Attention: Do not start the engine if the battery electrolyte level is low. This may cause battery failure. Do not leave the vehicle with the engine running in a poorly ventilated area, as you may be poisoned by carbon...
Attention: Do not start the engine if the battery electrolyte level is low. This may cause battery failure. Do not leave the vehicle with the engine running in a poorly ventilated area, as you may be poisoned by carbon...

Parking brake
Tightening the parking brake Press the parking brake pedal firmly with your left foot. The parking brake locks the rear wheels. Note: If you decide to tighten the parking brake further after tightening it, first release...
Tightening the parking brake Press the parking brake pedal firmly with your left foot. The parking brake locks the rear wheels. Note: If you decide to tighten the parking brake further after tightening it, first release...

Selector lever, automatic transmission
Models L, L-4 Assignment of the different positions of the selector lever Moving the selector lever Note: Set the automatic transmission selector lever to the desired position without error. If you move the lever to the...
Models L, L-4 Assignment of the different positions of the selector lever Moving the selector lever Note: Set the automatic transmission selector lever to the desired position without error. If you move the lever to the...

Driving cars with automatic transmission
In cars with automatic transmission, clutch control and gear shifting occur automatically, which makes driving the car much easier. Before starting the engine Get into a comfortable position and make sure that you can...
In cars with automatic transmission, clutch control and gear shifting occur automatically, which makes driving the car much easier. Before starting the engine Get into a comfortable position and make sure that you can...

Stopping the car
1. With the selector lever in position D, press the brake pedal. If necessary, apply the parking brake. Caution: Do not press the accelerator and brake pedals simultaneously. Also, do not stop the vehicle on an incline...
1. With the selector lever in position D, press the brake pedal. If necessary, apply the parking brake. Caution: Do not press the accelerator and brake pedals simultaneously. Also, do not stop the vehicle on an incline...

Car parking
1. Stop the vehicle completely. 2. While keeping the brake pedal depressed, apply the parking brake. 3. Move the selector lever to position P. Note: When parking, always make sure that the automatic transmission...
1. Stop the vehicle completely. 2. While keeping the brake pedal depressed, apply the parking brake. 3. Move the selector lever to position P. Note: When parking, always make sure that the automatic transmission...

Adaptive Cruise Control (IHCC) System — Device
The system is used on expressways and special highways where it is rarely necessary to accelerate or decelerate the vehicle. The system allows the distance and speed to be maintained automatically, without using the...
The system is used on expressways and special highways where it is rarely necessary to accelerate or decelerate the vehicle. The system allows the distance and speed to be maintained automatically, without using the...

Driving with the IHCC system operating
The system allows you to maintain a constant distance between you and the car in front. When the system is operating, the driver is notified of the traffic status. About the IHCC system The distance between cars is...
The system allows you to maintain a constant distance between you and the car in front. When the system is operating, the driver is notified of the traffic status. About the IHCC system The distance between cars is...

About brake lights
When the vehicle automatically brakes due to the IHCC system, the brake lights come on. Note: You can check the operation of the brake lights as follows: Stop the car. Set the automatic transmission selector lever to...
When the vehicle automatically brakes due to the IHCC system, the brake lights come on. Note: You can check the operation of the brake lights as follows: Stop the car. Set the automatic transmission selector lever to...

Setting the desired speed and moving at a constant speed
1. Turn on the IHCC system by pressing the "CRUISE" switch to the ON side (the indicator on the button will light). If you press the switch from the OFF side, the system will turn off. If the ignition key is set to...
1. Turn on the IHCC system by pressing the "CRUISE" switch to the ON side (the indicator on the button will light). If you press the switch from the OFF side, the system will turn off. If the ignition key is set to...

Changing the set distance between cars
You can set 3 distance levels depending on the speed of movement. (Distance depending on the speed of movement: with increasing speed the distance decreases, with decreasing speed the distance increases). The set...
You can set 3 distance levels depending on the speed of movement. (Distance depending on the speed of movement: with increasing speed the distance decreases, with decreasing speed the distance increases). The set...

Disabling the IHCC system
To turn off the system, press the "CANCEL" switch or press the brake pedal. You can also turn off the system by pressing the "CRUISE" switch on the OFF side. Automatic shutdown of the IHCC system In the following cases,...
To turn off the system, press the "CANCEL" switch or press the brake pedal. You can also turn off the system by pressing the "CRUISE" switch on the OFF side. Automatic shutdown of the IHCC system In the following cases,...

IHCC indicator and warning light
System operation indicator (green) This indicator lights up when the system is running. Lights up when the vehicle speed is limited. Does not light when the system is off. Flashes for approx. 5 seconds after the system...
System operation indicator (green) This indicator lights up when the system is running. Lights up when the vehicle speed is limited. Does not light when the system is off. Flashes for approx. 5 seconds after the system...

Warning buzzer
Single sound When the system has measured the distance to the vehicle in front or when it is not possible to measure the distance. When you press the gas pedal while the system is operating. Triple sound During...
Single sound When the system has measured the distance to the vehicle in front or when it is not possible to measure the distance. When you press the gas pedal while the system is operating. Triple sound During...

Automatic system shutdown
In the following cases, the display shown in the figure appears on the screen for 5 seconds and the system turns off automatically. The laser photodetector is dirty. Wipe the photodetector window area with a soft cloth...
In the following cases, the display shown in the figure appears on the screen for 5 seconds and the system turns off automatically. The laser photodetector is dirty. Wipe the photodetector window area with a soft cloth...

Laser photodetector
Laser photodetector maintenance To ensure the system works properly, please follow these guidelines. Keep the laser photodetector window clean at all times. Do not subject the laser to strong impacts. If the laser is...
Laser photodetector maintenance To ensure the system works properly, please follow these guidelines. Keep the laser photodetector window clean at all times. Do not subject the laser to strong impacts. If the laser is...
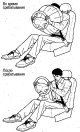
Front airbags
Airbag device Frontal airbags for the driver and front passenger are designed to deploy in the event of a severe frontal impact and help cushion the blow to the head. The airbag system is not a substitute for seat...
Airbag device Frontal airbags for the driver and front passenger are designed to deploy in the event of a severe frontal impact and help cushion the blow to the head. The airbag system is not a substitute for seat...

Side airbag system
The structure of the side airbag system Side airbags for the driver and front passenger are activated in the event of a severe side impact, deploying in the space between the crew members and the doors, helping to...
The structure of the side airbag system Side airbags for the driver and front passenger are activated in the event of a severe side impact, deploying in the space between the crew members and the doors, helping to...

Seat belt pretensioners
Operation of seat belt pretensioners In the event of a severe frontal collision, the driver and front passenger seat belts are instantly tightened, increasing their effectiveness. The pretensioners are activated...
Operation of seat belt pretensioners In the event of a severe frontal collision, the driver and front passenger seat belts are instantly tightened, increasing their effectiveness. The pretensioners are activated...

ABS (Anti-lock Braking System)
ABS system operation About ABS system This system prevents the wheels from locking (the wheels do not rotate) during sudden braking or braking on a slippery road, thereby ensuring vehicle control and facilitating...
ABS system operation About ABS system This system prevents the wheels from locking (the wheels do not rotate) during sudden braking or braking on a slippery road, thereby ensuring vehicle control and facilitating...

4WD Model Capabilities (L-4, V-4 Models)
Driving a car 4WD vehicles have a huge advantage over 2WD vehicles on sandy, swampy, mountainous and slippery roads. The accelerator pedal, steering wheel, and brake pedal are controlled in the same way as in...
Driving a car 4WD vehicles have a huge advantage over 2WD vehicles on sandy, swampy, mountainous and slippery roads. The accelerator pedal, steering wheel, and brake pedal are controlled in the same way as in...
Other safety devices
The vehicles are equipped with the following additional safety devices: Automatic transmission selector lever locking device. Prevents erroneous movement of the automatic transmission selector lever. Upper brake light....
The vehicles are equipped with the following additional safety devices: Automatic transmission selector lever locking device. Prevents erroneous movement of the automatic transmission selector lever. Upper brake light....

Comprehensive information display
Models without navigation system Displays on the display The display shows the following information. 1. Display the operating status of the audio system. The audio system operating status is displayed when the ignition...
Models without navigation system Displays on the display The display shows the following information. 1. Display the operating status of the audio system. The audio system operating status is displayed when the ignition...

Adjusting the air conditioner deflectors
To adjust the airflow direction, move the handles up and down and left and right. Central deflectors Side deflectors To blow air from the side, turn the regulator towards the opening side. Note: To quickly remove fog...
To adjust the airflow direction, move the handles up and down and left and right. Central deflectors Side deflectors To blow air from the side, turn the regulator towards the opening side. Note: To quickly remove fog...

Automatic air conditioner
Using the air conditioner Use the air conditioner while the engine is running. Common use 1. Press the AUTO button. 2. Set the desired temperature in the cabin. To turn off the air conditioner, press the OFF button....
Using the air conditioner Use the air conditioner while the engine is running. Common use 1. Press the AUTO button. 2. Set the desired temperature in the cabin. To turn off the air conditioner, press the OFF button....

Antenna — General Information
Central antenna The central antenna is tilted back approx. at 60°. If the antenna has dropped during washing in an automatic washing machine, return it to its original position (at an angle of approximately 60°). Note:...
Central antenna The central antenna is tilted back approx. at 60°. If the antenna has dropped during washing in an automatic washing machine, return it to its original position (at an angle of approximately 60°). Note:...

Audio system with AM/FM radio
The system is ready for operation when the ignition key is in position "I" or "II". Turning on the power supply To turn on the audio system, press the power button. If you press this button several times, it will switch...
The system is ready for operation when the ignition key is in position "I" or "II". Turning on the power supply To turn on the audio system, press the power button. If you press this button several times, it will switch...

Audio system — listening to a tape recorder
Playback Changing the direction of the tape To change the direction of the tape, press button "3". If the tape runs out, the direction of the tape will change automatically. Removal the cassette Press the cassette eject...
Playback Changing the direction of the tape To change the direction of the tape, press button "3". If the tape runs out, the direction of the tape will change automatically. Removal the cassette Press the cassette eject...

Audio system — CD changer (if available)
Listening to CDs 1. TAPE/AUX switch button. Each time you press this button, playback switches from the CD changer to the cassette recorder and vice versa. 2. Disc selection (DISC switch). Switching is done by pressing...
Listening to CDs 1. TAPE/AUX switch button. Each time you press this button, playback switches from the CD changer to the cassette recorder and vice versa. 2. Disc selection (DISC switch). Switching is done by pressing...

Steering wheel audio controls
CD changer (if available) The CD changer is located in the side pocket of the rear shelf. Installing and removing a disk 1. Press the button to open the tray. 2. Place the disc with the label facing up and insert it...
CD changer (if available) The CD changer is located in the side pocket of the rear shelf. Installing and removing a disk 1. Press the button to open the tray. 2. Place the disc with the label facing up and insert it...

Salon equipment
Interior light Position "ON" The lamp works regardless of whether the doors are open or closed. Central position Lights up when the doors are opened and goes out after closing. In addition, the light comes on and then...
Interior light Position "ON" The lamp works regardless of whether the doors are open or closed. Central position Lights up when the doors are opened and goes out after closing. In addition, the light comes on and then...

Luggage compartment
Spare wheel compartment cover Grab the hook and open the lid. If you want to leave the lid open, hook the hook onto the loop installed on the bottom of the shelf. Rear shelf Remove the latch from the back of the rear...
Spare wheel compartment cover Grab the hook and open the lid. If you want to leave the lid open, hook the hook onto the loop installed on the bottom of the shelf. Rear shelf Remove the latch from the back of the rear...

On-board tool, jack, spare wheel, squib
Location Jack, spare tire The spare wheel is located in a niche under the cover. Pyro cartridge The pyropatron is located near the feet of the front passenger. On-board tool
Location Jack, spare tire The spare wheel is located in a niche under the cover. Pyro cartridge The pyropatron is located near the feet of the front passenger. On-board tool

In case of a puncture of a tire — use a jack
Removal the jack 1. Grasp the hook, lift the lid and hook it onto the loop of the rear shelf. 2. Remove the jack. Jack mounting locations Raising a car with a jack 1. Stop the car on a level section of road with a hard...
Removal the jack 1. Grasp the hook, lift the lid and hook it onto the loop of the rear shelf. 2. Remove the jack. Jack mounting locations Raising a car with a jack 1. Stop the car on a level section of road with a hard...

Spare wheel
1. Open the cover and remove the tray with the on-board tool. 2. Loosen the mounting bolt and remove the spare wheel. The spare tire is used only in case of a puncture of the road tire. When using a spare tire, follow...
1. Open the cover and remove the tray with the on-board tool. 2. Loosen the mounting bolt and remove the spare wheel. The spare tire is used only in case of a puncture of the road tire. When using a spare tire, follow...

Wheel replacement
I Preparation 1. Stop the vehicle on a level, hard surface, remove the on-board tool and spare tire. 2. Apply the parking brake, support the wheel on the diagonally opposite side of the punctured wheel with stones on...
I Preparation 1. Stop the vehicle on a level, hard surface, remove the on-board tool and spare tire. 2. Apply the parking brake, support the wheel on the diagonally opposite side of the punctured wheel with stones on...

Checking and replacing fuses
Location of fuse boxes From the driver's door side Near the front passenger's feet In the engine compartment Removal fuses Remove the fuse using a fuse puller. When the fuse blows If the fuse is blown, replace it with...
Location of fuse boxes From the driver's door side Near the front passenger's feet In the engine compartment Removal fuses Remove the fuse using a fuse puller. When the fuse blows If the fuse is blown, replace it with...

Replacing lamps
If the lights are not working but the fuses are OK, it can be assumed that the bulbs have burned out. Check and replace burnt out bulbs. Headlight bulbs (high beam) Be careful when handling halogen lamps. Models V, V-4...
If the lights are not working but the fuses are OK, it can be assumed that the bulbs have burned out. Check and replace burnt out bulbs. Headlight bulbs (high beam) Be careful when handling halogen lamps. Models V, V-4...

Fog lights
Be careful when handling halogen lamps. 1. Loosen the mounting bolt and remove the headlight. 2. Disconnect the connector. 3. Remove the rubber cover. 4. Bend back the clamp and remove the lamp. 5. Remove the lamp....
Be careful when handling halogen lamps. 1. Loosen the mounting bolt and remove the headlight. 2. Disconnect the connector. 3. Remove the rubber cover. 4. Bend back the clamp and remove the lamp. 5. Remove the lamp....

Front side lights
Right side 1. Turn the socket counterclockwise and remove the lamp. Left side Models V, V-4 1. Remove the clip and remove the cover. 2. Turn the socket counterclockwise and remove the lamp. To secure the lid, press the...
Right side 1. Turn the socket counterclockwise and remove the lamp. Left side Models V, V-4 1. Remove the clip and remove the cover. 2. Turn the socket counterclockwise and remove the lamp. To secure the lid, press the...

Other lights
Turn signal repeater/hazard warning lights Wrap a rag around a screwdriver, press it against the spring from the back side and remove the light. Turn the socket counterclockwise and remove the lamp. Brake/tail lights,...
Turn signal repeater/hazard warning lights Wrap a rag around a screwdriver, press it against the spring from the back side and remove the light. Turn the socket counterclockwise and remove the lamp. Brake/tail lights,...

Emergency release of the rear door
If it is not possible to unlock the rear door from the outside, this can be done from inside the vehicle by removing the cover and turning the locking lever in the direction of the arrow shown in the figure. To lock the...
If it is not possible to unlock the rear door from the outside, this can be done from inside the vehicle by removing the cover and turning the locking lever in the direction of the arrow shown in the figure. To lock the...

Technical data
*1: Headlights with gas discharge lamps *2: Headlights with halogen lamps Warning. Replace gas discharge lamps only at a service station. High voltage is used in headlights with gas discharge lamps, so you can get an...
*1: Headlights with gas discharge lamps *2: Headlights with halogen lamps Warning. Replace gas discharge lamps only at a service station. High voltage is used in headlights with gas discharge lamps, so you can get an...

Recommended oil
It is recommended to use Honda engine oil or API SG type oil. Select oil viscosity according to expected outside air temperature.
It is recommended to use Honda engine oil or API SG type oil. Select oil viscosity according to expected outside air temperature.

Checking the amount of washer fluid
The fluid level in the tank is checked with a dipstick attached to the tank lid. L models L-4 Models V models V-4 Models *: Install tires designed for these models. Installing tires not intended for these models may...
The fluid level in the tank is checked with a dipstick attached to the tank lid. L models L-4 Models V models V-4 Models *: Install tires designed for these models. Installing tires not intended for these models may...
This section is available on: russian, bulgarian, belarusian, ukrainian, serbian, croatian, romanian, polish, slovak, hungarian
Link in different formats to this section
TEXTHTMLBB Code
- General information
- Controls and instruments
- User manual
- Power unit
- Engine maintenance
- Engine repair
- Cooling system
- Engine management
- Power and exhaust system
- Transmission
- Automatic gearbox
- Drive shafts and differential
- Chassis and running gear
- Steering
- Car suspension
- Brake system
- Body and interior
- Doors, locks and windows
- Interior (internal elements)
- Exterior (external elements)
- Air conditioner
- Electrical equipment
- Power devices
- Equipment and devices
- Headlights and lighting
- Electrical circuits