HondaBook.ru
Auto companies Volkswagen Auto companies Ford Auto companies Lada Auto companies Skoda Auto companies BMW Auto companies Mazda Auto companies Peugeot
English Русский
Български
Беларускі
Український
Српски
Hrvatski
Română
Polski
Slovenský
Magyar
Bookmark Contacts Sitemap   


Accord Civic Fit / Jazz CR-V HR-V Others Articles
Avancier 1 (1999-2003, petrol)

Front Brake Pads — Checking and Replacing (Honda Avancier 1)

  • Main
  • Honda
  • Avancier 1 (1999-2003, petrol)
  • Chassis and running gear
  • Brake system
  • Front Brake Pads — Checking and Replacing
0
Contents: Examination ⇊ Replacement ⇊

Examination


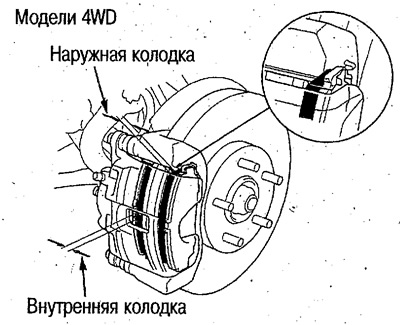
Check the thickness of the pads. If the thickness of the pads is less than the maximum, replace the inner and outer pads as a set.
  • Standard pad thickness: 11 mm
  • Maximum pad thickness: 1.6 mm

Without taking into account the thickness of the metal plate.
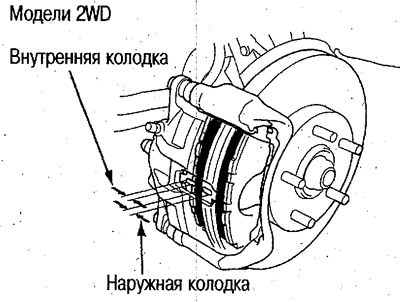
Without taking into account the thickness of the…

Replacement


Caution: Make sure that no oil gets on the rubbing surfaces of the pads and brake disc.


The procedure for replacing brake pads is considered using 2WD models as an example.

1. Disconnect the brake hose from the steering knuckle.

2. While holding the caliper pin with an Allen key, loosen the lower flange bolt (10mm) and rotate the caliper body upward.
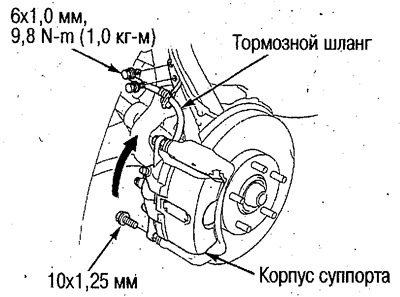
2. While holding the caliper pin with an Allen…


3. Tie the caliper body with wire.


Caution: Do not hang the caliper body on the brake hose. Do not damage the brake hose with the bracket and other components.


4. Remove the brake pads and linings from the caliper bracket.
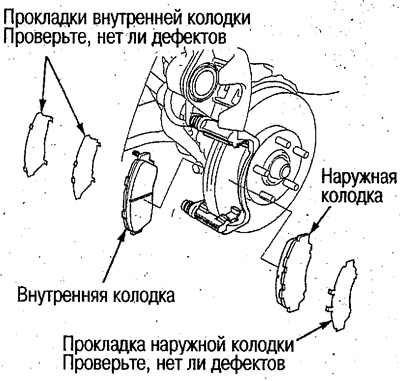
4. Remove the brake pads and linings from the…


5. Remove the brake pad holders and clean them.

6. Clean the caliper bracket.

7. Install the brake shoe holders.
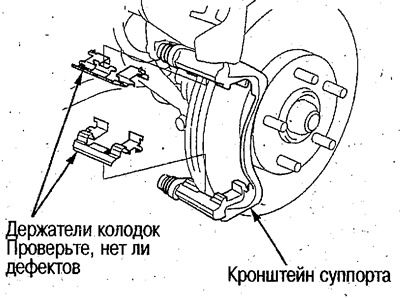
7. Install the brake shoe holders.


8. Apply Morikoto M77 or Daikarubu 528D grease to the areas shown by the arrows in the figure.

Attention:
  • Apply grease so that the grease is not squeezed out during installation of the gaskets.
  • Do not apply lubricant to the rubbing surfaces of the brake disc and brake pads.
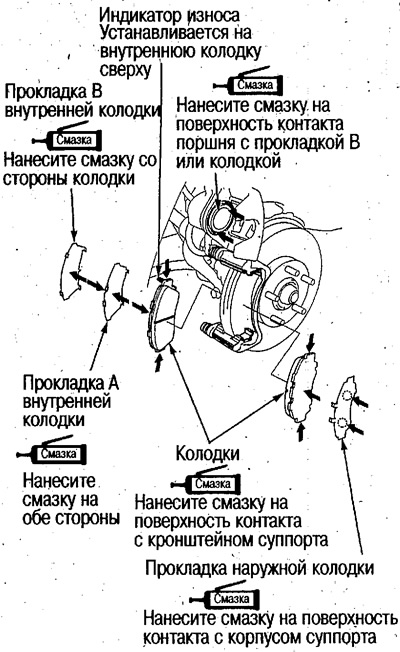

Do not apply lubricant to the rubbing surfaces of…


9. Clean the caliper body and carefully press in the piston.


Make sure there is no brake fluid leaking from the reservoir on the master cylinder.

10. Return the caliper body to its original position and, holding the caliper pin with an Allen key, tighten the flange bolt.
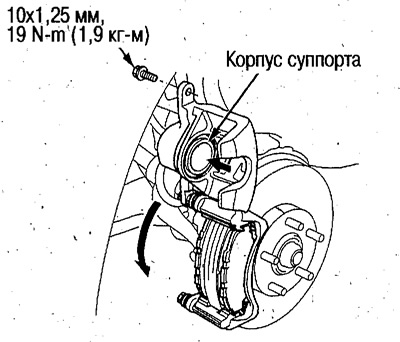
10. Return the caliper body to its original…


11. Connect the brake hose to the steering knuckle.

12. Extend the piston by pressing the brake pedal several times.

Caution: Do not start driving with the pistons not extended. If the piston is retracted too far, the braking effect may be insufficient when the pedal is first pressed.


13. Check the brake fluid level in the reservoir.

14. After assembly, check that the brake hose is not kinked, that the brake hose does not touch other components, and that brake fluid does not leak.
This article is available at: russian, bulgarian, belarusian, ukrainian, serbian, croatian, romanian, polish, slovak, hungarian
This information has been verified: Emil Safonov
Share with friends:
◀ Previous
Avancier 1: Brake system
Next ▶

Brake system — bleeding
Checking and adjusting the parking brake pedal
Checking and adjusting the brake pedal
Frequency of checking rubber components and brake booster
Component Locations
Front brake discs — check for runout
Front brake discs — thickness and parallelism check
Front Brake Discs — Brake Disc Grinding
Front Brake Caliper — Disassembly
Front Brake Caliper — Assembly
See also other articles from Honda manuals:
Front Disc Brake Pads — Inspection Honda Accord 3 (1985-1989)
Checking and replacing the brake fluid level switch sensor Honda Civic 6 (1995-2000)
Replacing the front brake pads Honda Fit 1 (2001-2008)
Checking and replacing the front brake pads — on a 15-inch brake disc Honda CR-V 2 (2002-2006, petrol)
Front Brake Pads — Checking and Replacing Honda HR-V 1 (1998-2006, petrol)
Link in different formats to this article
Comments and feedback from visitors
No comments yet


How much will 24 + 18 ?


Avancier 1 (1999-2003, petrol) 
  • General information
  • Controls and instruments
  • User manual
  • Power unit
  • Engine maintenance
  • Engine repair
  • Cooling system
  • Engine management
  • Power and exhaust system
  • Transmission
  • Automatic gearbox
  • Drive shafts and differential
  • Chassis and running gear
  • Steering
  • Car suspension
  • Brake system
  • Body and interior
  • Doors, locks and windows
  • Interior (internal elements)
  • Exterior (external elements)
  • Air conditioner
  • Electrical equipment
  • Power devices
  • Equipment and devices
  • Headlights and lighting
  • Electrical circuits
HondaBook.ru © 2018–2026 • Mobile version • Sitemap: EN BG BY UA RS HR RO PL SK HU • Feedback • Driver Information • Search system • Bookmark
Accord 3 (1985-1989) • Accord 6 (1997-2002) • Civic 3 and 4 (1983-1991) • Civic 5 and 6 (1991-2000) • Civic 6 (1995-2000) • Civic 7 (2000-2005) • Civic 8 (2005-2011) • Fit 1 (2001-2008) • CR-V 1 (1995-2001) • CR-V 2 (2002-2006) • HR-V 1 (1998-2006) • Avancier 1 (1999-2003) •
 
This website uses cookies to ensure proper functioning. By clicking "OK," you agree.