


Car automatic transmission Honda Fit/Jazz 1

General information about automatic transmission
Power from the engine is transmitted to the input shaft of the gearbox via a torque converter. Gear shifting is accomplished by engaging a specific combination of controls, which changes the output shaft speed....
Power from the engine is transmitted to the input shaft of the gearbox via a torque converter. Gear shifting is accomplished by engaging a specific combination of controls, which changes the output shaft speed....

Automatic transmission — device
Location of automatic transmission control system components. 1 - gear shifter (downshifting), 2 - gear shifter (upshifts), 3 - diagnostic connector, 4 - selector position sensor "P", 5 - electromagnetic valve of...
Location of automatic transmission control system components. 1 - gear shifter (downshifting), 2 - gear shifter (upshifts), 3 - diagnostic connector, 4 - selector position sensor "P", 5 - electromagnetic valve of...

Automatic transmission diagnostics
Description of the diagnostic system The electronic control unit has a failure protection system that can detect a malfunction in the system. When the ignition key is turned to the "ON" position, the automatic...
Description of the diagnostic system The electronic control unit has a failure protection system that can detect a malfunction in the system. When the ignition key is turned to the "ON" position, the automatic...

Stall test with vehicle at full braking (Stall test)
1. Preparation: a) Apply the parking brake and place chocks under the wheels. b) Check the following parameters: engine coolant level; engine oil level; automatic transmission fluid level; ignition timing angle; idle...
1. Preparation: a) Apply the parking brake and place chocks under the wheels. b) Check the following parameters: engine coolant level; engine oil level; automatic transmission fluid level; ignition timing angle; idle...

Pressure check
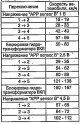
1. Preparation: a) (2WD models) Apply the parking brake and chock the rear wheels. Jack up the front of the vehicle and support it on stands. Make sure the front wheels turn freely. b) (2WD models) Jack up the vehicle...
1. Preparation: a) (2WD models) Apply the parking brake and chock the rear wheels. Jack up the front of the vehicle and support it on stands. Make sure the front wheels turn freely. b) (2WD models) Jack up the vehicle...
Road test
1. Start and warm up the engine. 2. Apply the parking brake and place chocks under the wheels. 3. Move the selector to position "D" and press the brake pedal. Press the accelerator pedal and release it sharply. The...
1. Start and warm up the engine. 2. Apply the parking brake and place chocks under the wheels. 3. Move the selector to position "D" and press the brake pedal. Press the accelerator pedal and release it sharply. The...
Checking the level and replacing the working fluid of the automatic transmission
The procedure for checking the level and replacing the working fluid is described in the chapter " Maintenance and general check and adjustment procedures ".
The procedure for checking the level and replacing the working fluid is described in the chapter " Maintenance and general check and adjustment procedures ".

Replacing the working fluid filter
1. Disconnect the cable from the negative terminal of the battery. Note: Before disconnecting the wire from the battery, make sure you know the access code for the radio. Otherwise, the radio will be blocked. 2. Remove...
1. Disconnect the cable from the negative terminal of the battery. Note: Before disconnecting the wire from the battery, make sure you know the access code for the radio. Otherwise, the radio will be blocked. 2. Remove...

Selector Lock Solenoid Valve
Examination 1. Remove the center console (see chapter " Body "). 2. Disconnect the selector lock solenoid valve connector. 3. Connect terminal "1" to the positive terminal of the battery, terminal "3" to the negative...
Examination 1. Remove the center console (see chapter " Body "). 2. Disconnect the selector lock solenoid valve connector. 3. Connect terminal "1" to the positive terminal of the battery, terminal "3" to the negative...

Selector position sensor
Examination 1. Remove the center console (see picture) " Body "). 2. Disconnect the connector shown in the figure. 3. Set the selector to the "P" position and make sure there is conductivity between the terminals. Move...
Examination 1. Remove the center console (see picture) " Body "). 2. Disconnect the connector shown in the figure. 3. Set the selector to the "P" position and make sure there is conductivity between the terminals. Move...

Start inhibit switch
Examination 1. Remove the air filter housing (see chapter " Maintenance and general check and adjustment procedures "). 2. Disconnect the start inhibit switch connector. 3. Check for continuity between the terminals...
Examination 1. Remove the air filter housing (see chapter " Maintenance and general check and adjustment procedures "). 2. Disconnect the start inhibit switch connector. 3. Check for continuity between the terminals...

Shift solenoid valves
Examination 1. Connect the diagnostic tool to the DLC connector. 2. Select "Shift Solenoid A, B, C and D" from the "Miscellaneous" menu of the device. 3. Using a diagnostic device, check the operation of the...
Examination 1. Connect the diagnostic tool to the DLC connector. 2. Select "Shift Solenoid A, B, C and D" from the "Miscellaneous" menu of the device. 3. Using a diagnostic device, check the operation of the...

Pressure control solenoid valves
Checking the solenoid valve "A" 1. Connect the scan tool to the DLC (Diagnostic Link Connector) (A). 2. Select "Clutch Pressure Control (Linear) Solenoid A" from the "Miscellaneous" menu of the instrument. 3. Conduct a...
Checking the solenoid valve "A" 1. Connect the scan tool to the DLC (Diagnostic Link Connector) (A). 2. Select "Clutch Pressure Control (Linear) Solenoid A" from the "Miscellaneous" menu of the instrument. 3. Conduct a...

Input shaft speed sensor
Replacement 1. Disconnect the cable from the negative terminal of the battery. Note: Before disconnecting the wire from the battery, make sure you know the access code for the radio. Otherwise, the radio will be...
Replacement 1. Disconnect the cable from the negative terminal of the battery. Note: Before disconnecting the wire from the battery, make sure you know the access code for the radio. Otherwise, the radio will be...

Output shaft speed sensor
Replacement 1. Disconnect the cable from the negative terminal of the battery. Note: Before disconnecting the wire from the battery, make sure you know the access code for the radio. Otherwise, the radio will be...
Replacement 1. Disconnect the cable from the negative terminal of the battery. Note: Before disconnecting the wire from the battery, make sure you know the access code for the radio. Otherwise, the radio will be...

Second gear clutch circuit working fluid pressure sensor
Replacement Note: Installation is carried out in the reverse order of removal. 1. Remove the air filter housing (see chapter " Maintenance and general check and adjustment procedures "). 2. Disconnect the cable from the...
Replacement Note: Installation is carried out in the reverse order of removal. 1. Remove the air filter housing (see chapter " Maintenance and general check and adjustment procedures "). 2. Disconnect the cable from the...

Third gear clutch fluid pressure sensor
Replacement Note: Installation is carried out in the reverse order of removal. 1. Pull out the parking brake lever, place chocks under the rear wheels and jack up the front of the car. 2. Disconnect the connector of the...
Replacement Note: Installation is carried out in the reverse order of removal. 1. Pull out the parking brake lever, place chocks under the rear wheels and jack up the front of the car. 2. Disconnect the connector of the...

Working fluid temperature sensor
Welding 1. Pull out the parking brake lever, place chocks under the rear wheels and jack up the front of the car. 2. Remove the mudguards. 3. Disconnect the transmission shift solenoid connector. 4. Measure the...
Welding 1. Pull out the parking brake lever, place chocks under the rear wheels and jack up the front of the car. 2. Remove the mudguards. 3. Disconnect the transmission shift solenoid connector. 4. Measure the...

Torque Converter Drive Plate
Removal and installation 1. Remove the gearbox (see section " Removal and installation the gearbox "). 2. Loosen the bolts and remove the torque converter drive plate (A) and spacer (B): Tightening torque - 74 Nm Note:...
Removal and installation 1. Remove the gearbox (see section " Removal and installation the gearbox "). 2. Loosen the bolts and remove the torque converter drive plate (A) and spacer (B): Tightening torque - 74 Nm Note:...

Selector — removal and installation
1. Remove the center console (see chapter " Body "). 2. Move the selector to the "N" position. 3. Unscrew the nut and disconnect the cable from the selector. 4. Remove the cable from the bracket by turning it as shown...
1. Remove the center console (see chapter " Body "). 2. Move the selector to the "N" position. 3. Unscrew the nut and disconnect the cable from the selector. 4. Remove the cable from the bracket by turning it as shown...

Selector device
Selector. 1 - screw, 2 - selector handle, 3 - selector position indicator panel, 4 - protective cover, 5 - selector position indicator, 6 - electromagnetic valve of selector lock, 7 - spring, 8 - plunger of the...
Selector. 1 - screw, 2 - selector handle, 3 - selector position indicator panel, 4 - protective cover, 5 - selector position indicator, 6 - electromagnetic valve of selector lock, 7 - spring, 8 - plunger of the...

Gearbox control cable — adjustment
1. Jack up the car and place it on stands. 2. Remove the center console (see chapter " Body "). 3. Move the selector to the "N" position. 4. Unscrew the nut and disconnect the cable from the selector. 5. Remove the...
1. Jack up the car and place it on stands. 2. Remove the center console (see chapter " Body "). 3. Move the selector to the "N" position. 4. Unscrew the nut and disconnect the cable from the selector. 5. Remove the...

Gearbox Control Cable — Replacement
1. Jack up the car and place it on stands. 2. Remove the center console (see chapter " Body "). 3. Move the selector to the "N" position. 4. Unscrew the nut and disconnect the cable from the selector. 5. Remove the...
1. Jack up the car and place it on stands. 2. Remove the center console (see chapter " Body "). 3. Move the selector to the "N" position. 4. Unscrew the nut and disconnect the cable from the selector. 5. Remove the...

Removal and installation the gearbox
1. Jack up the car and remove the front wheels and mudguards. 2. Remove the air filter housing (see chapter " Maintenance and general check and adjustment procedures "). 3. Disconnect the cable from the negative...
1. Jack up the car and remove the front wheels and mudguards. 2. Remove the air filter housing (see chapter " Maintenance and general check and adjustment procedures "). 3. Disconnect the cable from the negative...
This section is available on: russian, bulgarian, belarusian, ukrainian, serbian, croatian, romanian, polish, slovak, hungarian
Link in different formats to this section
TEXTHTMLBB Code
- General information
- User manual
- Maintenance
- Power unit
- Engine repair
- Cooling and lubrication system
- Injection and power system
- Control system
- Engine electrical equipment
- Transmission
- Clutch
- Mechanical gearbox
- Automatic gearbox
- Variator (CVT)
- Drive shafts and gearbox
- Chassis and running gear
- Car suspension
- Steering
- Brake system
- Body and interior
- Exterior (external elements)
- Interior (internal elements)
- Doors, locks and windows
- Heater and air conditioner
- Safety system
- Electrical equipment
- Equipment and devices
- Wiring diagrams (since 06.2001)
- Wiring diagrams (since 06.2004)